
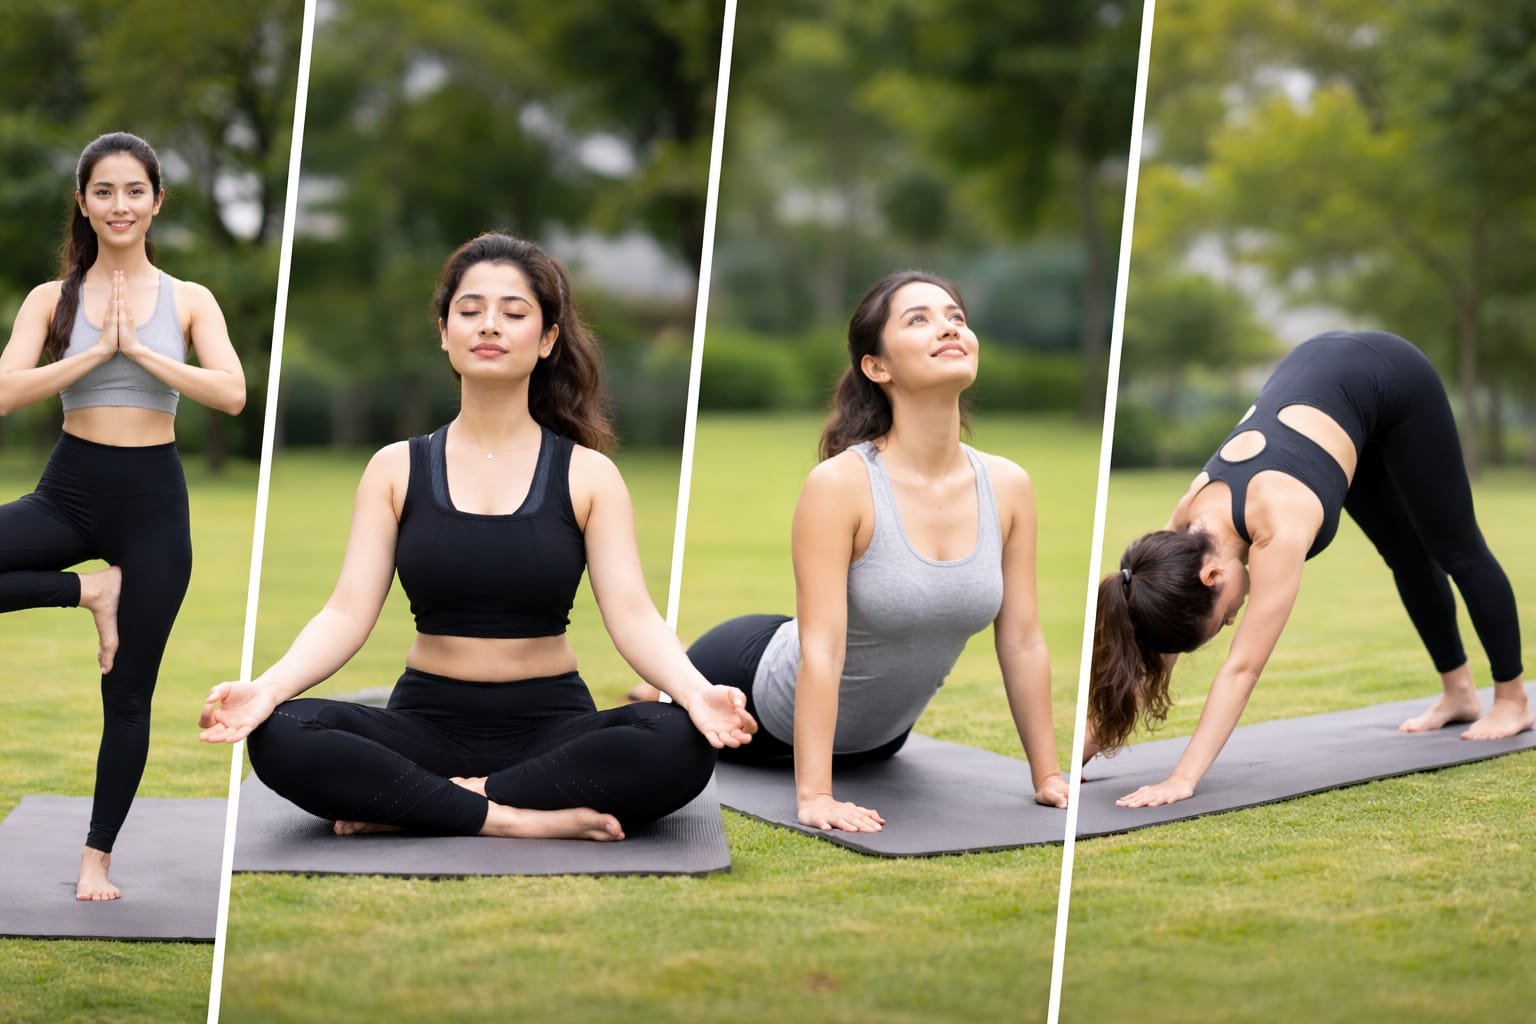


Introduction: More Than Just an Exercise
There are few practices as timeless and transformative as Surya Namaskar. In recent years, you may have seen celebrities and fitness enthusiasts sharing their morning ritual of “greeting the sun.” However, this is not just a modern wellness trend—it is a powerful practice deeply rooted in thousands of years of yogic tradition.
Surya Namaskar, which literally translates to “Sun Salutation,” is a structured sequence of 12 dynamic yoga postures performed in a smooth, continuous flow. In today’s fast-paced lifestyle, where most people begin their day with alarms, screens, and stress, this practice works as a natural reset for both the body and the mind.
Whether your goal is to support weight management, bring calmness into a busy routine, or energize your body naturally without relying on caffeine, this comprehensive guide is designed for you. Here, we will explore everything in a clear and practical way—from its ancient origins and step-by-step breakdown of all 12 poses, to its scientifically supported health benefits, traditional mantras, and the most common mistakes practitioners should avoid.
If you’re just starting your journey, you can explore this beginner-friendly yoga guide to build a strong foundation.
So, roll out your yoga mat—or simply find a comfortable space—and begin your journey toward better health, balance, and inner energy with Surya Namaskar. You can also combine this practice with a simple daily yoga routine for better results.
Table of Contents
The Historical and Spiritual Roots: Why We Salute the Sun
Before we begin the physical practice, it is important to understand the deeper purpose behind Surya Namaskar. In today’s fast-paced lifestyle, yoga is often viewed only as a form of exercise. However, Surya Namaskar was never intended to be just a physical workout or a simple warm-up—it is a holistic practice that connects the body, mind, and spirit. The term comes from Sanskrit: Surya means the Sun, and Namaskar means “to bow to” or “to offer respect.” In Indian tradition, the Sun is considered a powerful source of life energy—the visible force that sustains all living beings on Earth. Ancient texts like the Rig Veda describe the Sun as the “Soul of the Universe.” Our ancestors understood that without the Sun, life cannot exist—there would be no food, no warmth, and no natural balance. As a result, Surya Namaskar developed as a way to express gratitude and honor this life-giving energy. Yoga philosophy goes even deeper by explaining that the Sun is not only external but also exists within us. This internal energy center is known as the Manipura Chakra (Solar Plexus), located near the navel. It is believed to be the center of vitality, confidence, willpower, and digestive strength (Agni). When you practice Surya Namaskar, you are not just moving your body—you are consciously activating this inner energy. The sequence helps align your biological rhythm with nature, creating a sense of balance and harmony. This is why it is traditionally practiced during sunrise, facing east, to absorb the gentle and revitalizing energy of the morning light. Although the modern sequence gained popularity in the early 20th century through the efforts of the Raja of Aundh and was later refined by renowned yoga masters such as Krishnamacharya, Pattabhi Jois, and B.K.S. Iyengar, its true essence originates from ancient Vedic wisdom. Surya Namaskar is more than a series of postures—it is a form of moving meditation and a symbolic expression of gratitude toward the source of all life and light.The 12 Steps of Surya Namaskar (Hatha Style)
Now, let’s move into the physical practice of Surya Namaskar. In this guide, we will follow the traditional Hatha Yoga sequence, which consists of 12 structured postures performed in a continuous flow.
It is important to understand that this sequence works on one side of the body at a time. To complete one full round, the entire sequence should be repeated using the opposite leg.
Before you begin, a quick note on breathing:
Your breath is the foundation of this practice. The basic principle is simple — inhale as you expand or open the body, and exhale as you fold, bend, or contract. Maintaining this rhythm helps improve control, stability, and overall effectiveness of the practice.
Now, let’s begin. Stand at the front of your mat with your feet together, keep your posture relaxed yet steady, and take a slow, deep breath to prepare your body and mind for the sequence.
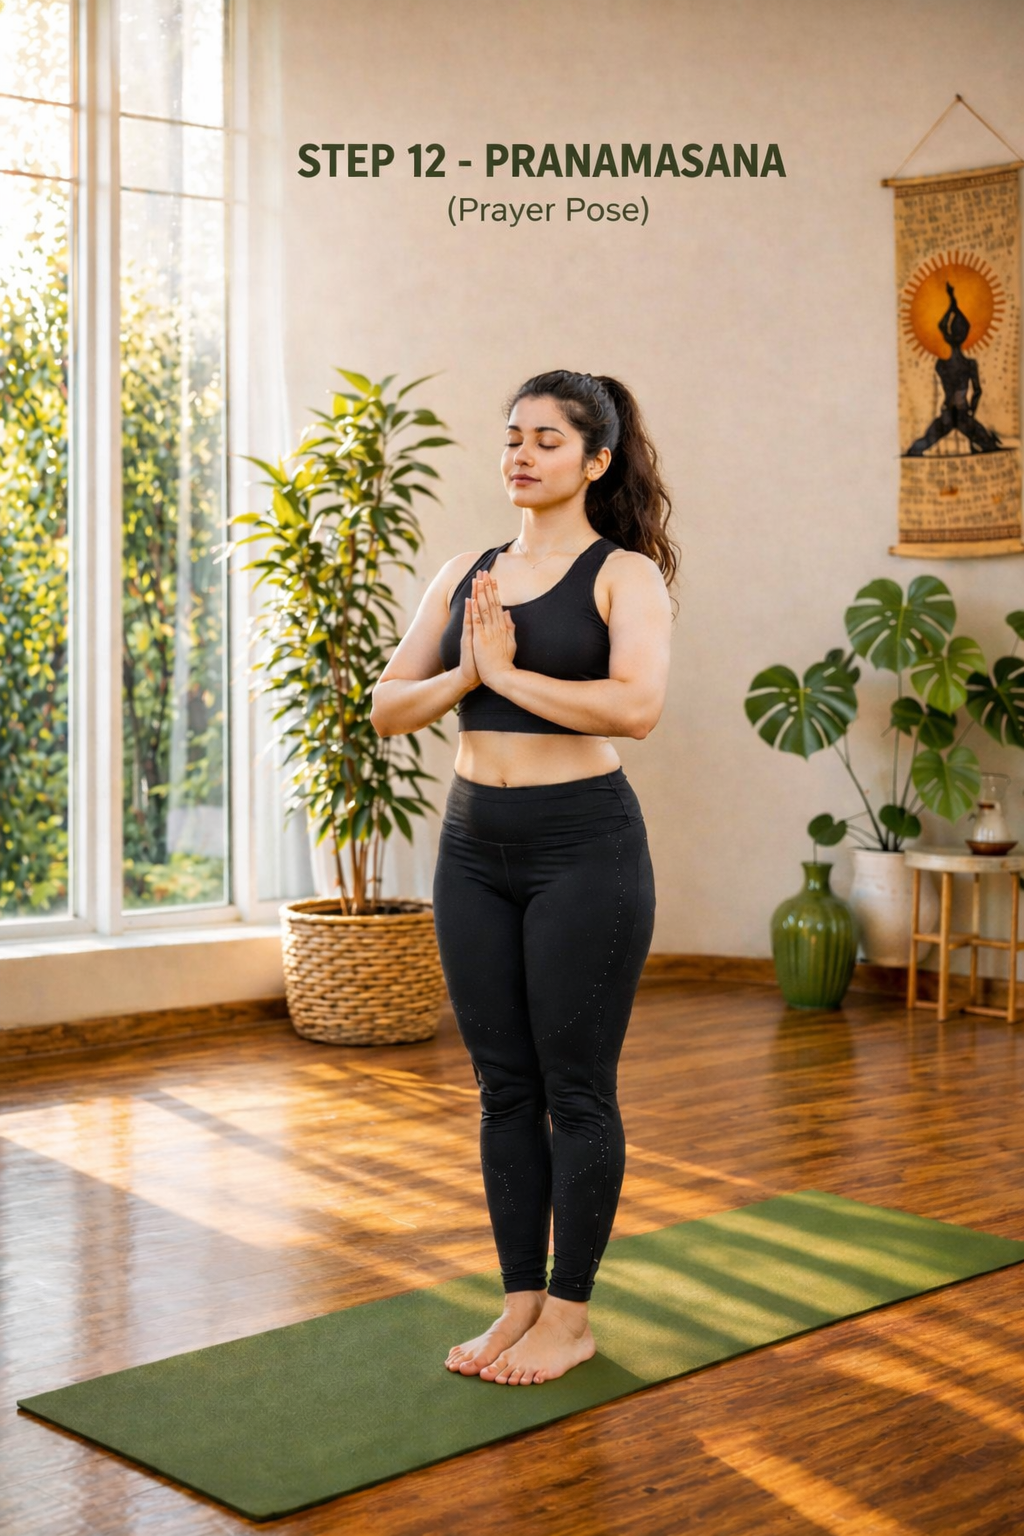
Pose 1: Pranamasana (Prayer Pose)
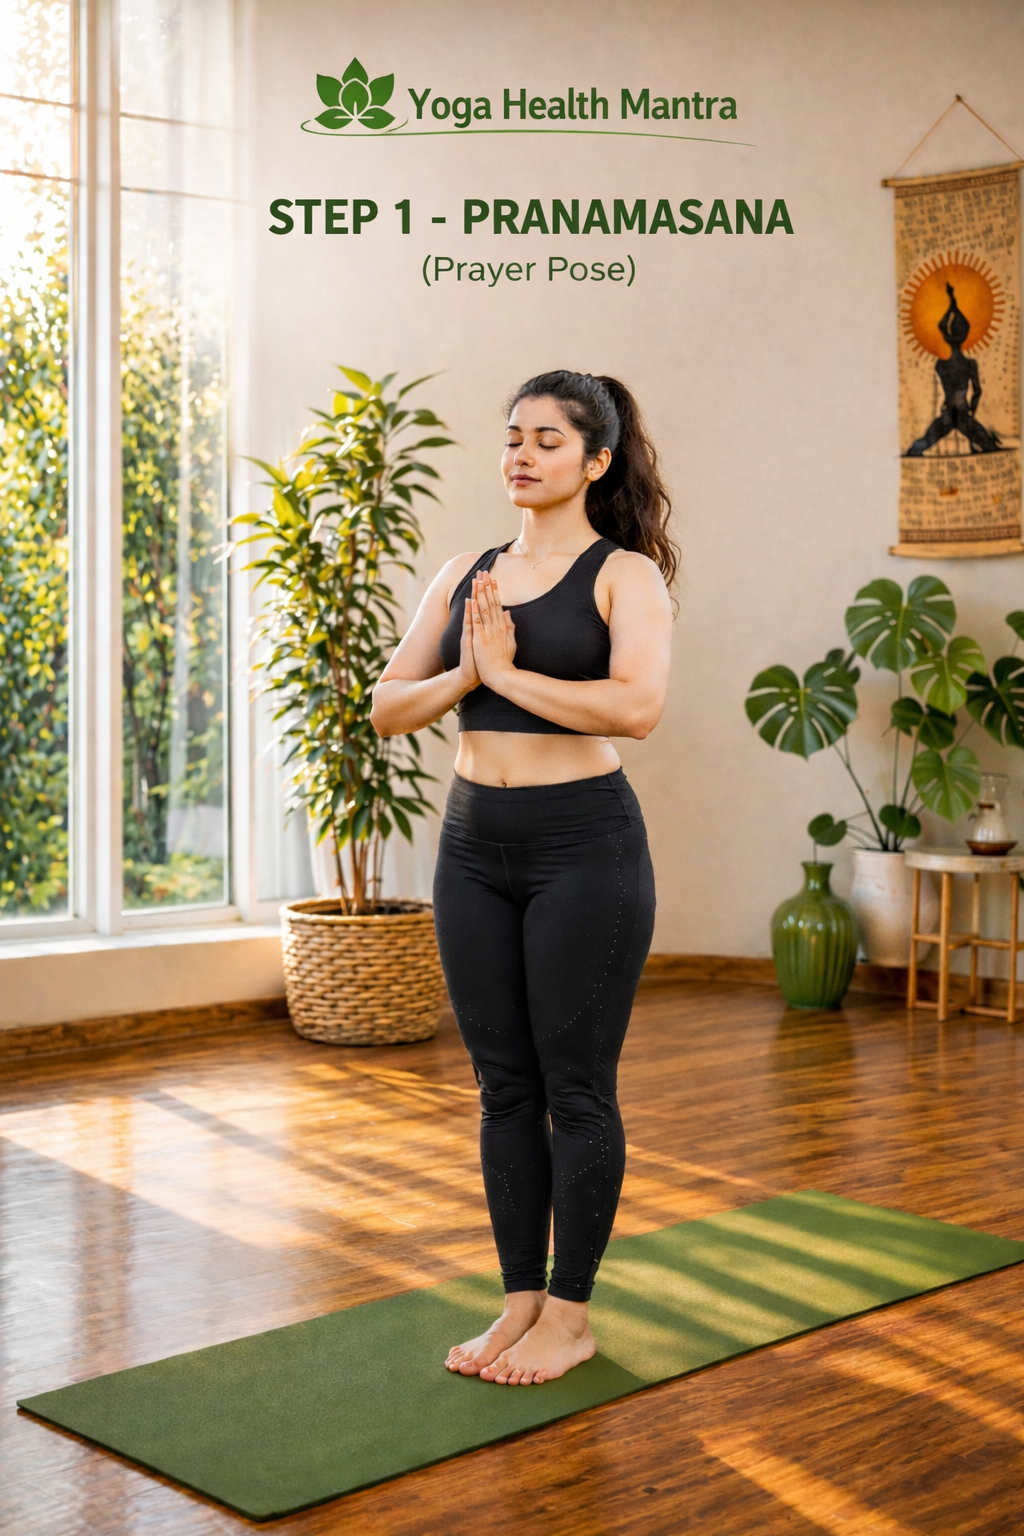
Execution:
Stand upright with your feet together and your weight evenly distributed across both feet. Keep your spine straight and shoulders relaxed. Gently bring your palms together in front of your chest in a prayer position (Namaste). Close your eyes for a moment, relax your body, and bring your awareness to your breath. Allow your body to settle into a stable and comfortable position before moving forward.
Breath: Exhale. Let your breathing become natural and steady, without any force or tension.
Why it matters:
This pose helps you feel grounded and centered. It allows you to shift your focus from external distractions to inner awareness. Practicing Pranamasana can calm the nervous system, improve balance, and prepare both the body and mind for the sequence ahead. It also creates a moment of stillness, helping you begin the practice with intention and mindfulness.
Common Mistake:
Many beginners tend to rush through this pose without pausing. Skipping this moment of stillness can reduce the overall effectiveness of the sequence.
Pro Tip:
Take one or two deep, conscious breaths here before moving to the next pose. This small pause can improve your focus and set the rhythm for the entire Surya Namaskar flow.
Pose 2: Hasta Uttanasana (Raised Arms Pose)

Keep your legs straight and firmly grounded. As you inhale deeply, sweep your arms out to the sides and raise them overhead. Gently arch your back by lifting your chest upward, while slightly pushing your pelvis forward. Keep your arms close to your ears and look upward toward your thumbs without straining your neck. Focus on lengthening your spine rather than forcing a deep bend.
Breath: Inhale. Allow your chest to expand fully as you lift and open your body.
Why it matters:
This is the first backbend in the sequence. It helps stretch the abdominal muscles, expand lung capacity, and open the chest. The movement creates a full-body extension, providing an energizing stretch from your heels to your fingertips. It also helps improve posture and prepares your body for the forward fold that follows.
Common Mistake:
Many beginners tend to bend too much from the lower back instead of lifting through the chest. This can create unnecessary strain and reduce the effectiveness of the pose.
Pro Tip:
Instead of pushing into a deep backbend, focus on lifting your chest upward and keeping your core slightly engaged. This will create a safer and more balanced stretch.
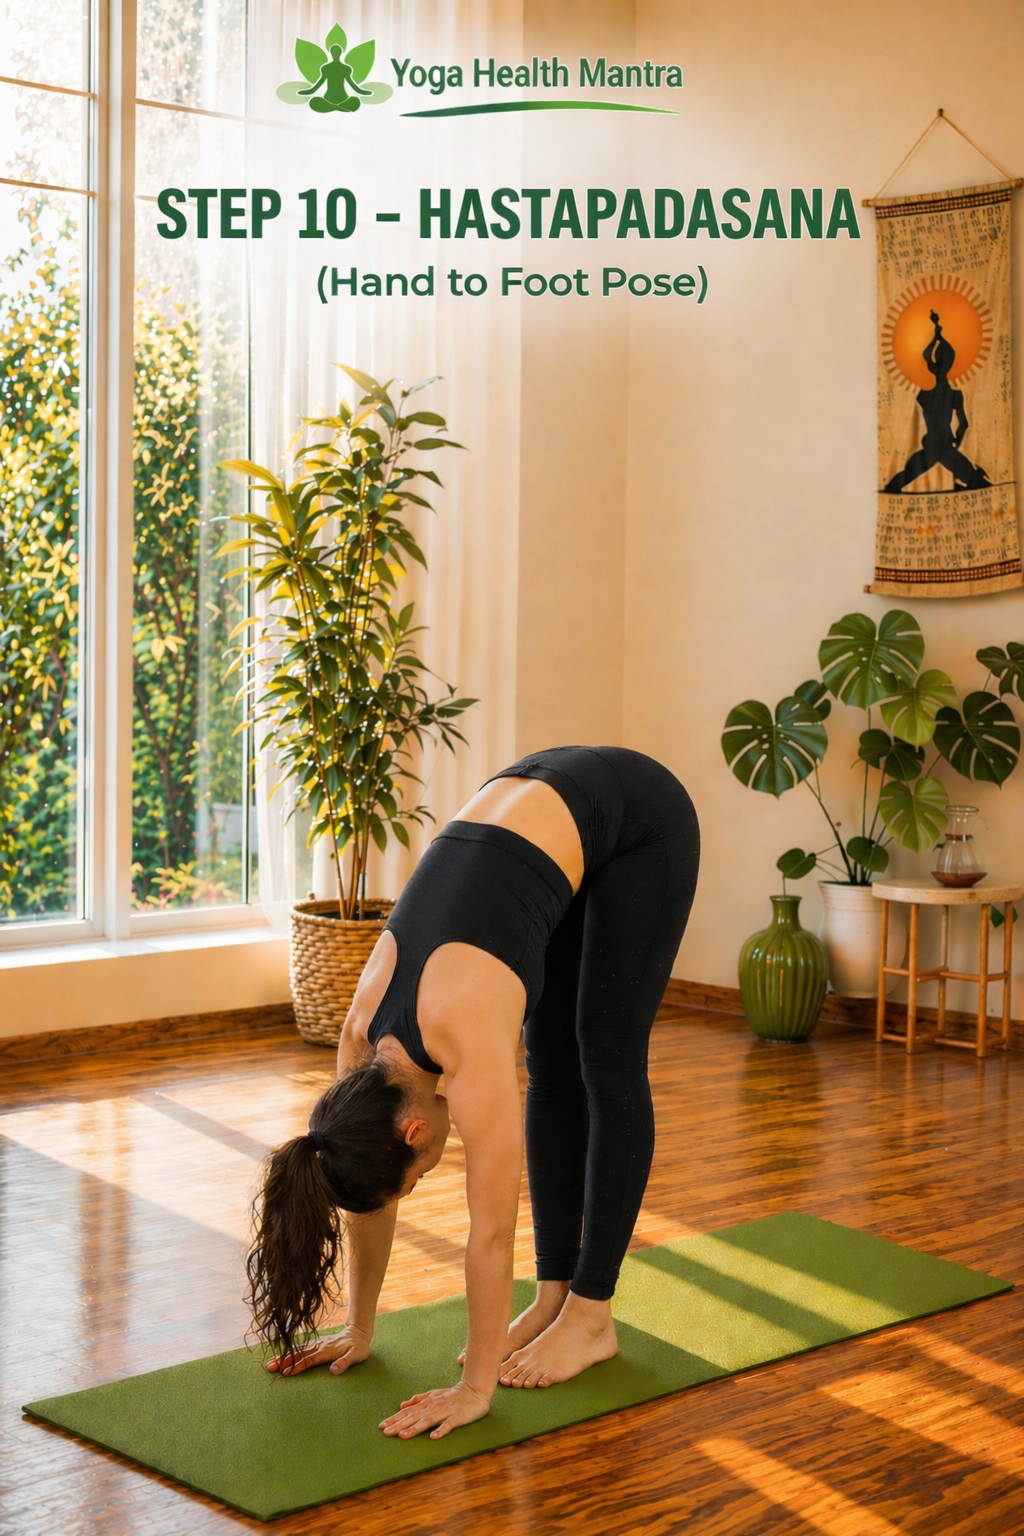
Pose 3: Hastapadasana (Hand to Foot Pose)
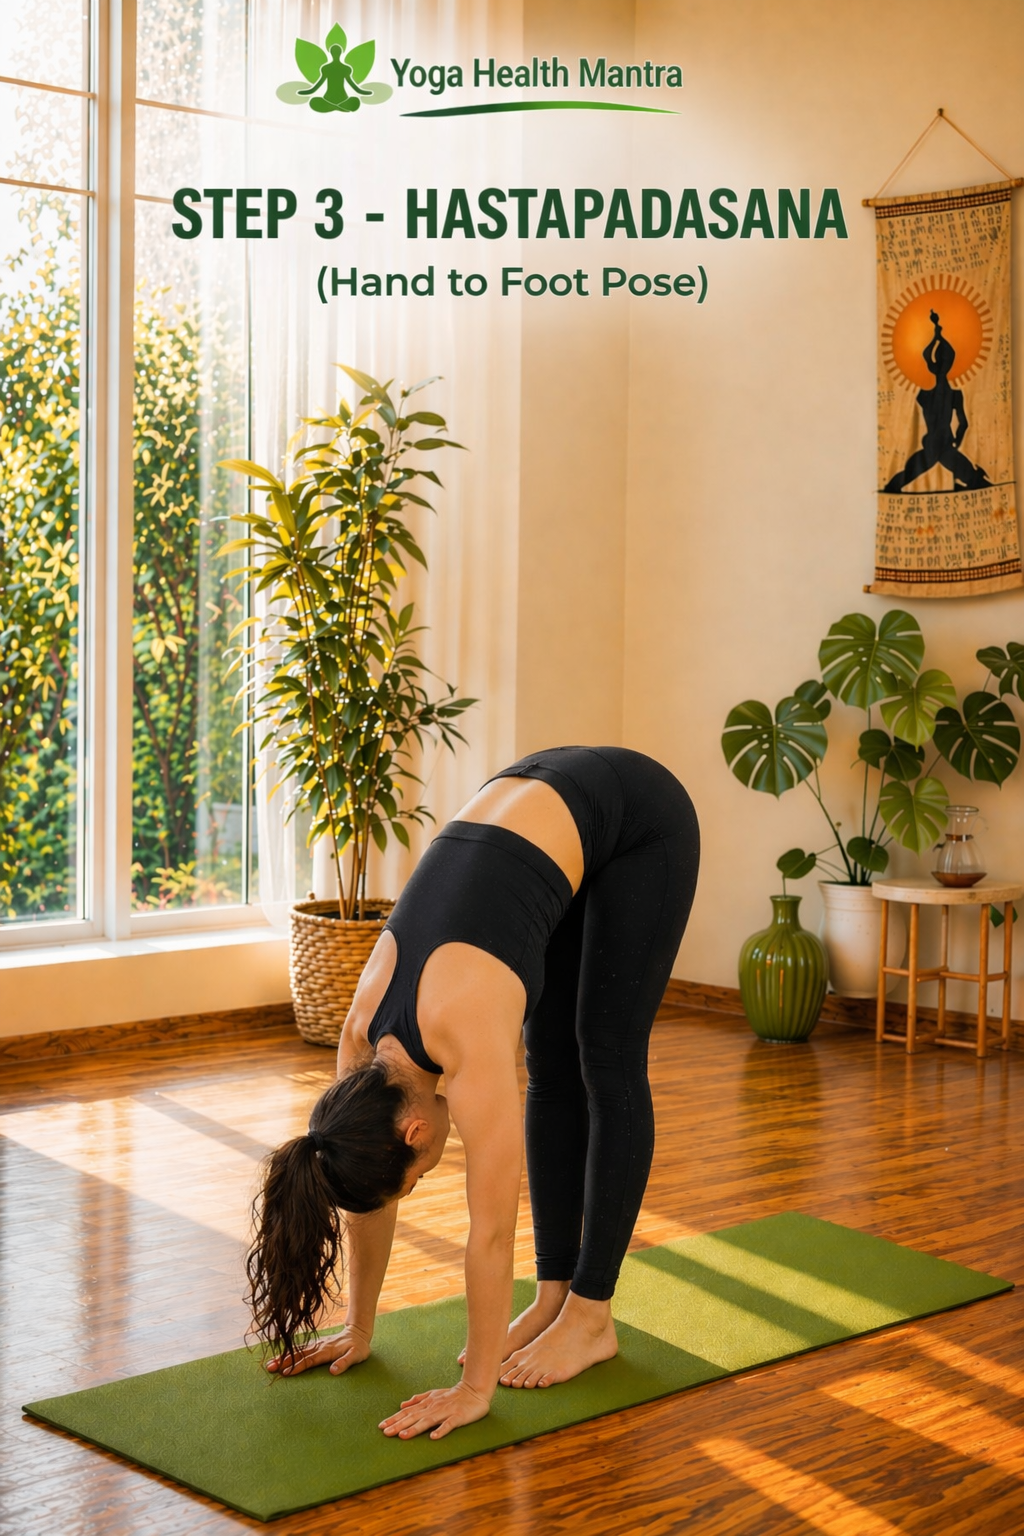
Execution:
As you exhale, hinge forward from your hips and slowly fold your upper body toward your legs. Keep your spine as long as possible while moving down. Try to keep your legs straight, but if your hamstrings feel tight, you can slightly bend your knees for comfort. Place your palms on the floor beside your feet, and gently bring your forehead closer toward your knees without forcing the movement. Focus on moving with control rather than trying to reach the floor quickly.
Breath: Exhale. Allow your body to relax into the forward fold as you breathe out.
Why it matters:
This forward bend gently compresses the abdominal area, which can support better digestion. It also provides a deep stretch to the hamstrings, calves, and lower back, helping release tension and improve flexibility in the spine. Over time, this pose can also help improve blood circulation toward the upper body.
Common Mistake:
Many beginners try to force their hands to touch the floor by rounding their back. This reduces the effectiveness of the stretch and can create unnecessary strain on the lower back.
Pro Tip:
Keep a slight bend in your knees if needed and focus on lengthening your spine. It is more important to maintain proper alignment than to reach the floor.
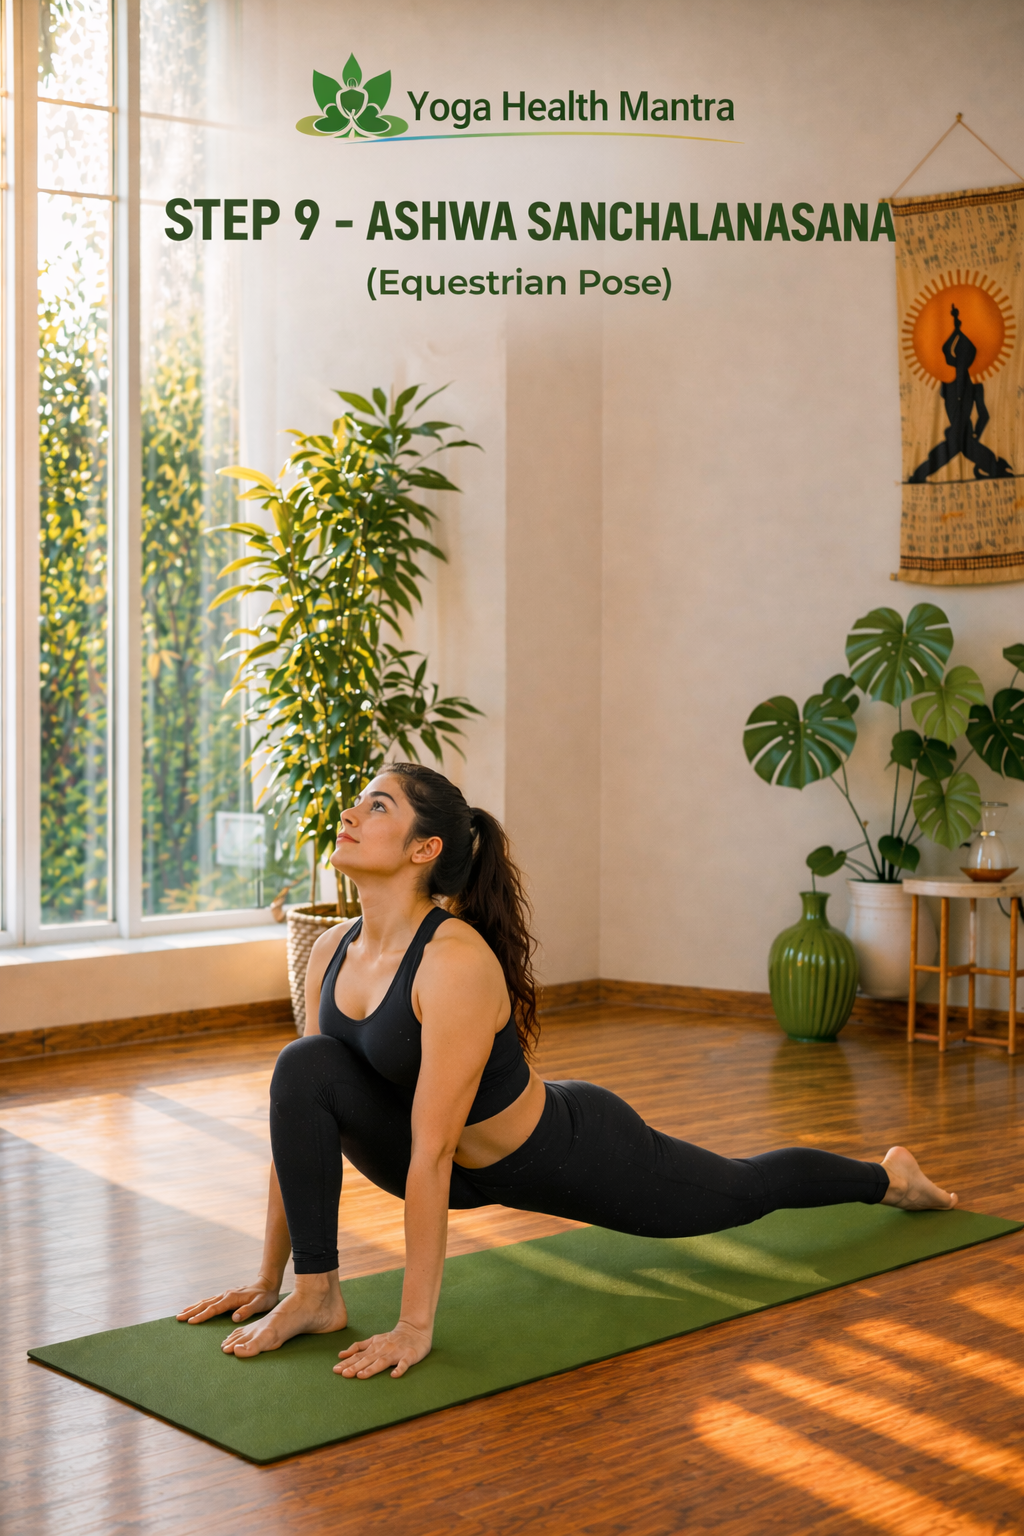
Pose 4: Ashwa Sanchalanasana (Equestrian Pose / Low Lunge)
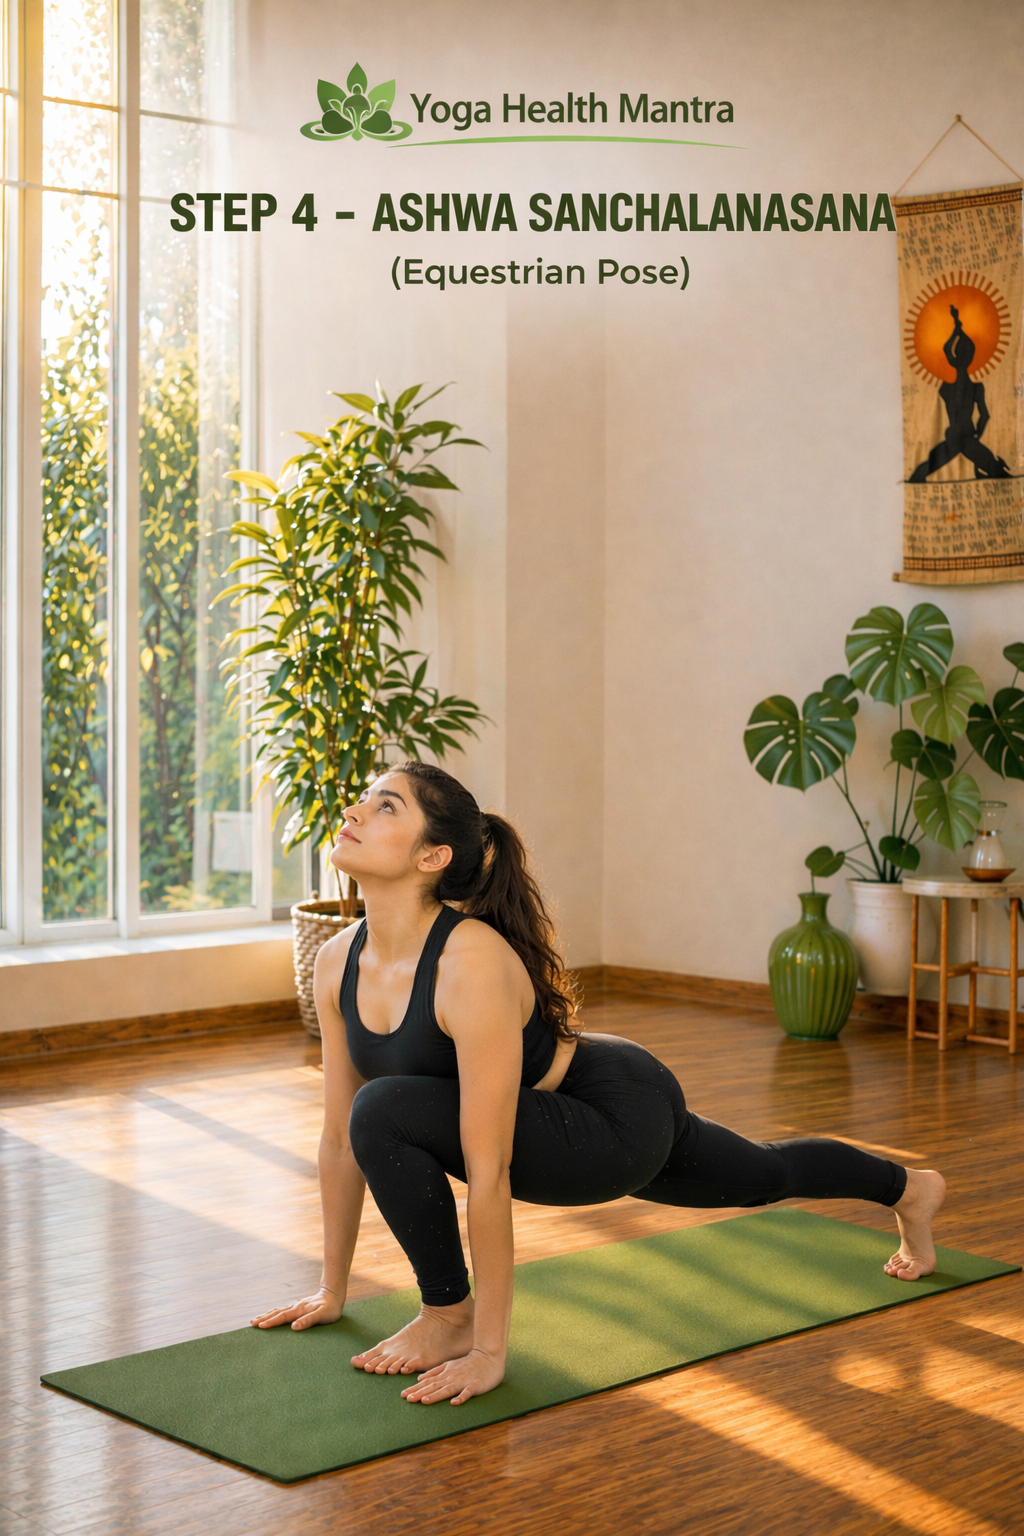
Execution:
As you inhale, bend your knees and place your palms firmly on the floor beside your feet. Keep your right foot between your hands, and step your left leg far back. Gently lower your left knee to the floor, or keep it lifted if you prefer a more intense variation. Lift your chest, arch your back slightly, and look upward while keeping your neck relaxed. Focus on keeping your front knee aligned with your ankle and your back leg extended comfortably.
Breath: Inhale. Allow your chest to open as you expand your breath.
Why it matters:
This pose helps open the hip flexors and stretch the thighs while strengthening the leg muscles. It also supports better balance, coordination, and stability as you transition through the sequence. The gentle backbend further opens the chest and prepares your body for the next posture.
Common Mistake:
Many beginners allow their front knee to move too far forward beyond the ankle or collapse inward, which can create strain on the knee joint.
Pro Tip:
Keep your front knee directly above your ankle and engage your core slightly. This will improve balance, protect your joints, and make the pose more stable.
Pose 5: Dandasana (Plank Pose)
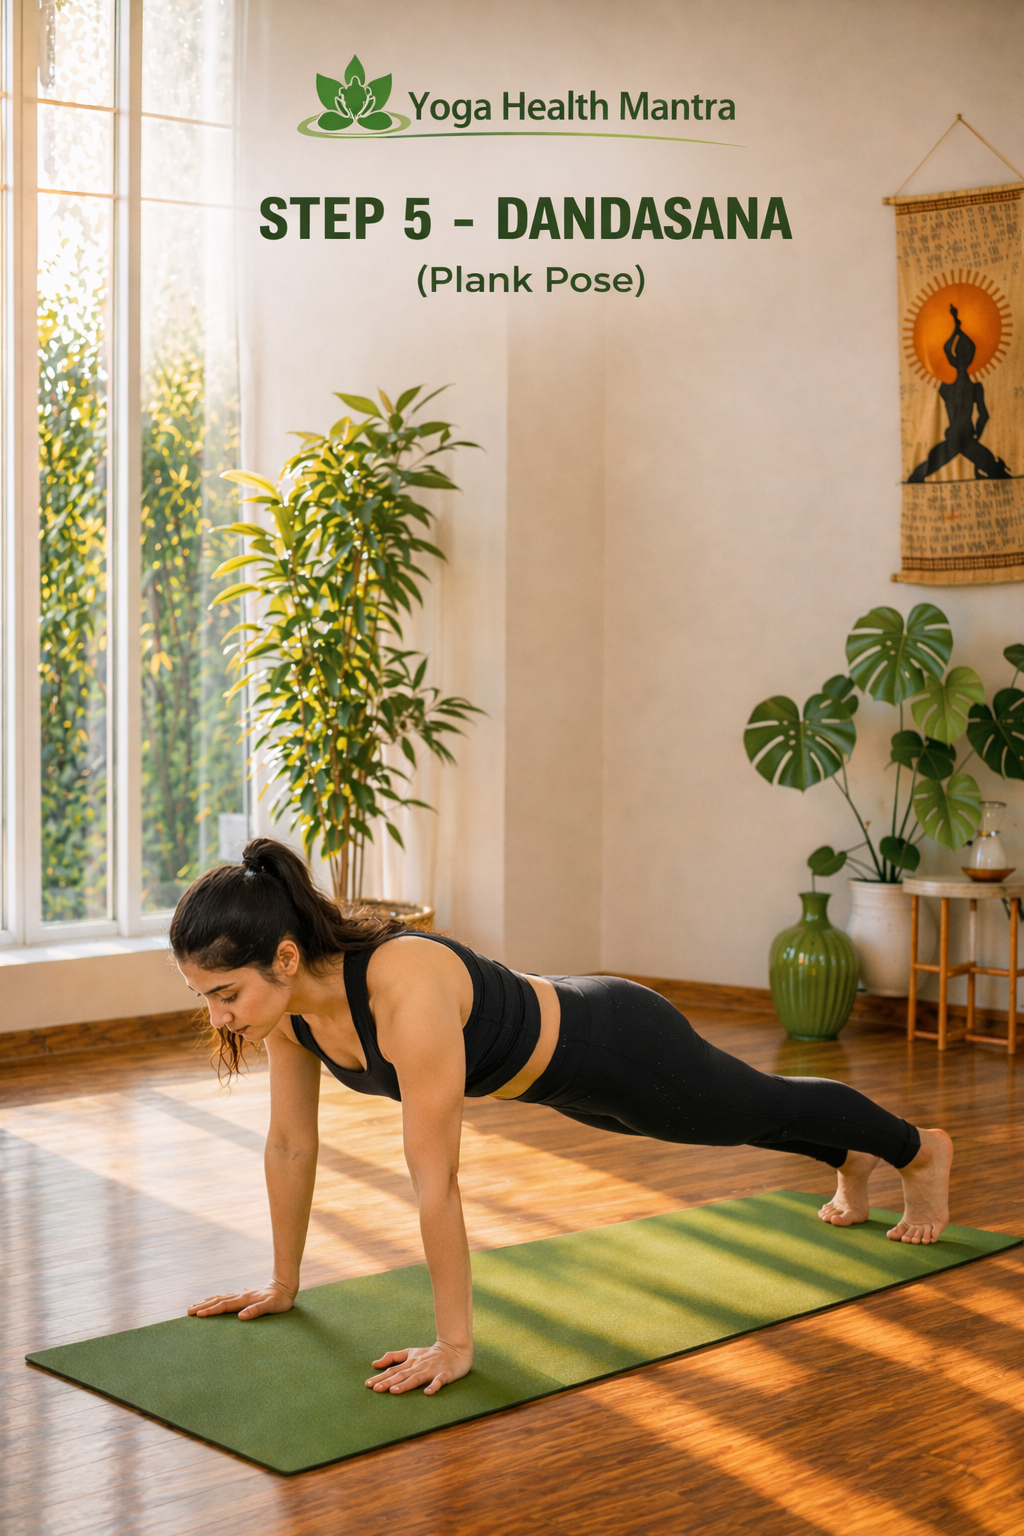
Execution:
As you inhale, step your left foot back to meet your right foot, bringing your body into a straight line from head to heels. Position your hands directly under your shoulders, spreading your fingers evenly on the mat for better stability. Engage your core, keep your hips neither too high nor sagging, and maintain a strong, neutral spine. Your neck should be aligned with your spine, with your gaze slightly forward or down.
Breath: Inhale. Maintain steady and controlled breathing while holding the plank position.
Why it matters:
This pose strengthens the entire body, especially the core, arms, shoulders, and legs. It builds stability and endurance while preparing the body for the next transition in Surya Namaskar. A strong plank also helps improve posture and supports spinal alignment.
Common Mistake:
Many beginners either drop their hips too low or lift them too high, breaking the straight line of the body. This reduces effectiveness and can strain the lower back or shoulders.
Pro Tip:
Keep your core engaged and imagine your body forming a straight line like a plank. Press firmly through your palms and avoid locking your elbows. Focus on stability and alignment rather than holding the pose for too long.
Pose 6: Ashtanga Namaskara (Eight-Limbed Salute)
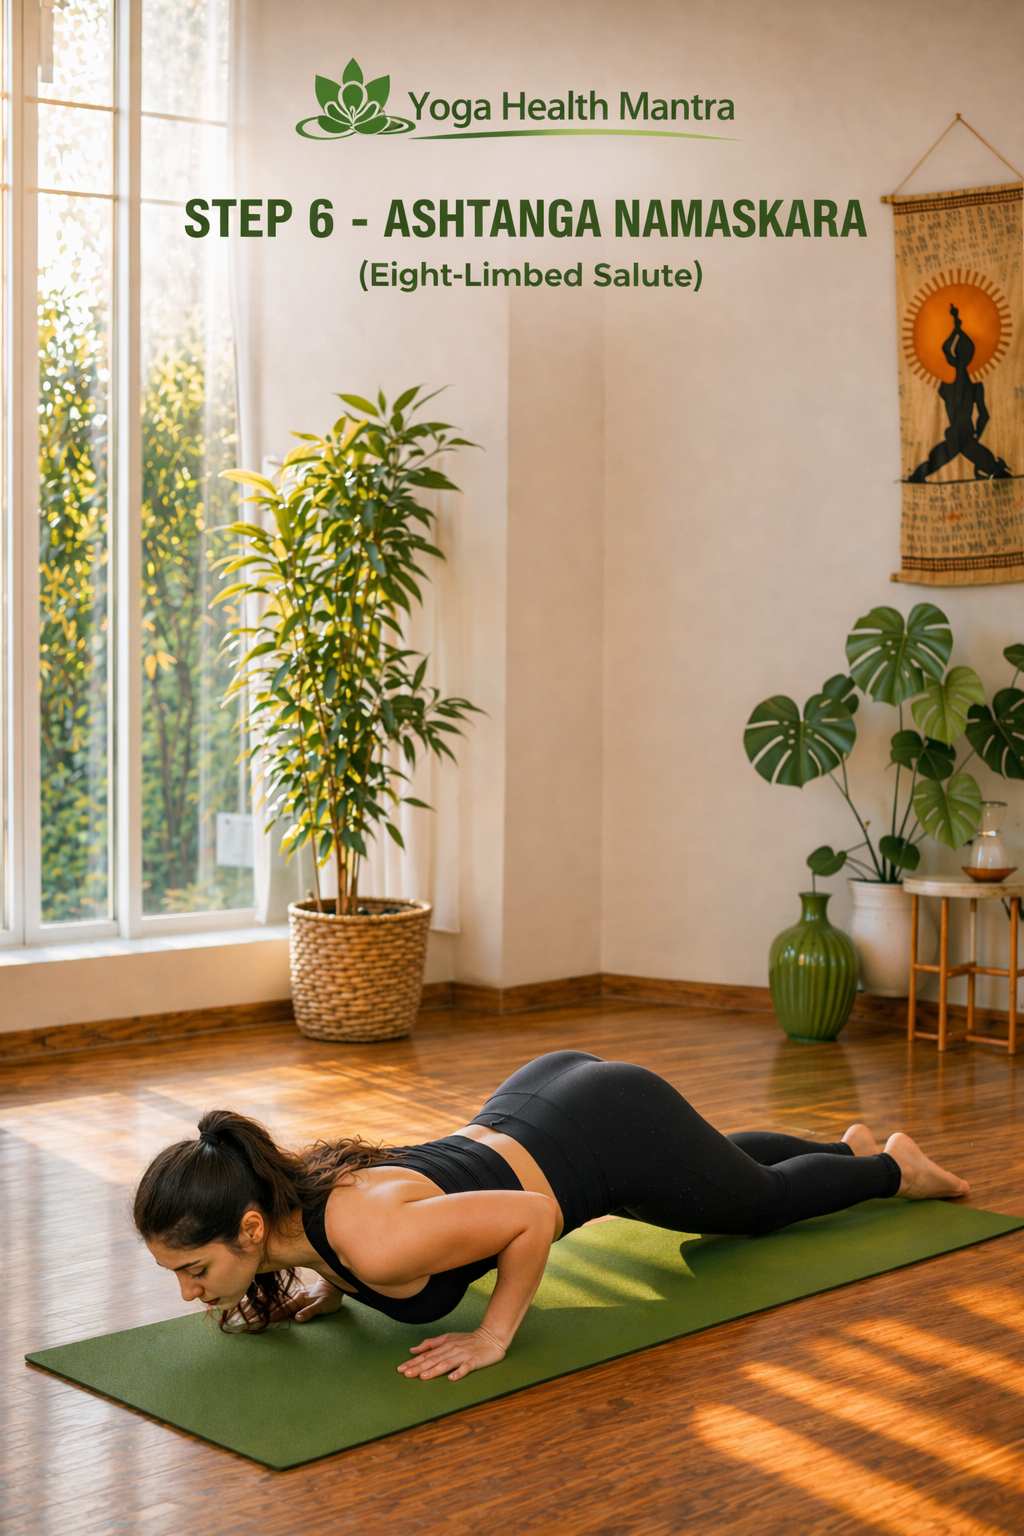
Execution:
Gently lower your knees to the floor. As you exhale, slide your chest forward and down toward the ground while keeping your hips slightly lifted. In this position, eight points of your body should touch the floor: toes, knees, palms, chest, and chin. Keep your abdomen slightly lifted off the floor and your elbows close to your body for better control and support. Move slowly and maintain awareness throughout the transition.
Breath:
Exhale as you lower your body. Maintain a smooth and controlled breathing pattern without holding your breath.
Why it matters:
This posture helps build strength in the arms, shoulders, and chest while improving control and stability. It also prepares the body for deeper backbends in the next pose, making the transition smoother and safer. Additionally, it helps develop coordination between upper body strength and controlled movement.
Common Mistake:
Many beginners drop their hips to the floor or spread their elbows outward, which reduces stability and puts unnecessary strain on the shoulders.
Pro Tip:
Keep your elbows close to your ribs and your hips slightly lifted. Move slowly and stay in control rather than rushing into the pose. This will help maintain proper alignment and protect your shoulders.
Pose 7: Bhujangasana (Cobra Pose)
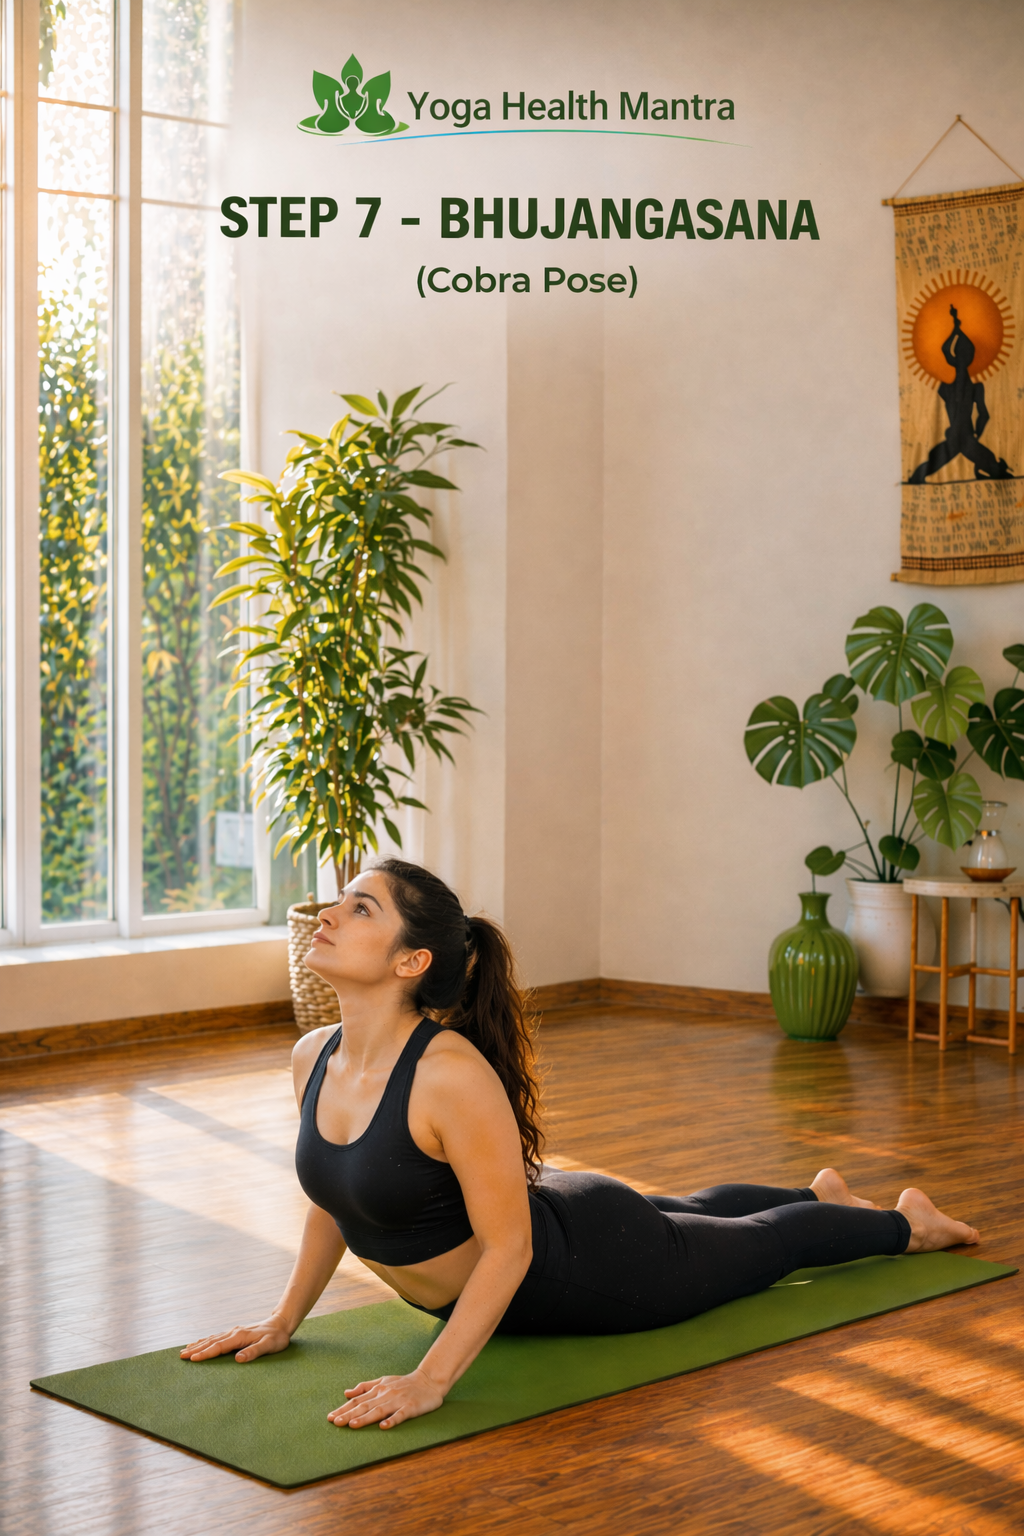
Execution:
As you inhale, gently lower your hips to the floor and press your palms into the ground. Lift your chest upward while arching your back, keeping your elbows slightly bent and close to your body. Roll your shoulders back and down, away from your ears, and look upward without putting strain on your neck. Focus on lifting through your chest rather than pushing too hard with your hands.
Breath: Inhale. Allow your chest to expand fully as you open the front of your body.
Why it matters:
This is a strong backbend that helps strengthen the spine and open the chest. It also gently stimulates the abdominal organs, which may support better digestion and overall internal function when practiced regularly. Additionally, it helps improve posture and counteracts the effects of prolonged sitting.
Common Mistake:
Many beginners tend to straighten their arms completely and push too much into the lower back, which can cause discomfort or strain.
Pro Tip:
Keep a slight bend in your elbows and engage your back muscles. Lift your chest gradually instead of forcing the movement, and keep your shoulders relaxed.
Pose 8: Adho Mukha Svanasana (Downward-Facing Dog)
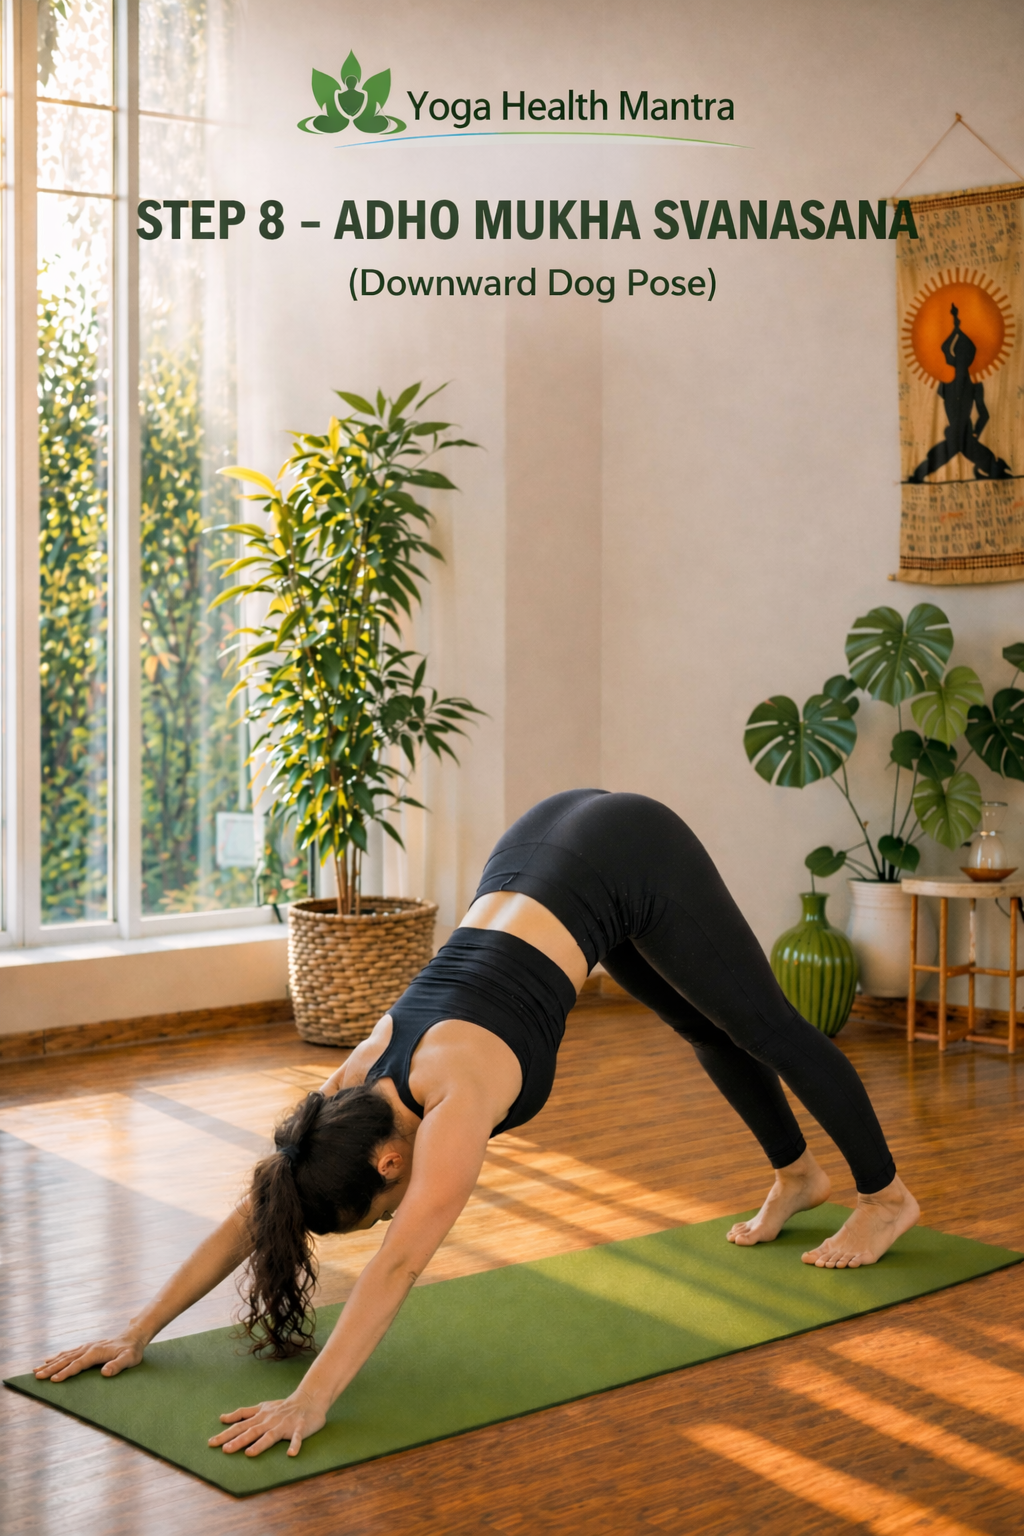
Execution:
As you exhale, curl your toes under and press firmly through your palms to lift your hips up and back toward the ceiling. Form an inverted “V” shape with your body, keeping your arms and legs as straight as possible. Gently press your heels toward the floor and position your head between your arms. Focus on lengthening your spine and maintaining balance throughout the posture.
Breath: Exhale. Maintain a steady and relaxed breathing rhythm as you hold the position.
Why it matters:
This posture helps stretch and lengthen the spine while strengthening the arms and legs. It supports better blood circulation and helps release tension from the back, shoulders, and legs. It also brings stability and balance to the body during the sequence.
Common Mistake:
Many beginners do not lift their hips high enough or put too much pressure on their wrists, which affects alignment and balance.
Pro Tip:
Lift your hips higher and press evenly through your palms. Keep your spine long and relaxed. If needed, slightly bend your knees to maintain proper alignment.
Pose 9: Ashwa Sanchalanasana (Equestrian Pose)
Execution:
As you inhale, step your left foot forward and place it between your hands. Keep your right leg extended back, either with the knee resting on the floor or lifted for a more active variation. Lift your chest, gently arch your back, and look upward while keeping your neck relaxed. This is the same lunge position as Pose 4, performed on the opposite side. Focus on keeping your front knee aligned with your ankle and your body stable.
Breath: Inhale. Allow your chest to expand as you open the front of your body.
Why it matters:
This pose helps stretch the hip flexors and thighs while strengthening the legs. It also improves balance and coordination, ensuring symmetry in the body as you move through the sequence. Practicing this on both sides helps maintain equal flexibility and strength throughout the body.
Common Mistake:
Many beginners place their front foot too far forward or allow the knee to move out of alignment, which can reduce stability and put pressure on the joints.
Pro Tip:
Make sure your front knee stays directly above your ankle and engage your core slightly. This will improve balance and make the transition smoother.
Pose 10: Hastapadasana (Hand to Foot Pose)
Execution:
As you exhale, step your right foot forward to meet your left foot. Keeping your legs as straight as possible, gently fold forward from the hips. Place your hands on the floor beside your feet, and bring your forehead closer toward your knees without forcing the movement. Focus on maintaining a long spine as you move deeper into the pose.
Breath: Exhale. Allow your body to relax into the forward fold with each breath.
Why it matters:
This forward bend helps stretch the hamstrings, calves, and lower back while gently compressing the abdominal area. It can support flexibility and help release tension from the spine when practiced with proper alignment. It also encourages better blood flow toward the upper body.
Common Mistake:
Many beginners try to force their forehead to touch their knees by rounding the back, which reduces the effectiveness of the stretch and can strain the lower back.
Pro Tip:
Keep a slight bend in your knees if needed and focus on lengthening your spine rather than reaching down. Proper alignment is more important than depth.
Pose 11: Hasta Uttanasana (Raised Arms Pose)

Execution:
As you inhale, sweep your arms forward and upward, bringing them overhead. Gently arch your back by lifting your chest upward, keeping your arms close to your ears. Slightly push your hips forward and look upward toward the sky without straining your neck. Focus on lifting through your chest rather than forcing a deep bend.
Breath: Inhale. Allow your chest to expand fully as you open the front of your body.
Why it matters:
This posture helps expand the chest and lungs while stretching the abdominal muscles. It creates a gentle backbend that energizes the body and prepares you for the final step of the sequence. It also helps improve posture and restore balance after the forward bend.
Common Mistake:
Many beginners push too much into the lower back or throw their head back, which can create strain and reduce stability.
Pro Tip:
Keep your core slightly engaged and lift your chest upward. Maintain a gentle backbend and keep your neck relaxed to avoid unnecessary strain.
Pose 12: Pranamasana (Prayer Pose)
Execution:
As you exhale, gently straighten your body and bring your arms down alongside your body. Relax your shoulders and bring your palms together in front of your chest in a prayer position. Maintain a steady posture and take a moment to return to a calm and centered state. Allow your body to fully relax before beginning the next round.
Breath: Exhale. Let your breathing return to a natural and steady rhythm.
Why it matters:
This posture marks the completion of the sequence and allows the body to return to a balanced state. At this point, you have completed half of a full Surya Namaskar. To complete one full round, repeat the entire sequence, this time stepping the opposite leg back in Pose 4 to maintain balance on both sides of the body. It also provides a moment of stillness to observe the effects of the practice.
Common Mistake:
Many beginners rush into the next round without pausing, which reduces the calming and balancing effect of the sequence.
Pro Tip:
Pause for a breath or two in this position. Observe your body and breath before starting the next round to maintain mindfulness and control.
Alignment Tips: How to Practice Surya Namaskar Correctly
While following the 12 steps is important, proper alignment is what truly makes your Surya Namaskar effective and safe. Small adjustments in posture can make a significant difference in how your body responds to the practice. Paying attention to alignment not only helps prevent strain but also allows you to get the maximum benefit from each movement.
1. Maintain a Neutral Spine
Throughout the sequence, try to keep your spine long and aligned. Avoid rounding your back too much in forward bends or over-compressing the lower back in backbends. Focus on lengthening the spine first, and then move deeper into the pose only as much as your body allows.
2. Engage Your Core Muscles
Your core plays a key role in maintaining balance and stability. Gently engage your abdominal muscles, especially during transitions like stepping back or lowering your body. This helps protect your lower back and keeps your movements controlled.
3. Distribute Your Weight Evenly
In standing and balancing positions, ensure that your weight is evenly distributed across both feet. In poses like Downward-Facing Dog, press firmly through your palms and spread the weight across your hands and feet. Avoid putting too much pressure on a single joint.
4. Keep Your Shoulders Relaxed and Stable
Avoid lifting or tightening your shoulders unnecessarily. In poses where your arms are overhead or supporting your body, keep your shoulders relaxed and drawn away from your ears. This reduces tension in the neck and improves overall posture.
5. Align Your Knees and Ankles Properly
In lunges and forward bends, make sure your knees are aligned with your ankles. Avoid letting your knees collapse inward or move too far forward beyond the toes. Proper alignment helps protect the joints and improves stability.
6. Move with Control, Not Speed
It is common to rush through Surya Namaskar, especially when trying to complete multiple rounds. However, controlled and mindful movement is more beneficial than speed. Focus on smooth transitions and proper form rather than completing more rounds quickly.
7. Listen to Your Body
Every body is different, and flexibility or strength levels may vary. Do not force yourself into deep stretches or extreme positions. Practice within your comfort range and gradually improve over time. To avoid common errors, you can also review common yoga mistakes for better awareness.
“In short, proper alignment ensures both safety and effectiveness.”
The Breath: The Heartbeat of the Flow
If there is one key principle to remember from this practice, it is this: never hold your breath. In many forms of physical exercise, people are often encouraged to hold or brace their breath during effort. However, Surya Namaskar follows a different approach. Here, every movement is closely connected with the rhythm of your breath, making the practice more controlled and effective. The general guideline is simple and easy to follow:- Backbends (Poses 2, 4, 7, 9, 11): These are expansion movements where the chest opens and the body lengthens. In these positions, you should inhale.
- Forward Folds (Poses 3, 10): These are contraction movements where the body folds inward and the abdominal area is compressed. In these positions, you should exhale.
- Plank & Transitions (Poses 5 and 6): These require controlled breathing. Generally, you exhale as you lower your body.
- Inverted & Balancing Poses (Pose 8): Maintain steady breathing while holding the posture.
Breathing Science: How Breath Affects Your Body and Mind
Breathing in Surya Namaskar is not just about inhaling and exhaling at the right time—it has a direct impact on your nervous system, energy levels, and mental state. When you consciously control your breath during the sequence, you are influencing how your body responds to stress, movement, and relaxation.1. Connection with the Nervous System
Your breathing pattern is closely linked to your nervous system. Slow and controlled breathing helps activate the parasympathetic nervous system, which is responsible for relaxation and recovery. On the other hand, fast and shallow breathing can trigger the sympathetic nervous system, which is associated with stress and alertness. When you practice Surya Namaskar with steady breathing, your body naturally shifts toward a calmer and more balanced state.2. Role of the Vagus Nerve
The vagus nerve plays an important role in regulating heart rate, digestion, and overall relaxation. Deep, rhythmic breathing—especially longer exhalations—can gently stimulate this system. As a result, your body may experience a sense of calm, improved focus, and better internal balance during and after the practice.3. Oxygen Flow and Energy Levels
Proper breathing ensures that your body receives a steady supply of oxygen. During Surya Namaskar, coordinated breathing helps improve oxygen exchange, which supports muscle function and overall endurance. This is one of the reasons why the practice often leaves you feeling energized rather than tired.4. Breath and Mindfulness
When your breath and movement are synchronized, your mind naturally becomes more focused. Instead of thinking about distractions, your attention stays on the present moment. This connection between breath and awareness is what transforms Surya Namaskar from a physical routine into a moving meditation. You can explore deeper breathing practices through pranayama techniques and benefits.5. Why You Should Avoid Holding Your Breath
Holding your breath during the sequence can disrupt the natural rhythm of movement and reduce its effectiveness. It may also create unnecessary tension in the body. Maintaining a smooth and continuous breathing pattern helps keep the flow stable and safe, a relationship that has also been discussed in research on slow breathing and its effects on the body and mind.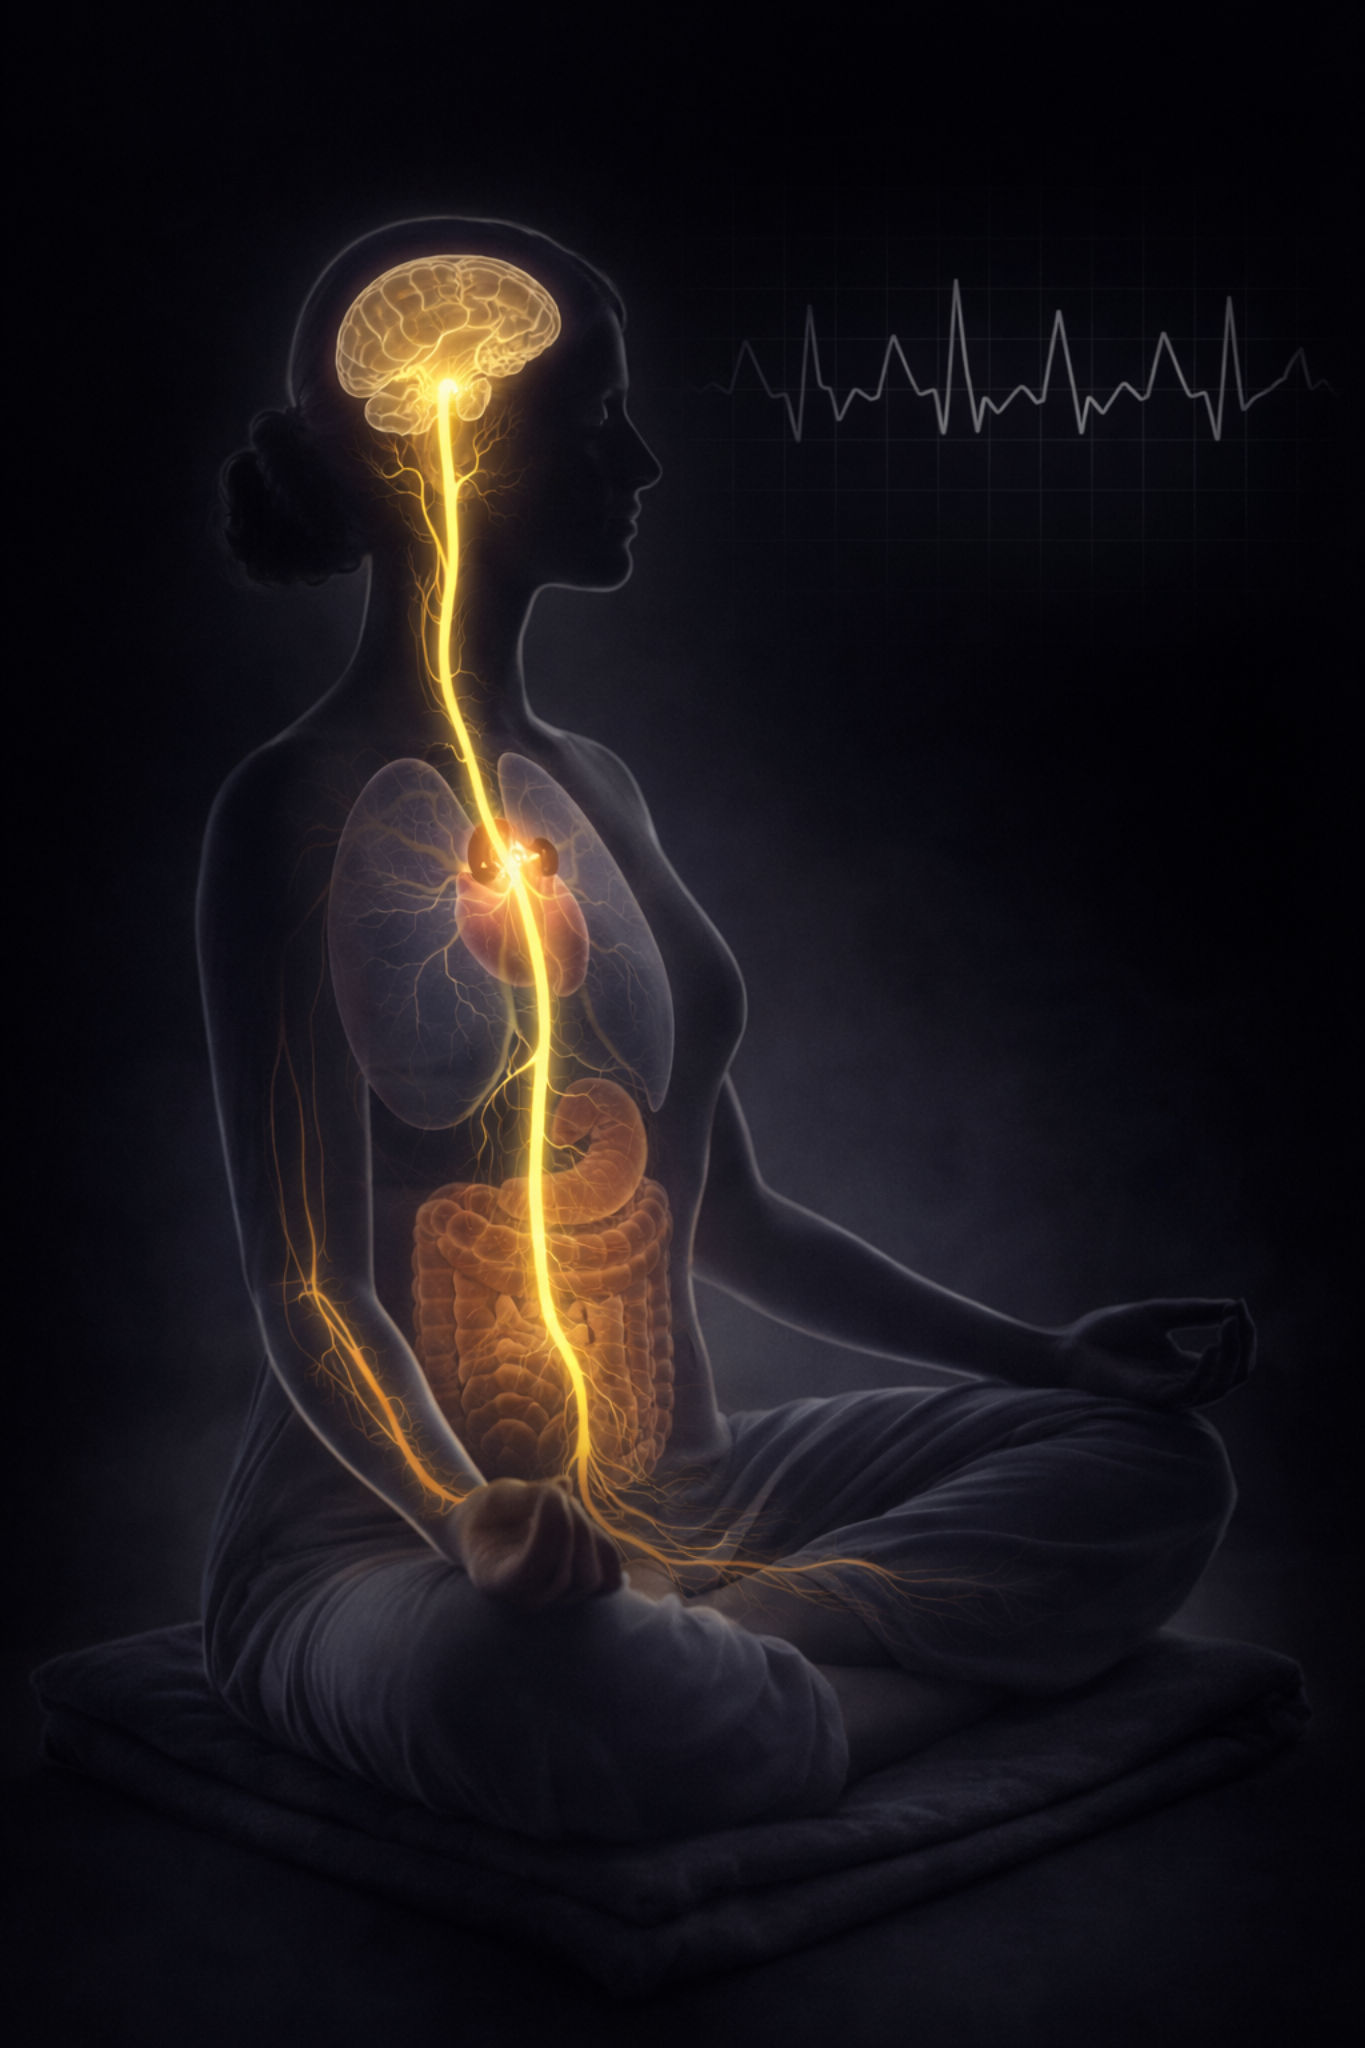
Different Styles and Variations
One of the most valuable aspects of Surya Namaskar is its flexibility and adaptability. Over time, this traditional sequence has evolved into multiple styles. Depending on your fitness level, physical condition, or the yoga tradition you follow, the sequence may vary slightly in pace, intensity, and structure. Hatha Surya Namaskar: This is the traditional 12-step sequence explained above. It is practiced at a slower pace, with an emphasis on holding each posture and maintaining steady, deep breathing. It is especially suitable for beginners and those looking to build a strong foundation. If you are new, you can also start with easy yoga poses for beginners to build confidence. Ashtanga Surya Namaskar (A & B): This variation is more dynamic and physically demanding. Commonly practiced in Ashtanga and Power Yoga, Surya Namaskar A includes a series of flowing movements (vinyasas), while Surya Namaskar B adds more challenging postures such as Virabhadrasana I (Warrior Pose), making the sequence more intense and strength-focused. Sivananda Sun Salutation: This style closely resembles the Hatha sequence but places greater emphasis on the spiritual aspect of the practice. It often incorporates mantra chanting and a more meditative approach. Gentle or Viniyoga Variations: These adaptations are designed for individuals with limited mobility, back concerns, or those recovering from injury. Modifications may include replacing full Chaturanga with the Knees-Chest-Chin position (Pose 6) or stepping back instead of jumping, allowing for a safer and more accessible practice.Goal-Based Practice: Customize Surya Namaskar for Your Needs
Surya Namaskar is a versatile practice that can be adapted based on your personal goals. By adjusting the speed, intensity, and focus of your practice, you can achieve different benefits. Instead of following a one-size-fits-all approach, you can align your routine with what your body and mind need the most.1. For Weight Management and Fitness
If your goal is to improve fitness and support weight management, focus on maintaining a steady and slightly faster pace.- Perform 8–12 rounds at a moderate to fast speed
- Minimize long pauses between poses
- Keep your movements continuous and controlled
- Maintain steady breathing without holding your breath
2. For Stress Relief and Relaxation
If you are looking to reduce stress and calm your mind, practice at a slower and more mindful pace.- Perform 4–6 rounds slowly
- Hold each pose for a few breaths
- Focus on deep and controlled breathing
- Keep your attention on the movement and breath
3. For Flexibility and Mobility
If your focus is on improving flexibility, allow more time in each posture and avoid rushing.- Perform 4–8 rounds at a slow pace
- Hold forward bends and backbends slightly longer
- Focus on gentle stretching without forcing the body
- Maintain smooth and steady breathing
4. For Strength and Endurance
To build strength, focus on control and muscle engagement during each movement.- Perform 6–10 rounds with controlled transitions
- Engage your core and arms, especially in plank and lowering phases
- Avoid collapsing into poses; maintain proper alignment
- Keep a steady breathing rhythm
5. For Morning Energy Boost
If you want to start your day with energy and focus, practice Surya Namaskar at a balanced pace.- Perform 6–12 rounds in the morning
- Combine steady movement with deep breathing
- Keep your posture aligned and transitions smooth
- End the practice with a few moments of stillness
Benefits Backed by Science (And Ancient Wisdom)
You do not have to rely only on traditional knowledge to understand the effectiveness of Surya Namaskar. Modern research continues to support many of the benefits that yogic practices have emphasized for centuries.1. A Full-Body Cardio Workout
Surya Namaskar is often misunderstood as only a stretching routine, but it can also function as an effective cardiovascular workout. Studies have shown that practicing Sun Salutations at a steady pace can significantly elevate the heart rate. Research published in the Journal of Bodywork and Movement Therapies suggests that a 30-minute session may help burn a considerable number of calories, making it comparable to activities like brisk walking or light jogging.2. Mental Health & Stress Relief
Surya Namaskar can have a positive impact on mental well-being. Controlled breathing combined with rhythmic movement encourages mindfulness and relaxation. Research indicates that regular practice may help reduce perceived stress levels and support overall mental balance. It can also contribute to lowering cortisol levels, which are commonly associated with stress, as highlighted in broader research on exercise and mental health available at exercise and health benefits.3. Flexibility and Posture
Modern lifestyles often involve long hours of sitting, leading to stiffness and poor posture. Surya Namaskar helps stretch and strengthen multiple muscle groups simultaneously. Studies suggest that consistent practice may improve flexibility, particularly in the lower back and hamstrings, while also supporting better posture and reducing the risk of musculoskeletal discomfort.4. Weight Management
When performed regularly and at an appropriate pace, Surya Namaskar can support weight management goals. Each round engages multiple muscle groups and increases energy expenditure. Over time, consistent practice may contribute to improved metabolism and help maintain a healthy body weight when combined with a balanced lifestyle, a concept also supported by medical insights on metabolism and energy balance from expert health guidance. For a structured approach, you can follow a weight loss yoga plan.5. Digestive Health
The sequence involves alternating forward bends and backbends, which gently compress and stretch the abdominal area. This movement pattern can help stimulate the digestive organs and support better digestion. Regular practice may also assist in maintaining a healthy digestive rhythm.6. Skin and Circulation Benefits
Surya Namaskar promotes better blood circulation throughout the body. Improved circulation helps deliver oxygen and nutrients more efficiently to the skin and scalp. Over time, this may contribute to healthier-looking skin and overall vitality when combined with proper lifestyle habits.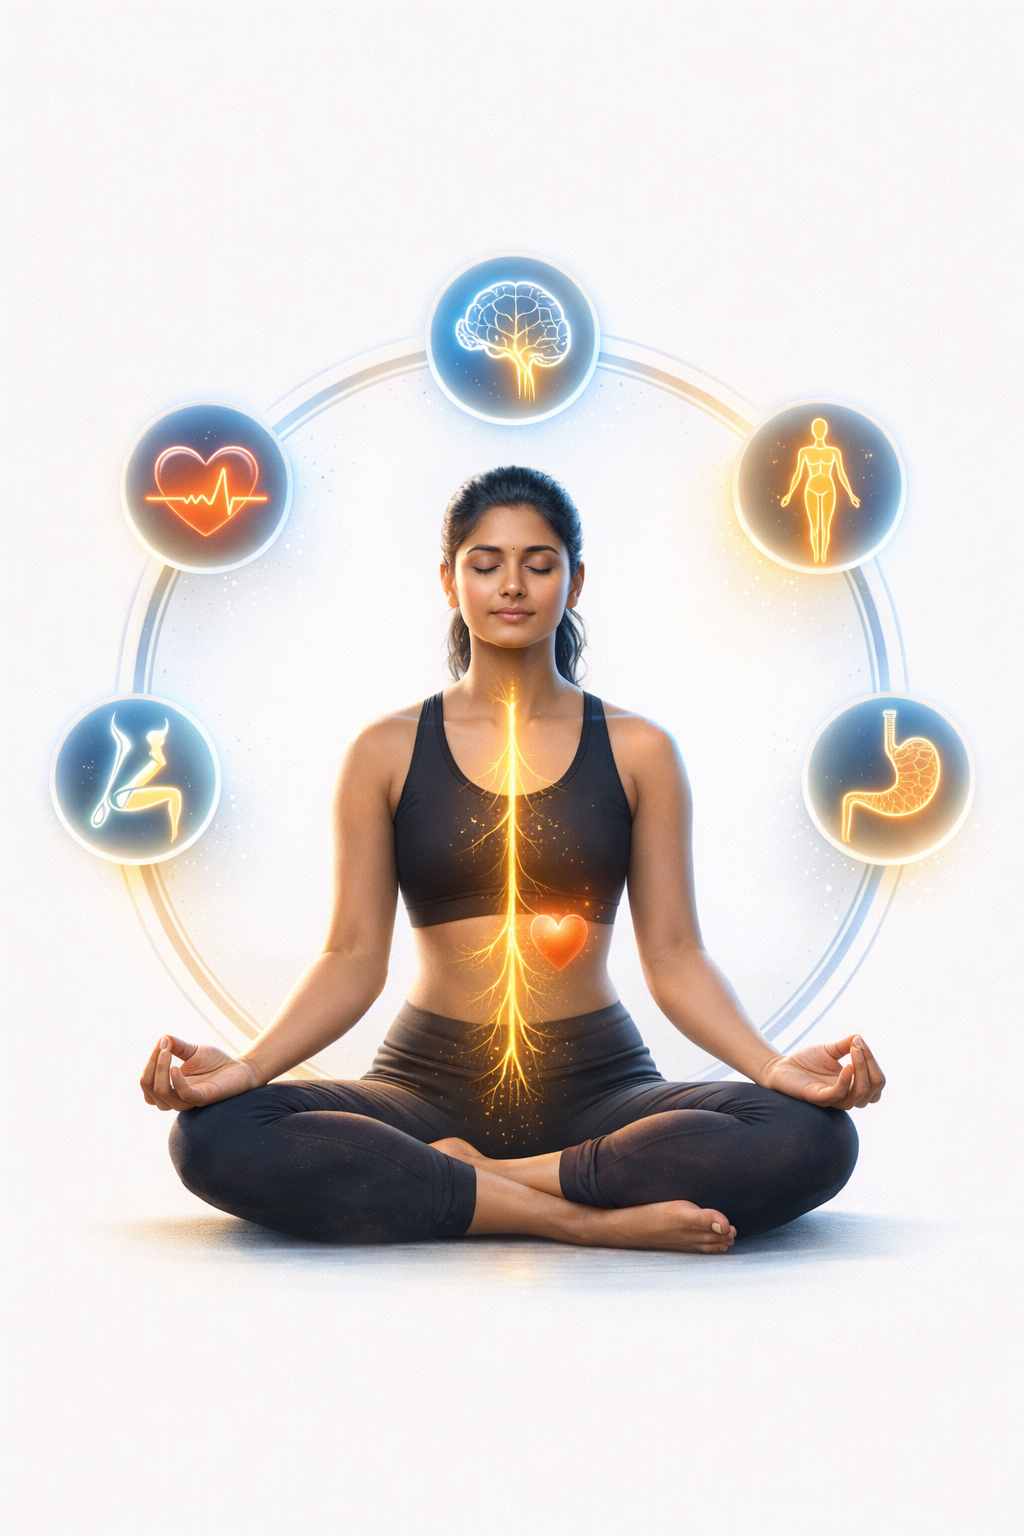
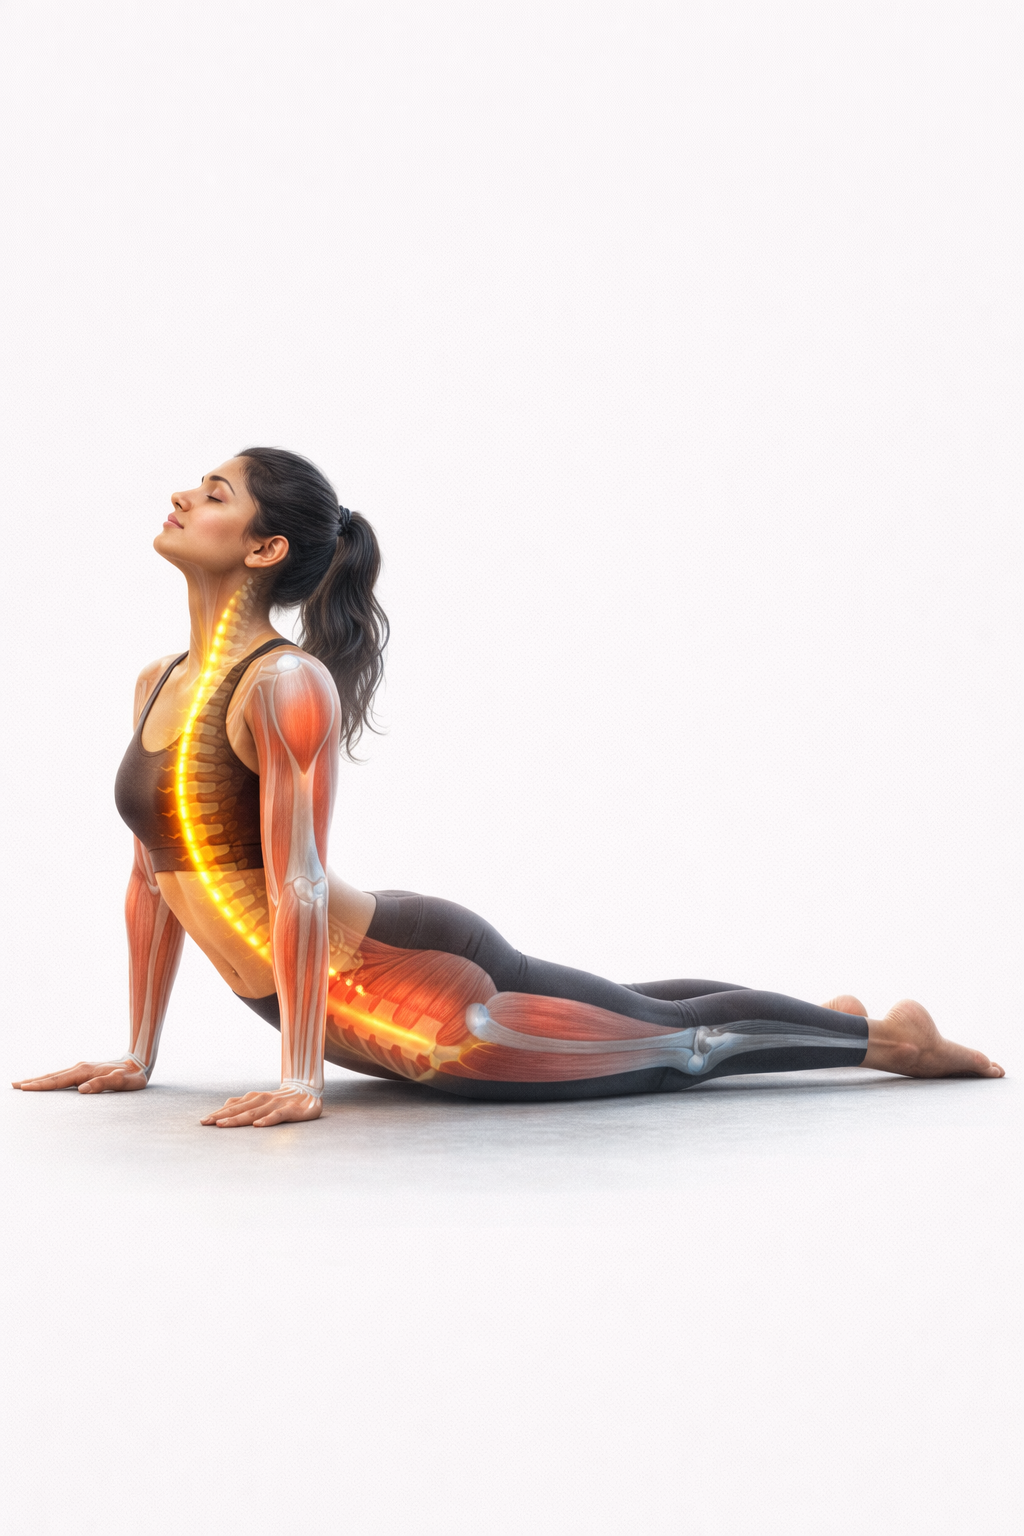
Anatomy Insight: How Surya Namaskar Works on Your Body
Surya Namaskar is not just a sequence of movements—it is a full-body practice that engages multiple muscle groups, joints, and internal systems at the same time. Understanding the basic anatomy behind the sequence can help you perform each pose with better awareness and effectiveness.
1. Activation of Major Muscle Groups
During Surya Namaskar, several key muscle groups work together in coordination:
- Upper Body: The shoulders, arms, and chest are actively engaged during poses like Plank, Ashtanga Namaskara, and Downward Dog.
- Core Muscles: Your abdominal muscles support stability and balance throughout the transitions.
- Lower Body: The legs, including the quadriceps, hamstrings, and calves, are continuously involved in standing, lunging, and stretching movements.
This full-body engagement is what makes Surya Namaskar both a strengthening and stretching practice.
2. Spine Movement and Flexibility
One of the most important aspects of Surya Namaskar is the continuous movement of the spine:
- Backbends (such as Hasta Uttanasana and Bhujangasana) encourage spinal extension.
- Forward bends (such as Hastapadasana) promote spinal flexion.
This alternating pattern helps maintain spinal mobility and can support better posture when practiced regularly with proper alignment.
3. Joint Mobility and Stability
The sequence gently moves major joints through their natural range of motion:
- Shoulders and wrists support body weight in several poses
- Hips and knees are actively involved in lunges and forward bends
- Ankles provide balance and grounding in standing positions
This combination of movement and stability helps improve overall joint function over time. If you experience discomfort, you can also explore yoga for back pain relief for better support.
4. Circulation and Internal Function
The dynamic flow of Surya Namaskar encourages better blood circulation throughout the body. As you move through different positions, especially forward bends and inverted poses, circulation patterns shift, helping deliver oxygen and nutrients more efficiently.
In addition, the gentle compression and stretching of the abdominal area may support normal digestive function when practiced consistently.
5. Coordination Between Breath and Movement
From an anatomical perspective, breathing and movement work together to support efficiency. Inhaling during expansion creates space in the chest, while exhaling during contraction supports control and stability. This coordination helps the body move more smoothly and reduces unnecessary tension.
The Mantras: The Spiritual Vibration
While Surya Namaskar can be practiced purely as a physical exercise, the addition of mantras brings a deeper spiritual dimension to the practice. Traditionally, there are 12 specific mantras—often referred to as Bija Mantras—associated with the 12 postures. Each mantra represents a different name or quality of the Sun, symbolizing various aspects of light, energy, and life.
Here is the list of the 12 mantras that can be chanted mentally or aloud as you move through the sequence:
- Om Mitraya Namaha (Salutations to the Friend of All)
- Om Ravaye Namaha (Salutations to the Shining One)
- Om Suryaya Namaha (Salutations to the Dispeller of Darkness)
- Om Bhanave Namaha (Salutations to the Illuminator)
- Om Khagaya Namaha (Salutations to the One Who Moves in the Sky)
- Om Pushne Namaha (Salutations to the Giver of Nourishment)
- Om Hiranyagarbhaya Namaha (Salutations to the Golden Cosmic Source)
- Om Marichaye Namaha (Salutations to the Lord of the Dawn)
- Om Adityaya Namaha (Salutations to the Son of Aditi)
- Om Savitre Namaha (Salutations to the Stimulating Power)
- Om Arkaya Namaha (Salutations to the Radiant One)
- Om Bhaskaraya Namaha (Salutations to the Giver of Light)
You do not need to follow any specific religious belief to include mantras in your practice. Simply focusing on the sound and vibration of “Om” can help calm the mind, improve concentration, and bring a deeper sense of rhythm and awareness to your breathing and movement. This concept is also closely connected to chakra healing, where sound and energy play an important role in balancing the body and mind.
5 Common Mistakes to Avoid (And How to Fix Them)
When you see people performing Surya Namaskar, it often looks smooth and effortless. However, many beginners unknowingly make small mistakes that can reduce the effectiveness of the practice or lead to discomfort. Here are some of the most common mistakes and how you can correct them.1. Skipping the Breath Coordination
The Mistake: Moving through the sequence without following the proper inhale and exhale rhythm. The Fix: If you lose track of your breath, pause and return to Pranamasana (Prayer Pose). Reset your breathing and begin again. In Surya Namaskar, breath and movement are deeply connected. Without proper breathing, the flow loses its purpose and effectiveness.2. Rushing the Flow
The Mistake: Trying to complete multiple rounds too quickly without maintaining proper form or awareness. The Fix: Slow down and focus on controlled movement. Surya Namaskar is not about speed but about coordination and awareness. Spend a moment in each posture, and allow your body to fully engage in the movement for better results.3. Collapsing During Lowering (Pose 6)
The Mistake: Dropping the body too quickly toward the floor without control, which can strain the lower back and shoulders. The Fix: Keep your elbows close to your body and engage your core muscles. Lower your body in a controlled manner, maintaining alignment. If needed, gently bring your knees to the floor to reduce strain and maintain proper form.4. Incorrect Neck Position
The Mistake: Looking too far forward in Downward Dog or forcing the chin toward the chest in forward bends. The Fix: Maintain a neutral neck position. In Downward Dog, keep your head between your arms and gaze toward your navel or feet. In forward folds, focus on lengthening the spine instead of forcing the neck downward.5. Locking the Knees
The Mistake: Fully straightening or hyperextending the knees in standing forward bends (Poses 3 and 10). The Fix: Keep a slight bend in your knees to protect the joints. This allows for better movement from the hips and reduces unnecessary strain on the lower back. You can also explore more detailed insights on common yoga mistakes to improve your overall practice.Advanced Mistakes: Subtle Errors That Can Affect Your Practice
Once you become familiar with the basic sequence of Surya Namaskar, it is easy to assume that you are performing it correctly. However, even experienced practitioners can develop subtle mistakes that may reduce effectiveness or create unnecessary strain over time. Paying attention to these finer details can help you refine your practice and achieve better results.
1. Overarching the Lower Back in Backbends
The Mistake: Forcing a deep backbend by pushing the lower back too much, especially in poses like Hasta Uttanasana and Bhujangasana.
The Fix: Instead of compressing the lower back, focus on lifting your chest and lengthening the spine. Engage your core muscles and distribute the bend evenly across the entire spine.
2. Poor Weight Distribution in Downward Dog
The Mistake: Placing too much weight on the wrists while keeping the legs passive.
The Fix: Shift your hips upward and slightly back, press through your palms evenly, and actively engage your legs. Try to distribute your weight between your hands and feet for better balance.
3. Collapsing Shoulders During Transitions
The Mistake: Letting the shoulders sink or collapse during poses like Plank or Ashtanga Namaskara.
The Fix: Keep your shoulders stable and engaged. Push the floor away slightly, keep your arms active, and maintain proper alignment to protect the joints.
4. Hyperextending the Knees and Elbows
The Mistake: Locking the joints completely, especially in standing poses and transitions.
The Fix: Maintain a slight softness in your joints. Avoid fully locking your knees and elbows, as this helps reduce stress on the joints and improves control.
5. Losing Core Engagement
The Mistake: Relaxing the core during transitions, which can lead to poor posture and strain on the lower back.
The Fix: Keep your core gently engaged throughout the sequence. This supports stability, protects the spine, and improves overall control of movement.
6. Ignoring Breath-Movement Synchronization
The Mistake: Performing the sequence mechanically without coordinating breath and movement.
The Fix: Return your focus to the rhythm of your breath. Let each movement follow your inhale and exhale to maintain flow and awareness.
A Beginner’s Guide: How to Start Today
You do not need to be highly flexible or use any special equipment to begin practicing Surya Namaskar. You can start comfortably in your own space with just a small, clean area and a willingness to learn.Step 1: Choose the Right Time
The ideal time to practice Surya Namaskar is early in the morning at sunrise, preferably on an empty stomach. However, it can also be practiced at other times of the day, as long as you have not consumed a heavy meal for at least 2 hours.Step 2: Start with a Warm-Up
Avoid jumping directly into a fast-paced routine. Begin with 2 slow and controlled rounds, focusing on proper breathing and correct alignment. This helps prepare your body and reduces the risk of strain.Step 3: Set a Realistic Goal
Start with 4 rounds (2 on each side of the body). Practice consistently for a few days to build familiarity and comfort with the sequence.Step 4: Gradually Increase Intensity
As your body adapts, gradually increase the number of rounds. For example, move to 6 rounds in the second week and 8 rounds in the third week. For general health and fitness, 12 rounds is often considered an effective goal, which can usually be completed within 10–15 minutes at a steady pace.Step 5: Make Necessary Modifications
Adjust the practice according to your body’s needs and limitations:- Tight hamstrings? Slightly bend your knees during forward folds.
- Weak wrists? You can perform the poses on fists or modify hand placement for better support.
- High blood pressure? Avoid deep backbends (Poses 2 and 11) and keep your gaze neutral or downward.
⚠️ Precautions & When to Avoid
Surya Namaskar is generally safe for most people, but it is important to practice mindfully and listen to your body. If you are new to yoga, you can also explore a beginner-friendly daily yoga routine to build consistency.- Pregnancy: After the first trimester, avoid this sequence due to abdominal pressure. Consult a qualified prenatal yoga expert before practicing.
- Back Injuries: Move slowly, avoid jumping transitions, and focus on maintaining a long spine rather than deep backbends.
- Hypertension or Heart Conditions: Avoid holding your breath and practice at a slow, controlled pace.
- Hernia or Recent Surgery: Avoid practicing until you have received medical clearance.
Pro Tips: Expert-Level Strategies to Improve Your Practice
Once you are comfortable with the basic flow of Surya Namaskar, small refinements can make a noticeable difference in your overall experience. These practical tips are often used by experienced practitioners to improve control, efficiency, and awareness during the sequence.1. Focus on Smooth Transitions
Instead of treating each pose as a separate step, try to connect them through smooth and continuous movement. Gentle transitions help maintain rhythm, reduce unnecessary strain, and make the practice feel more natural.2. Match Your Breath with Movement
Keep your breathing steady and synchronized with each movement. Avoid rushing ahead of your breath. When your breath leads the movement, the entire sequence becomes more controlled and balanced.3. Maintain a Steady Pace
Find a pace that suits your body rather than copying others. A consistent rhythm—neither too fast nor too slow—helps improve endurance and allows better focus on alignment and form.4. Engage Your Drishti (Focus Point)
Gently fix your gaze at a stable point in each pose. This technique, known as Drishti, helps improve concentration, balance, and overall awareness during the practice.5. Practice on an Empty Stomach
For better comfort and ease of movement, practice Surya Namaskar on an empty stomach or after a sufficient gap following a meal. This allows you to move freely without discomfort.6. End with Relaxation
After completing your rounds, take a few minutes to rest in a relaxed position such as Savasana. This helps your body absorb the benefits of the practice and allows your breathing and heart rate to return to normal.7. Be Consistent, Not Perfect
Consistency is more important than perfection. Even a few rounds practiced regularly can bring noticeable improvements over time. Focus on steady progress rather than trying to achieve perfect form immediately.Conclusion: Bring the Sun Inside
Surya Namaskar is more than just a series of physical movements. It is a practice of awareness, balance, and gratitude. In a fast-paced world that constantly pushes us to do more and move faster, this simple routine invites you to slow down, breathe deeply, and reconnect with yourself. Whether you are a beginner or someone with years of experience, Surya Namaskar is accessible to all age groups and fitness levels. With regular practice, it can help improve flexibility, strength, and overall physical well-being. At the same time, it supports mental clarity, focus, and emotional balance. As you begin your day, take a few moments for yourself. Step onto your mat, stand tall, bring your hands to your heart, and move through the sequence with awareness. Over time, you may notice not only changes in your body but also a deeper sense of calm and inner strength. Surya Namaskar is not just about connecting with the energy of the sun outside—it is about awakening the energy within you.⚠️ Disclaimer
This article is intended for informational purposes only and should not be considered a substitute for professional medical advice. If you have any existing health conditions or concerns, it is recommended to consult a qualified healthcare professional before starting any new exercise routine.Frequently Asked Questions (FAQs) About Surya Namaskar
1. How many rounds of Surya Namaskar should I do daily?
Beginners can start with 4 rounds (2 on each side) and gradually increase to 6, 8, and up to 12 rounds. For general fitness and health, 12 rounds per day is commonly recommended.
2. Is it safe to do Surya Namaskar every day?
Yes, Surya Namaskar can be practiced daily when performed with proper technique and control. If you have any medical conditions, it is advisable to consult a healthcare professional before starting.
3. What is the best time to practice Surya Namaskar?
The ideal time is early morning at sunrise on an empty stomach. However, it can also be practiced later in the day, provided you have not eaten a heavy meal in the last 2–3 hours.
4. Does Surya Namaskar help with weight loss?
Surya Namaskar is a full-body workout that can help burn calories and improve metabolism. When combined with a balanced diet and regular practice, it may support weight management.
5. Can beginners practice Surya Namaskar?
Yes, beginners can start practicing Surya Namaskar at a slow pace. It is important to focus on proper alignment, breathing, and make modifications if needed.
6. Does Surya Namaskar improve flexibility?
Yes, this sequence stretches multiple muscle groups, including the hamstrings, back, and shoulders, which can gradually improve flexibility over time.
7. Does Surya Namaskar increase height?
Surya Namaskar helps improve posture and spinal flexibility, but there is no direct scientific evidence that it increases height. However, it may help you stand taller by improving alignment.
8. Is Surya Namaskar beneficial for women?
Yes, Surya Namaskar can be beneficial for women as it supports overall strength, flexibility, and hormonal balance when practiced regularly and correctly.
