
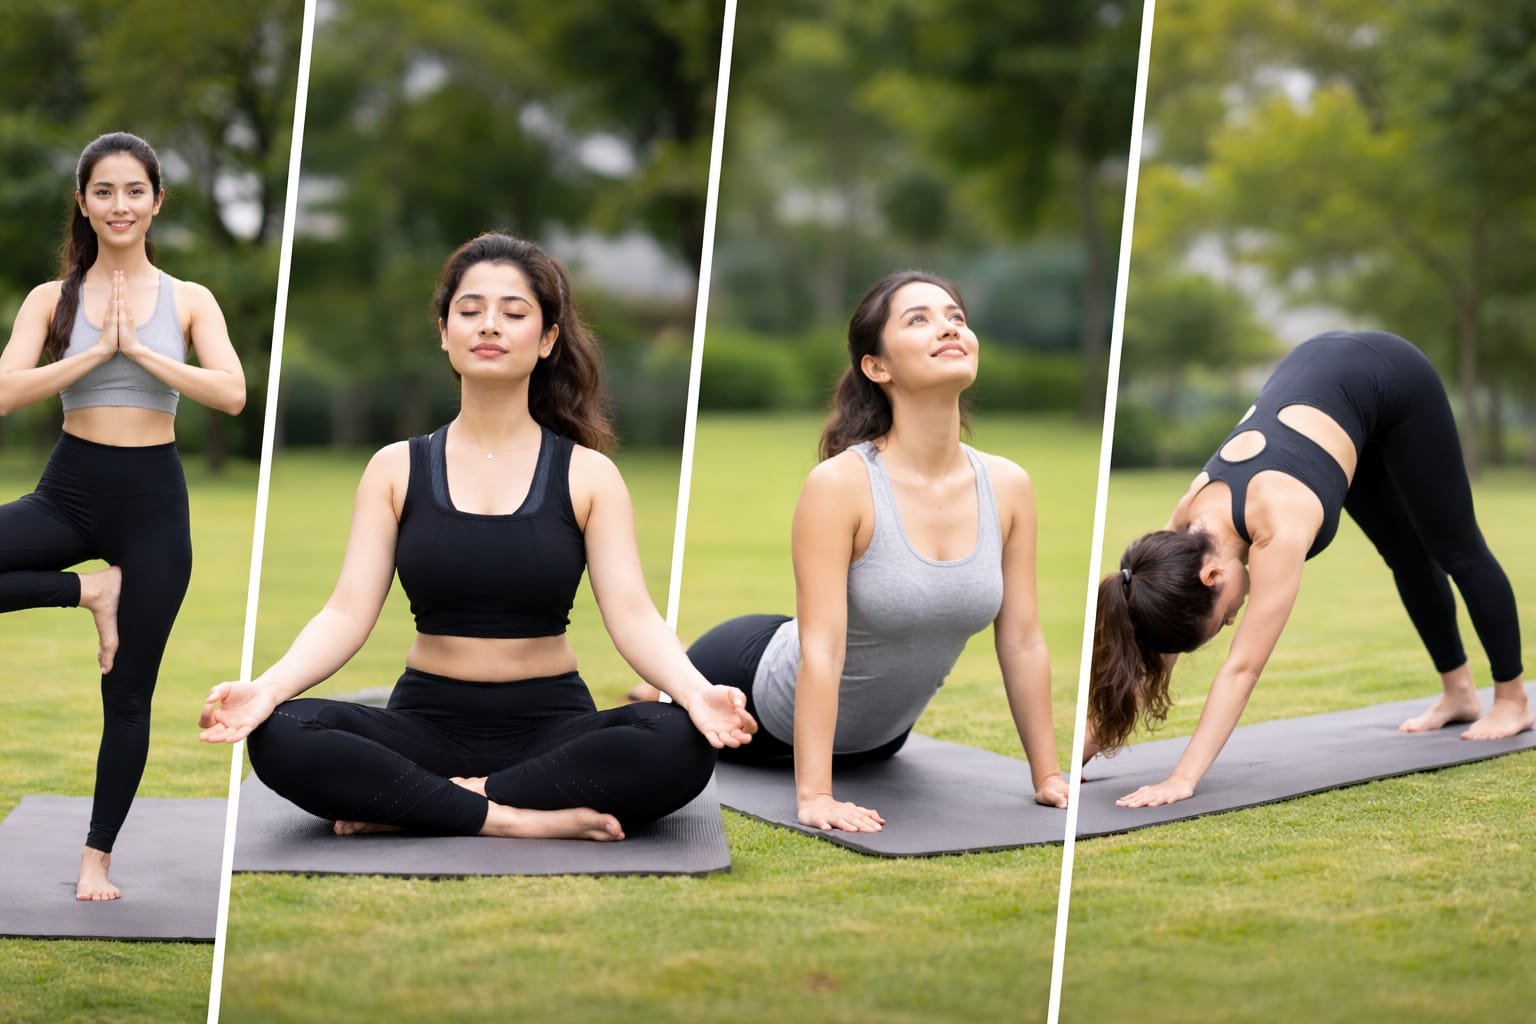

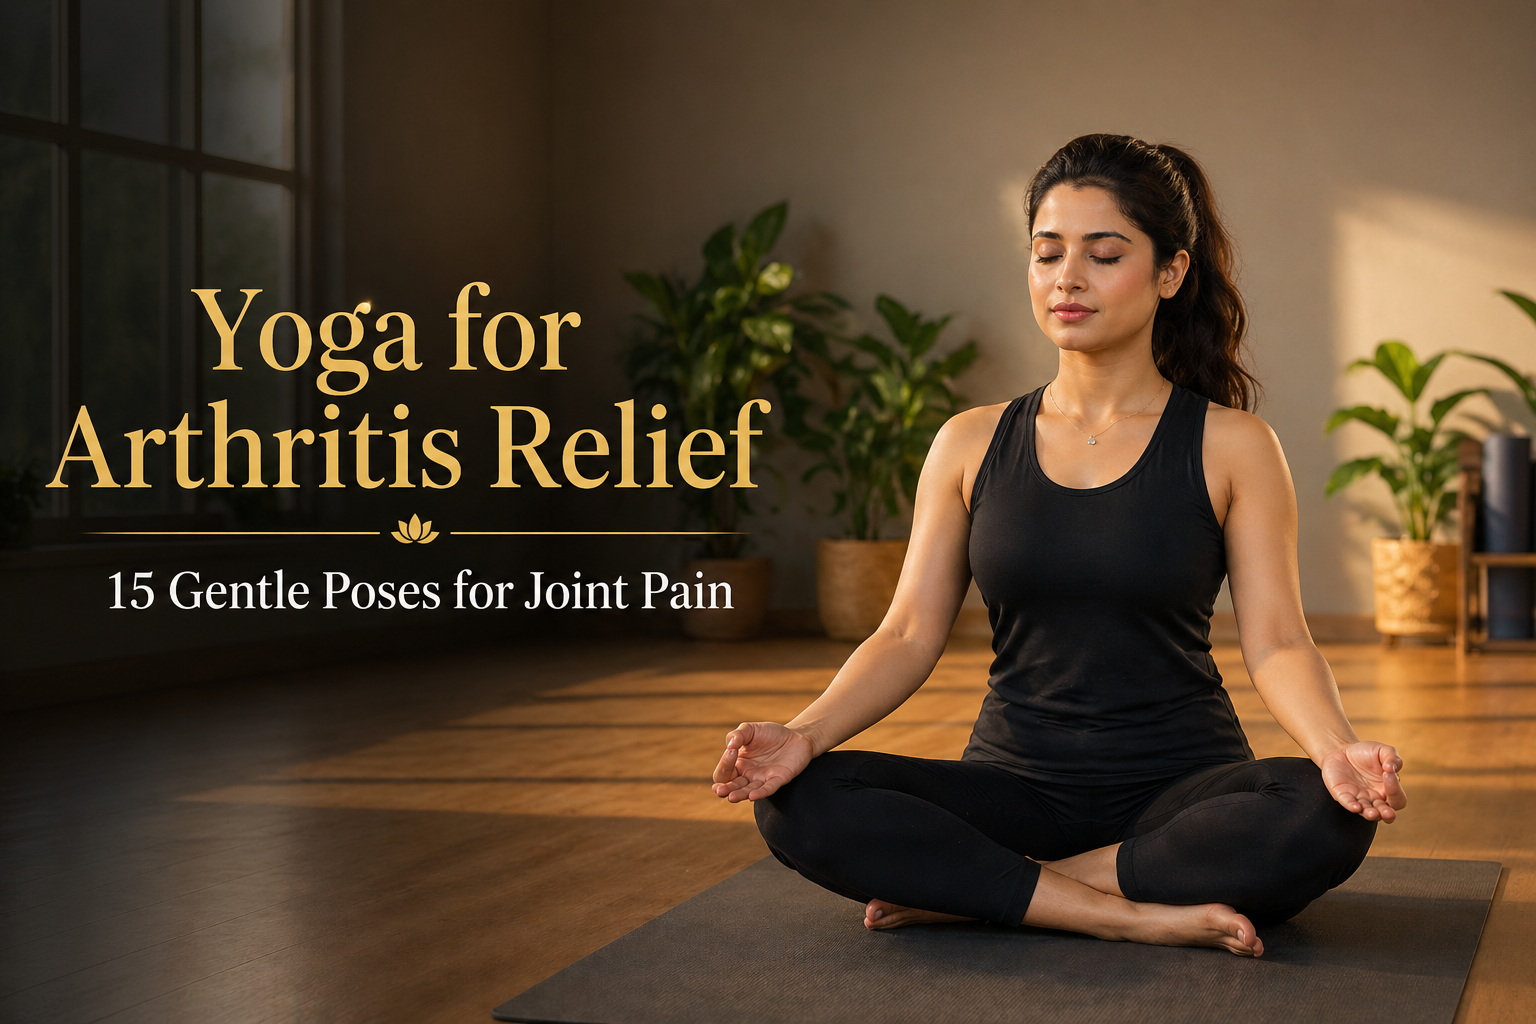
Introduction
Arthritis is one of the most common joint-related conditions, and it can affect daily life in many ways. If you wake up with stiff knees, aching fingers, tight shoulders, or a lower back that feels difficult to move, you’re not alone. Joint discomfort can make simple activities like walking, sitting, climbing stairs, or even holding objects feel challenging.
While medication and medical care are important, many people also look for gentle, low-impact ways to support their joints naturally. This is where yoga for arthritis and joint pain relief can make a difference. Yoga combines slow, controlled movement with mindful breathing, stretching, and relaxation — all of which may help ease tightness, improve flexibility, and support better mobility over time.
This guide is designed especially for beginners and anyone looking for a safe, easy-to-follow routine. You’ll learn 15 gentle yoga poses for arthritis relief, a simple 20-minute daily routine, effective breathing techniques, safety tips, and practical lifestyle habits to support joint health naturally.
No prior yoga experience is required. If you’re completely new to yoga, you can first understand the basics through our complete beginner’s guide to yoga before starting these joint-friendly practices.
Let’s begin this simple and gentle journey toward better movement, less stiffness, and a more comfortable body.
Why Yoga Works for Arthritis – The Science
Arthritis simply means joint inflammation, but its effects go far beyond just pain. It can cause stiffness, swelling, reduced mobility, and ongoing discomfort in daily life. The two most common types are osteoarthritis (caused by wear and tear of cartilage) and rheumatoid arthritis (an autoimmune condition where the body attacks its own joints).
If you want to understand these conditions in more detail, you can explore this medical overview from Mayo Clinic, which explains symptoms, causes, and types of arthritis in a clear and easy-to-understand way.
Yoga works as a supportive practice because it gently addresses both physical stiffness and stress-related triggers that often make joint discomfort worse. Unlike high-impact exercises, yoga focuses on slow, controlled movement, mindful breathing, and relaxation — making it suitable for most people dealing with joint issues.
- Improves joint lubrication: Gentle movement helps increase synovial fluid circulation, which naturally keeps joints lubricated and reduces friction.
- Strengthens surrounding muscles: Strong muscles around the joints reduce pressure on bones and support better stability.
- Supports inflammation control: Regular practice may help lower stress hormones like cortisol, which are linked to inflammation. You can also explore how breathing and relaxation support this in our pranayama techniques guide.
- Enhances flexibility and range of motion: Yoga helps improve movement in key areas such as the hips, knees, shoulders, and hands.
- Reduces stress and pain sensitivity: Stress can increase how we perceive pain. Gentle relaxation and breathing practices, as explained in our stress relief yoga guide, can help calm the nervous system.
Modern research also supports these benefits. A clinical reference from the Johns Hopkins Arthritis Center suggests that regular yoga practice may help reduce joint discomfort and improve physical function over time when practiced consistently.
Because of these combined effects — movement, strength, flexibility, and stress reduction — yoga is now widely recommended as a complementary practice alongside medical care for managing arthritis in a safe and natural way.
5 Golden Rules Before You Start (Safety First)
Before beginning any yoga practice for arthritis, it’s important to focus on safety, comfort, and awareness. Yoga should support healing — not create strain. If you have severe arthritis, recent surgery, joint replacement, or active inflammation, it’s always best to consult a qualified healthcare professional before starting.
Also, keep one simple rule in mind: never force a pose. Yoga is not about pushing your limits — it’s about moving gently within your comfort zone. If you feel sharp or unusual pain, stop immediately and allow your body to rest.
- Warm up first: Spend at least 5 minutes doing gentle joint movements such as ankle, wrist, shoulder, and neck rotations to prepare your body.
- Use props for support: Yoga blocks, cushions, straps, or a folded blanket can reduce pressure on sensitive joints and make each pose more comfortable.
- Practice on an empty stomach: Try to wait at least 2 hours after meals before practicing to avoid discomfort and support better movement.
- Avoid high-inversion poses: Advanced poses like shoulder stand or headstand can put extra pressure on the neck and joints, especially if you are a beginner.
- Listen to your body: Move slowly, breathe steadily, and stay aware of how your body feels. A helpful mindset for arthritis-friendly yoga is
“no pain, more gain.”
If you are new to yoga or unsure about proper technique, it can help to first understand basic alignment and posture through our easy yoga poses for beginners, which can make your practice safer and more comfortable.
15 Gentle Yoga Poses for Arthritis & Joint Pain
The following yoga poses are carefully selected to be joint-friendly, safe, and beginner-friendly. Each pose can be adjusted based on your comfort level, so you can practice without strain. The focus here is not on perfection, but on slow, mindful movement and consistency.
Move at your own pace, avoid sudden jerks, and stay connected with your breathing. If any pose feels uncomfortable or causes sharp pain, simply skip it or modify the position to suit your body.
With regular practice, these gentle movements can help improve flexibility, ease tightness, and support smoother joint movement over time.
As highlighted by the Arthritis Foundation, gentle and modified yoga poses can be a safe and effective way to stay active while managing joint discomfort.
1. Neck Rotations (Greeva Sanchalana)
Neck stiffness is one of the most common concerns in arthritis, especially for those who spend long hours sitting or working on screens. Neck rotations are a simple and gentle way to release built-up tension, improve blood circulation, and restore natural movement in the cervical spine.
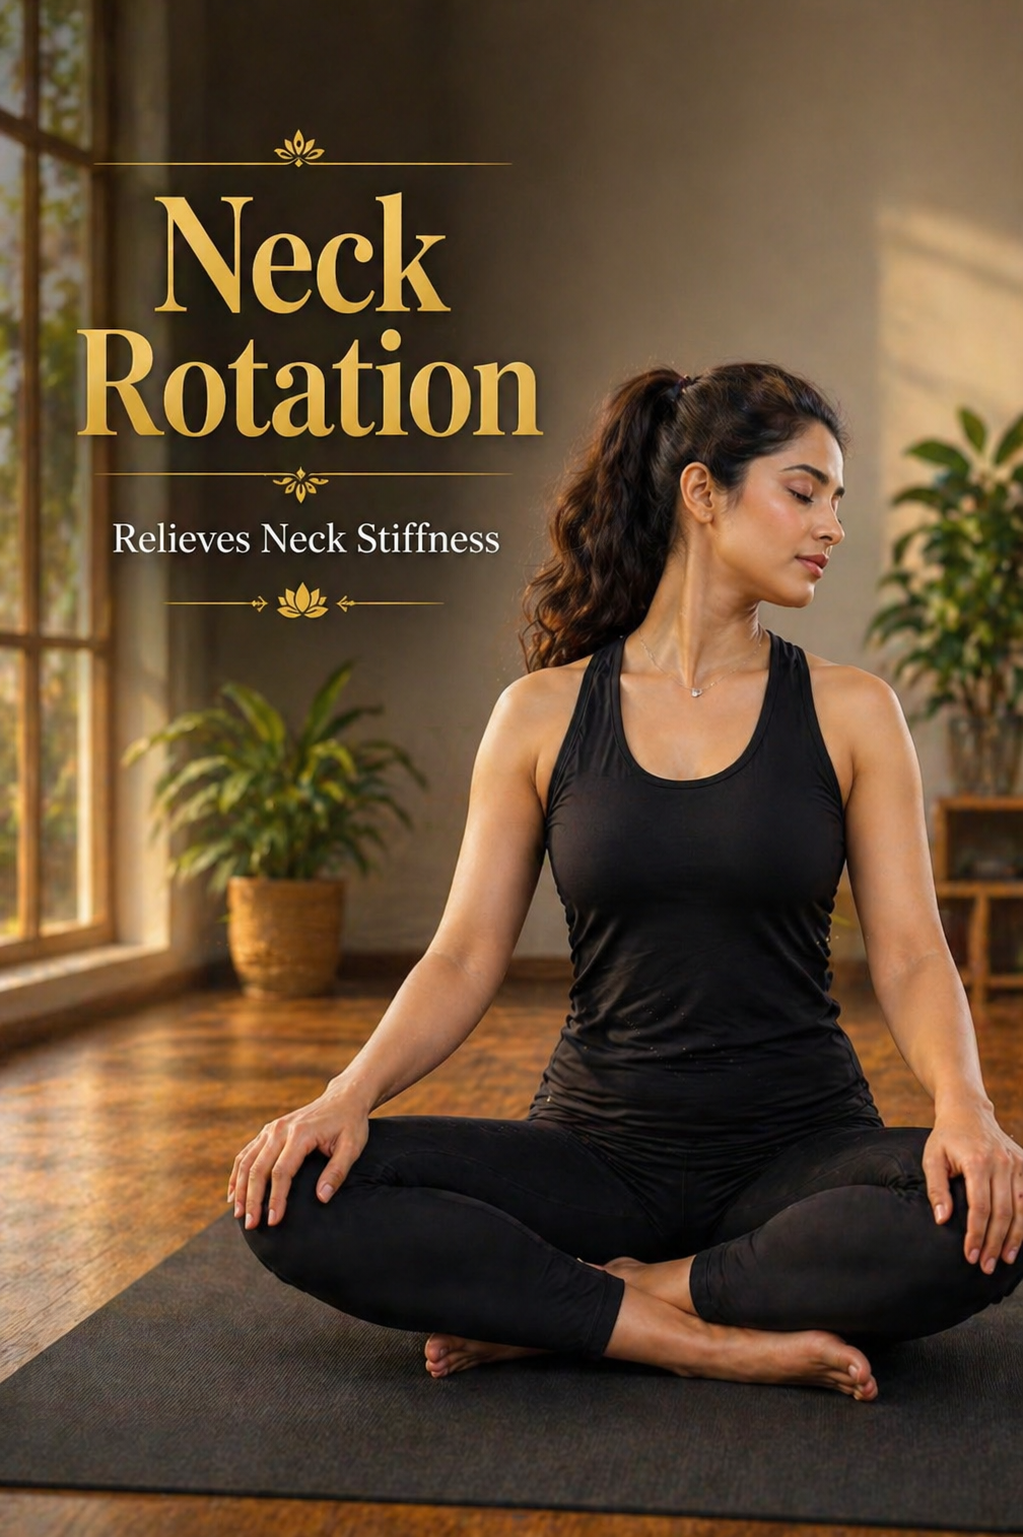
How to Do It:
- Sit comfortably in a cross-leg position or on a chair with your spine straight.
- Keep your shoulders relaxed and let your hands rest naturally on your knees.
- Slowly turn your head to the right side, staying within a comfortable range.
- Bring your head back to the center, then gently turn it to the left side.
- Now tilt your head so that your right ear moves toward your right shoulder (avoid lifting the shoulder).
- Return to the center and repeat the same movement on the left side.
- Keep the movement slow and controlled, allowing it to flow naturally with your breath.
Breathing Pattern:
- Inhale as you return your head to the center.
- Exhale gently as you turn or tilt your head.
Duration:
- Repeat 5 rounds in each direction.
- Move slowly and stay relaxed — avoid rushing.
Benefits:
- Helps ease cervical stiffness and tightness
- Improves neck flexibility and range of motion
- May relieve tension headaches and upper neck discomfort
- Supports better posture, especially during desk work
Safety Tips:
- Avoid fast or jerky movements.
- Do not rotate the neck in a full circular motion if you have severe cervical sensitivity.
- Stop immediately if you feel sharp pain or dizziness.
If you experience stiffness in the upper back along with neck discomfort, combining this movement with yoga for back pain relief at home can provide more balanced support for overall mobility.
2. Finger Stretch & Grip (Hasta Mudra)
Stiffness in the fingers and hands can make everyday tasks like holding objects, typing, or opening jars feel uncomfortable. This Finger Stretch & Grip exercise is a simple yet effective way to improve mobility, ease tightness, and support healthy joint movement in the hands.
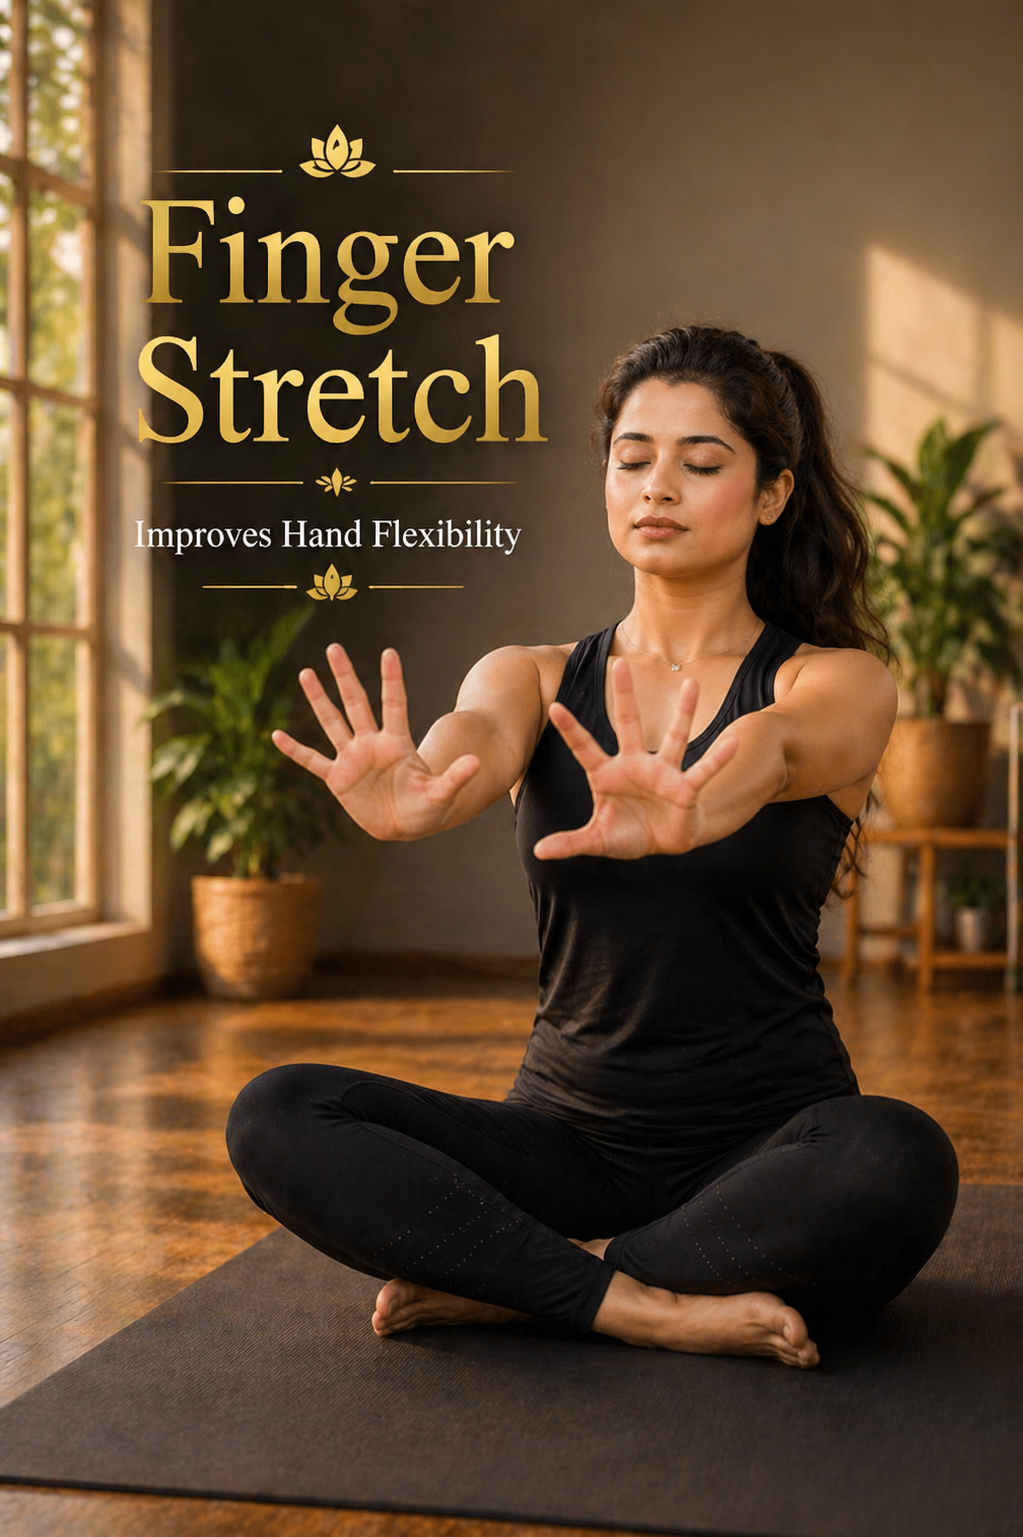
How to Do It:
- Sit comfortably in a cross-leg position or on a chair with your spine straight.
- Extend both arms forward or rest them gently on your thighs.
- Open your palms wide and spread your fingers like a star.
- Hold this position for a few seconds, noticing a gentle stretch in your fingers.
- Slowly bring your fingers together and form a soft, relaxed fist (avoid squeezing tightly).
- Release the fist and open your fingers again.
- Continue this slow opening and closing motion with control.
Breathing Pattern:
- Inhale as you open and stretch your fingers.
- Exhale as you close your hands into a gentle fist.
Duration:
- Repeat 10 slow and controlled repetitions.
- Perform 1–2 sets based on your comfort level.
Benefits:
- Helps ease stiffness in the fingers and hand joints
- Improves grip strength and flexibility
- Supports relief from hand arthritis and trigger finger discomfort
- Enhances blood circulation in the hands
Safety Tips:
- Avoid clenching your fist too tightly — keep the movement gentle.
- If your fingers feel swollen or sensitive, reduce the repetitions.
- Move slowly and stay mindful for better results.
Practicing this simple movement regularly can help maintain flexibility and make everyday hand movements feel more comfortable over time.
3. Wrist Rotations (Manibandha Chakra)
Wrist stiffness and discomfort are quite common, especially if you spend long hours typing, using a mobile, or doing repetitive hand movements. Wrist rotations offer a gentle way to improve circulation, ease tightness, and support smoother joint movement in the wrists.
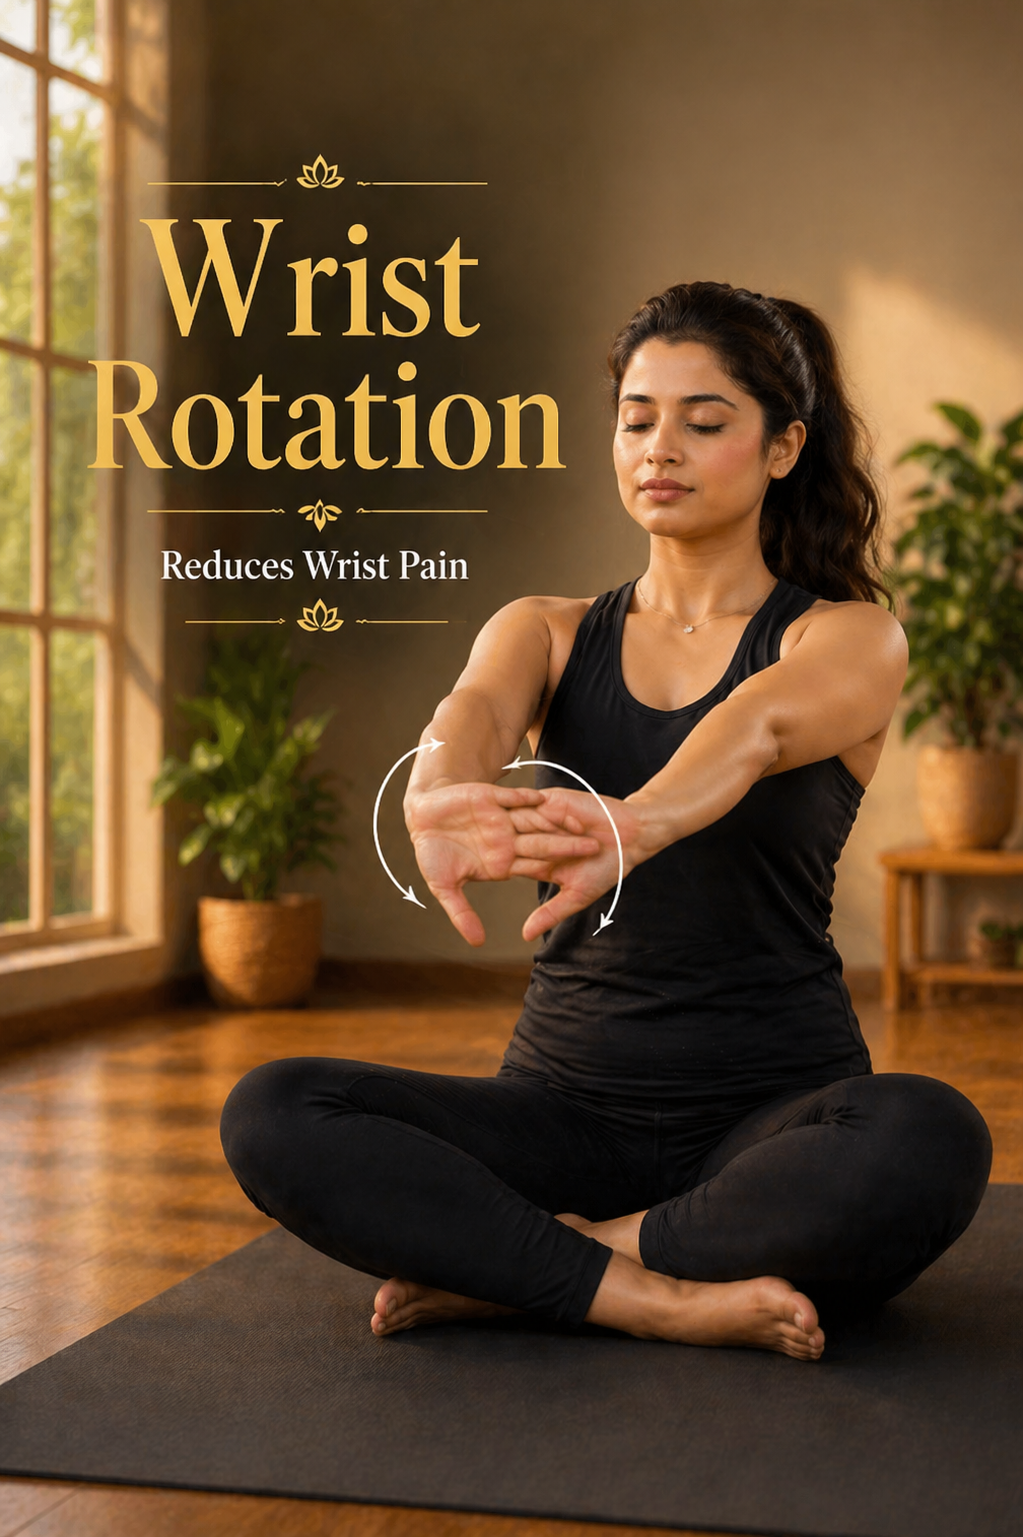
How to Do It:
- Sit comfortably with your spine straight, either cross-leg on the floor or on a chair.
- Extend both arms forward at shoulder level.
- Keep your fingers relaxed and slightly open.
- Slowly rotate your wrists in a clockwise direction.
- After a few rounds, switch to counter-clockwise rotation.
- Then gently move your wrists up (extension) and down (flexion).
- Keep all movements slow and controlled, without putting strain on the joints.
Breathing Pattern:
- Breathe normally and stay relaxed throughout the movement.
- Avoid holding your breath.
Duration:
- Rotate wrists 5 times clockwise and 5 times counter-clockwise.
- Repeat flexion and extension movements 8–10 times.
Benefits:
- Helps ease wrist stiffness and joint discomfort
- Supports those dealing with carpal tunnel sensitivity
- Improves flexibility and blood flow in the wrist joints
- Reduces strain caused by typing, writing, or repetitive hand use
Safety Tips:
- Avoid fast or forceful rotations.
- If there is swelling or sharp pain, reduce the range of motion.
- Keep your shoulders relaxed to avoid unnecessary tension.
Practicing this gentle movement regularly can help maintain wrist flexibility and reduce strain caused by daily hand activities.
4. Ankle Rotations (Gulpha Chakra)
Stiff ankles are quite common, especially after long hours of sitting or limited movement. Ankle rotations are a simple and gentle way to improve joint mobility, support circulation, and ease tightness in the lower body.
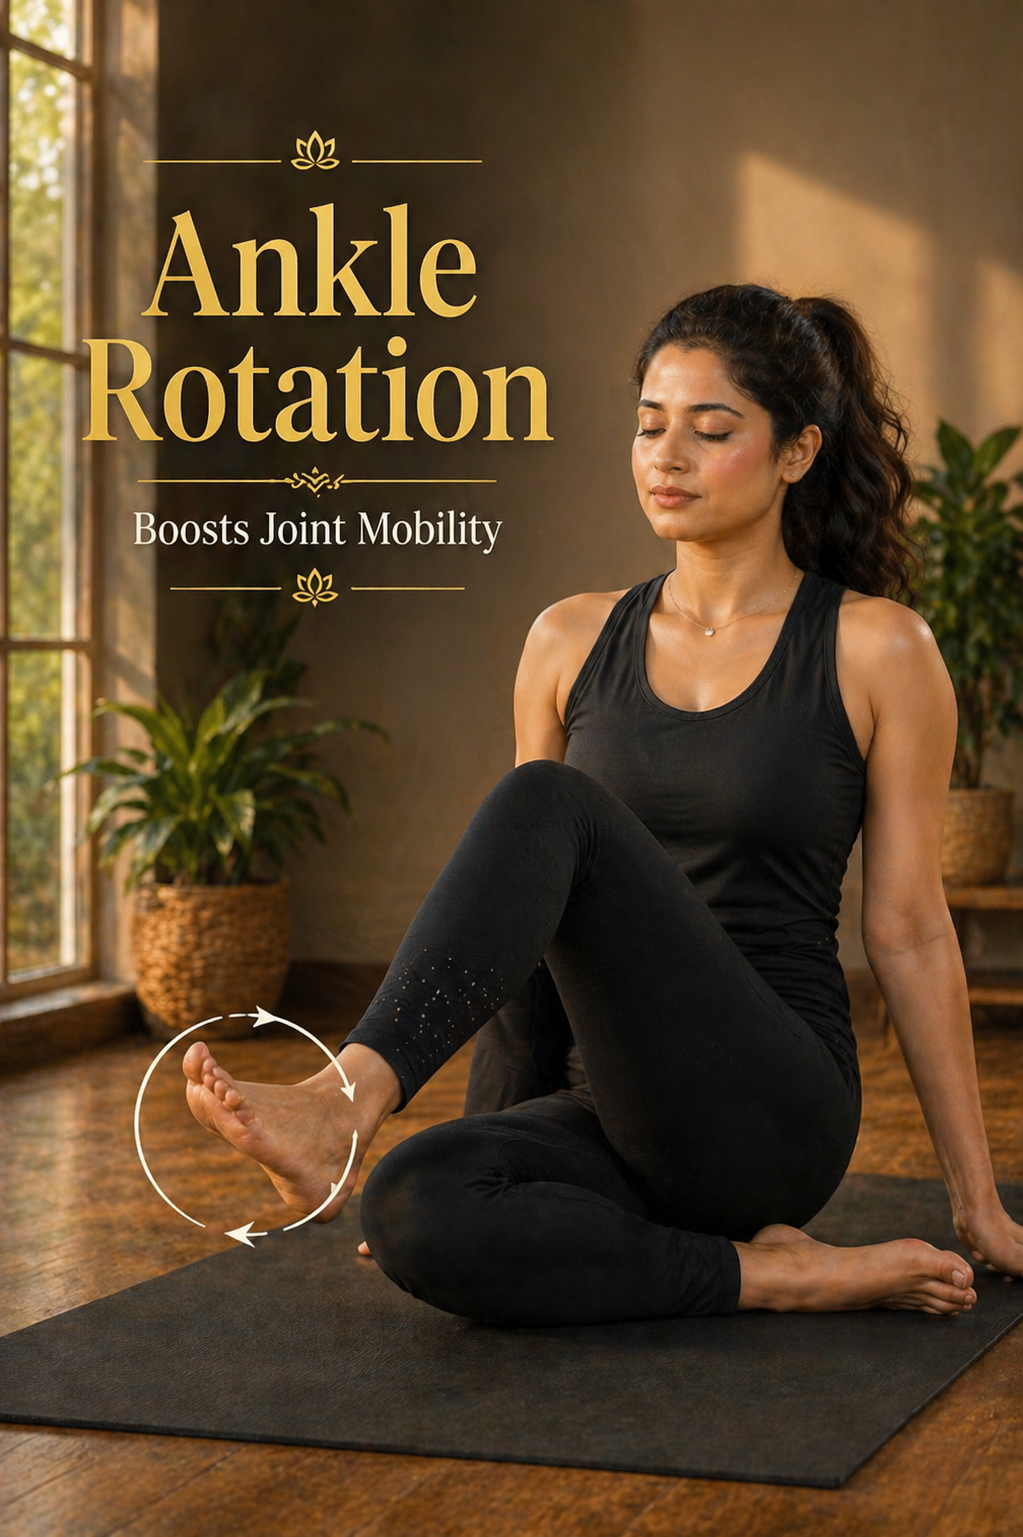
How to Do It:
- Sit comfortably on a chair or on a mat with your spine straight.
- Keep one foot on the floor and lift the other foot slightly.
- Slowly rotate your ankle in a clockwise direction, making smooth circular movements.
- After a few rounds, switch to the counter-clockwise direction.
- Lower the foot and repeat the same movement with the other leg.
- Keep the movement controlled and avoid any jerky motion.
Breathing Pattern:
- Breathe normally and stay relaxed throughout the movement.
- Avoid holding your breath.
Duration:
- Rotate the ankle 5 times clockwise and 5 times counter-clockwise on each side.
Benefits:
- Helps ease ankle stiffness and joint discomfort
- Improves mobility and flexibility
- Supports better blood circulation in the lower legs
- Useful for stiffness caused by prolonged sitting or inactivity
Safety Tips:
- Avoid fast or forceful movements.
- If you feel pain or swelling, reduce the range of motion.
- Maintain an upright posture to avoid unnecessary strain.
For better lower-body mobility and to reduce stiffness from long sitting hours, this movement can be combined with a gentle morning yoga routine to start the day with more ease and flexibility.
5. Seated Cat-Cow (Bidalasana – Chair Version)
If getting down on the floor feels uncomfortable, this seated cat-cow variation is a safe and practical way to keep your spine active. It gently mobilizes the back, supports better posture, and helps release stiffness without putting pressure on the knees or wrists.
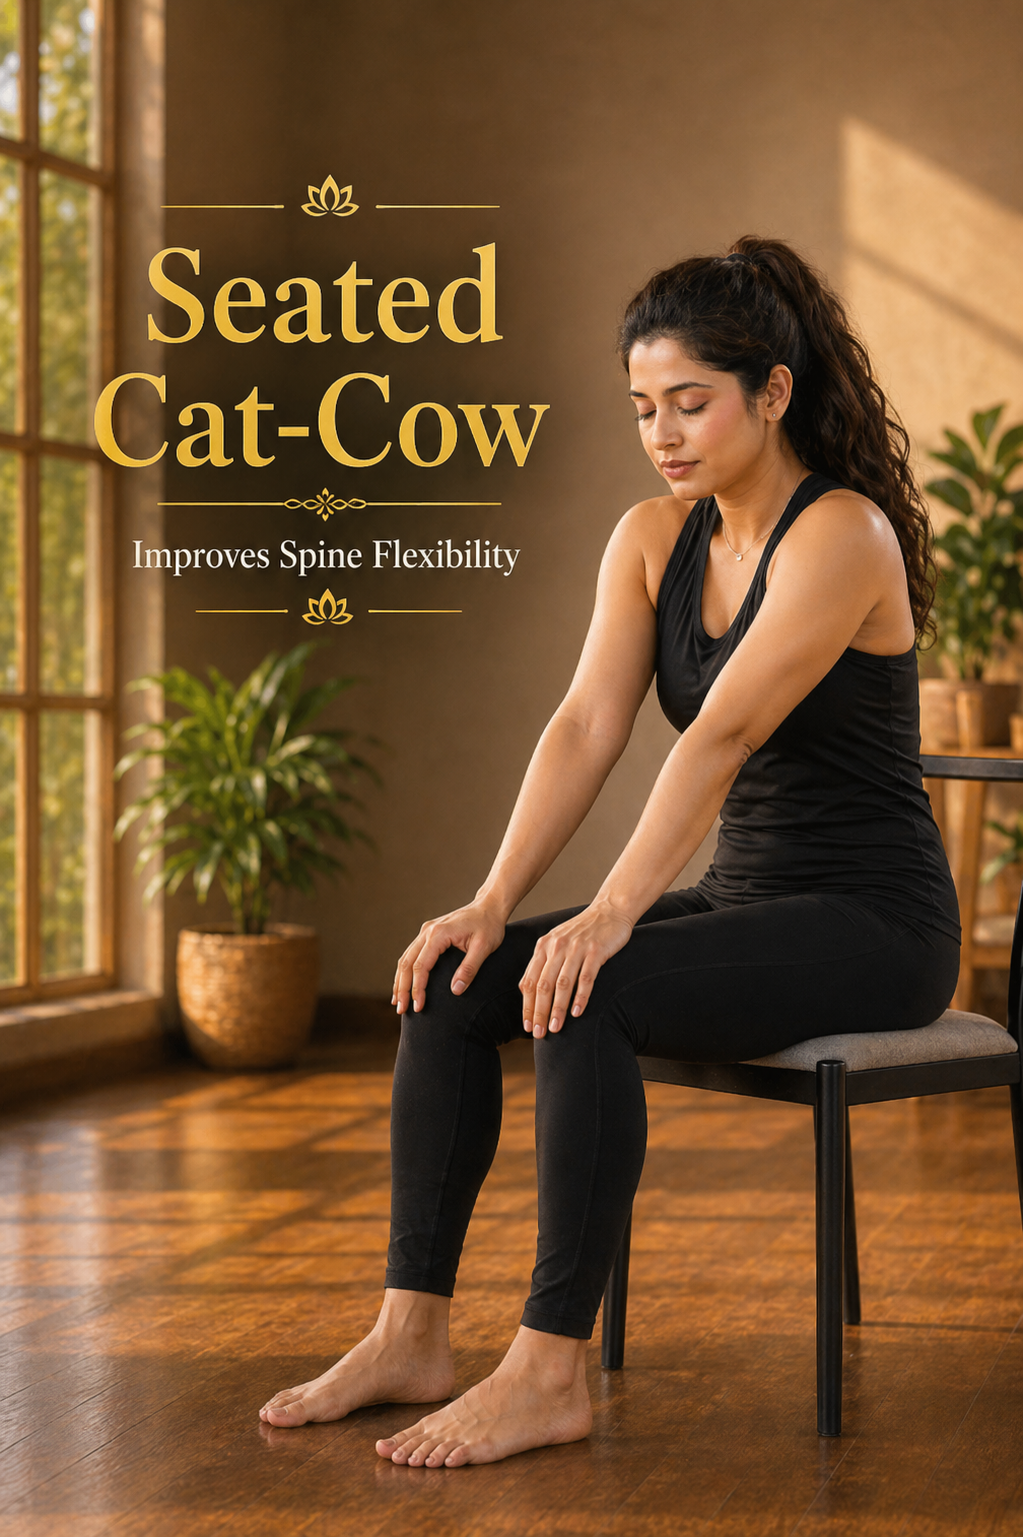
How to Do It:
- Sit on a sturdy chair with your feet flat on the floor, hip-width apart.
- Keep your spine upright and place your hands on your knees.
- Inhale: Gently arch your back, lift your chest forward, and slightly look upward (cow position).
- Exhale: Round your spine, draw your belly in, and tuck your chin toward your chest (cat position).
- Move slowly between these two positions, letting the movement follow your breath.
Breathing Pattern:
- Inhale as you open the chest and arch the back.
- Exhale as you round the spine and relax the neck.
Repetitions:
- Repeat 8 slow rounds, keeping the movement smooth and controlled.
Benefits:
- Improves spinal flexibility and mobility
- Helps ease lower back tightness and discomfort
- Supports better posture and alignment
- Provides gentle relief for spinal stiffness
Safety Tips:
- Avoid forcing the movement; stay within a comfortable range.
- Keep your shoulders relaxed and avoid hunching.
- If you feel discomfort in the lower back, reduce the depth of movement.
Practicing this movement regularly can help maintain spinal flexibility and reduce stiffness, especially if you spend long hours sitting.
6. Balasana – Child’s Pose (Supported)
Balasana (Child’s Pose) is one of the most calming and restorative yoga poses. The supported version makes it even more comfortable, especially for those with joint sensitivity. It gently stretches the lower back, hips, and thighs while allowing the body to relax deeply.

How to Do It:
- Kneel down on a yoga mat with your knees slightly apart and toes touching.
- Place a pillow or folded blanket under your thighs for extra support.
- Slowly sit back toward your heels, staying within a comfortable range.
- Gently fold your upper body forward.
- Rest your forehead on a yoga block, cushion, or mat for comfort.
- Keep your arms relaxed — either extended forward or resting beside your body.
Breathing Pattern:
- Take slow, deep breaths.
- Feel your back gently expand as you inhale and soften as you exhale.
Duration:
- Hold the pose for 30 seconds to 2 minutes, depending on your comfort level.
Benefits:
- Helps ease lower back tension and stiffness
- Gently stretches the hips and thighs
- Provides support for knee and hip joints
- Promotes relaxation and stress relief
Safety Tips:
- Use enough support under the thighs and forehead to avoid strain.
- If there is discomfort in the knees, increase cushioning or avoid deep bending.
- Do not force your hips to touch your heels — keep the position natural and comfortable.
This pose is ideal for relaxation and works especially well at the end of your routine, helping the body unwind and release built-up tension.
7. Marjaryasana / Bitilasana (Tabletop Cat-Cow)
The Tabletop Cat-Cow flow is a gentle, rhythmic movement that helps keep the spine flexible and releases tightness in the back. It is especially helpful for those experiencing discomfort in the lower (lumbar) and mid (thoracic) spine.
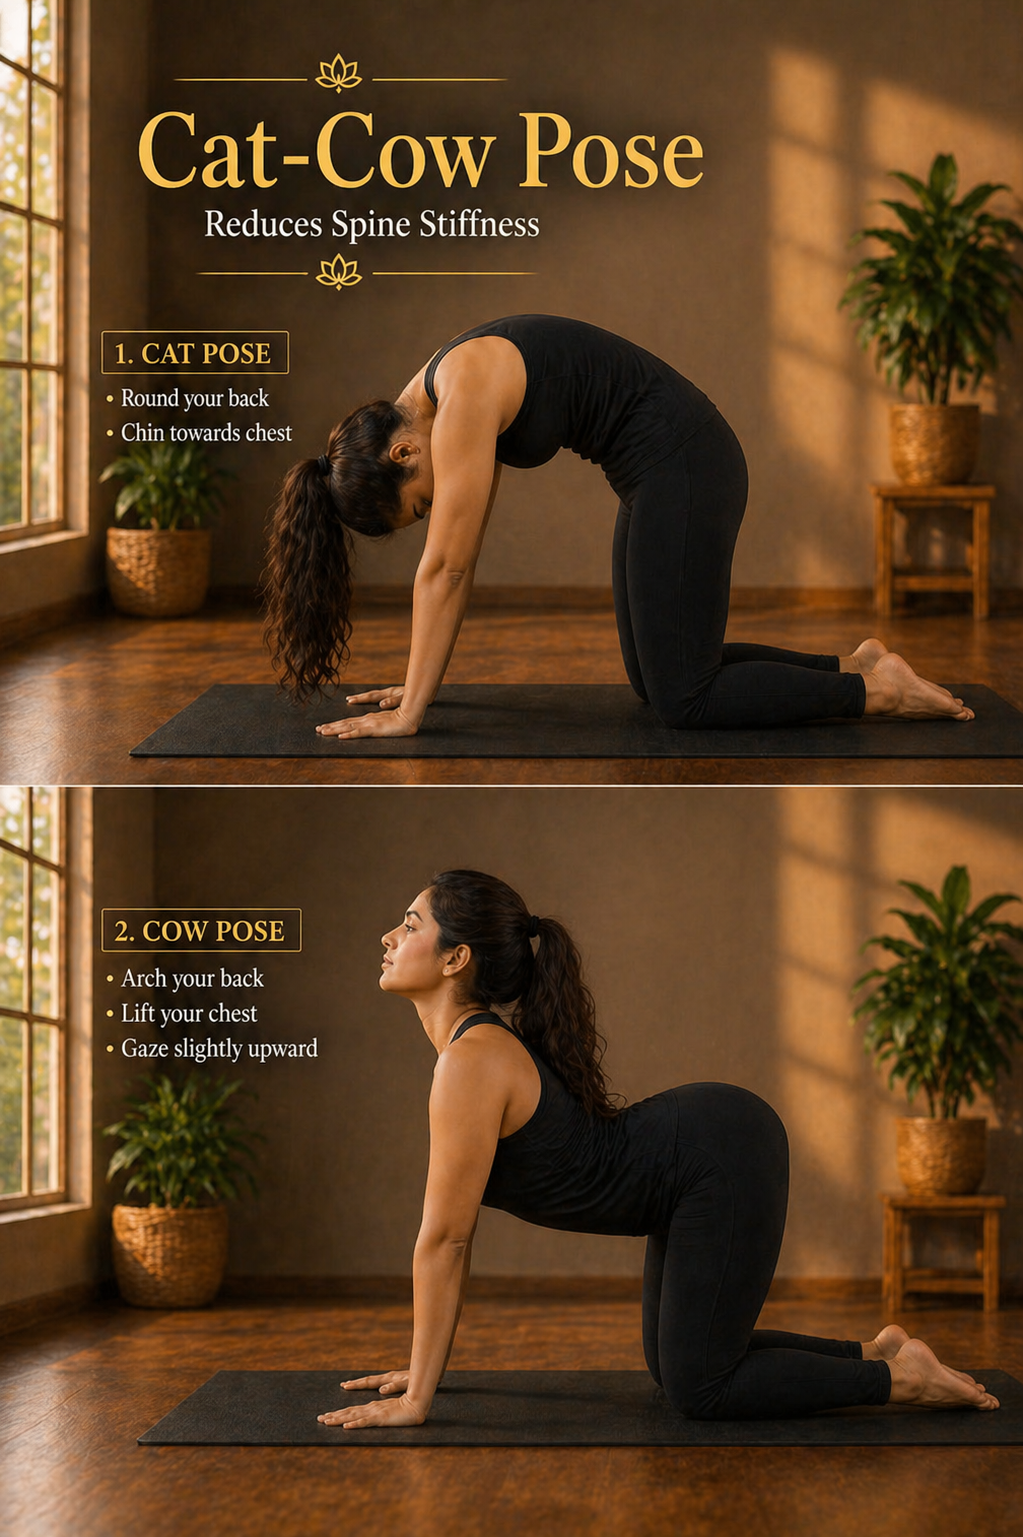
How to Do It:
- Come onto all fours (tabletop position) on a yoga mat.
- Place your wrists directly under your shoulders and your knees under your hips.
- Keep your arms straight but not locked, and spread your fingers evenly for support.
- Inhale (Cow Pose): Drop your belly toward the mat, lift your chest forward, and gently raise your sitting bones upward. Keep your neck relaxed.
- Exhale (Cat Pose): Round your spine upward, draw your belly in, and tuck your chin toward your chest.
- Move slowly between these two positions, allowing the motion to flow naturally with your breath.
Breathing Pattern:
- Inhale as you open the chest and arch the back (Cow).
- Exhale as you round the spine and relax the neck (Cat).
Duration:
- Repeat for 6 to 8 slow, controlled breaths.
Benefits:
- Supports spinal flexibility and smooth movement
- Helps ease tightness in the lower and mid-back
- May provide relief from lumbar discomfort
- Encourages better posture and alignment
Safety Tips:
- If there is pressure on the wrists, place a folded towel under your palms.
- Keep the movement slow and controlled — avoid forcing the spine.
- If your knees feel sensitive, use a soft cushion or folded blanket underneath.
Practicing this flowing movement regularly can help maintain spinal mobility and reduce stiffness, especially if you spend long hours sitting.
8. Bhujangasana – Cobra Pose (Gentle)
Bhujangasana (Cobra Pose) is a gentle backbend that helps strengthen the lower back and improve spinal flexibility. This mild variation is especially suitable for arthritis, as it avoids excess pressure while still encouraging healthy movement in the spine.
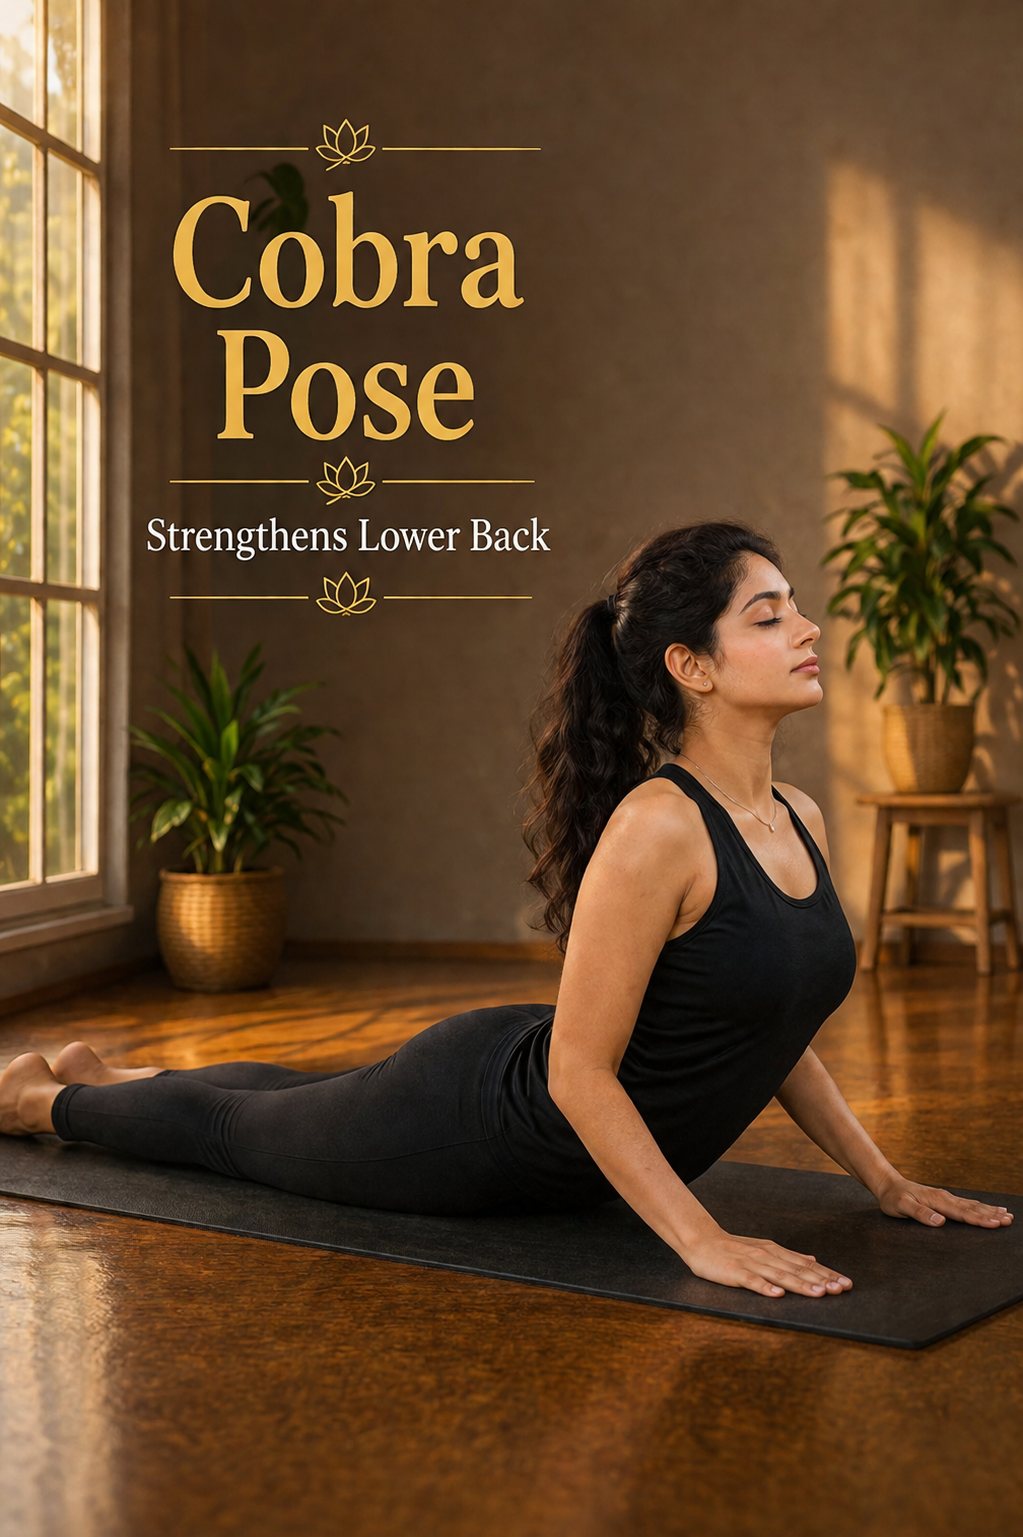
How to Do It:
- Lie down on your stomach on a yoga mat with your legs extended and feet relaxed.
- Place your palms beside your ribs, keeping your elbows close to your body.
- Let your forehead or chin rest lightly on the mat.
- Inhale: Gently lift your chest a few inches off the floor, using your back muscles rather than pushing with your hands.
- Keep your navel on the mat and avoid lifting too high.
- Maintain a soft bend in your elbows — do not lock them.
- Look slightly forward while keeping your neck relaxed.
Breathing Pattern:
- Inhale as you lift your chest.
- Hold the position with slow, steady breathing.
- Exhale as you gently lower back down.
Duration:
- Hold for 3 to 5 deep breaths.
- Repeat 2 to 3 times, depending on your comfort.
Benefits:
- Strengthens the lower back and spinal muscles
- Improves spinal extension and flexibility
- Helps ease back stiffness
- Supports better posture and chest opening
Safety Tips:
- Avoid lifting too high — keep the movement gentle and controlled.
- Do not push through pain in the lower back.
- Keep your shoulders relaxed and away from the ears.
Including this gentle backbend in your routine can help improve spinal mobility and reduce stiffness over time.
9. Setu Bandhasana – Bridge Pose (Supported)
Setu Bandhasana (Bridge Pose) is a gentle way to strengthen the hips and support the lower back. The supported variation makes it safer and more comfortable, especially for those with arthritis, as it reduces pressure on the joints while still offering the benefits of the pose.
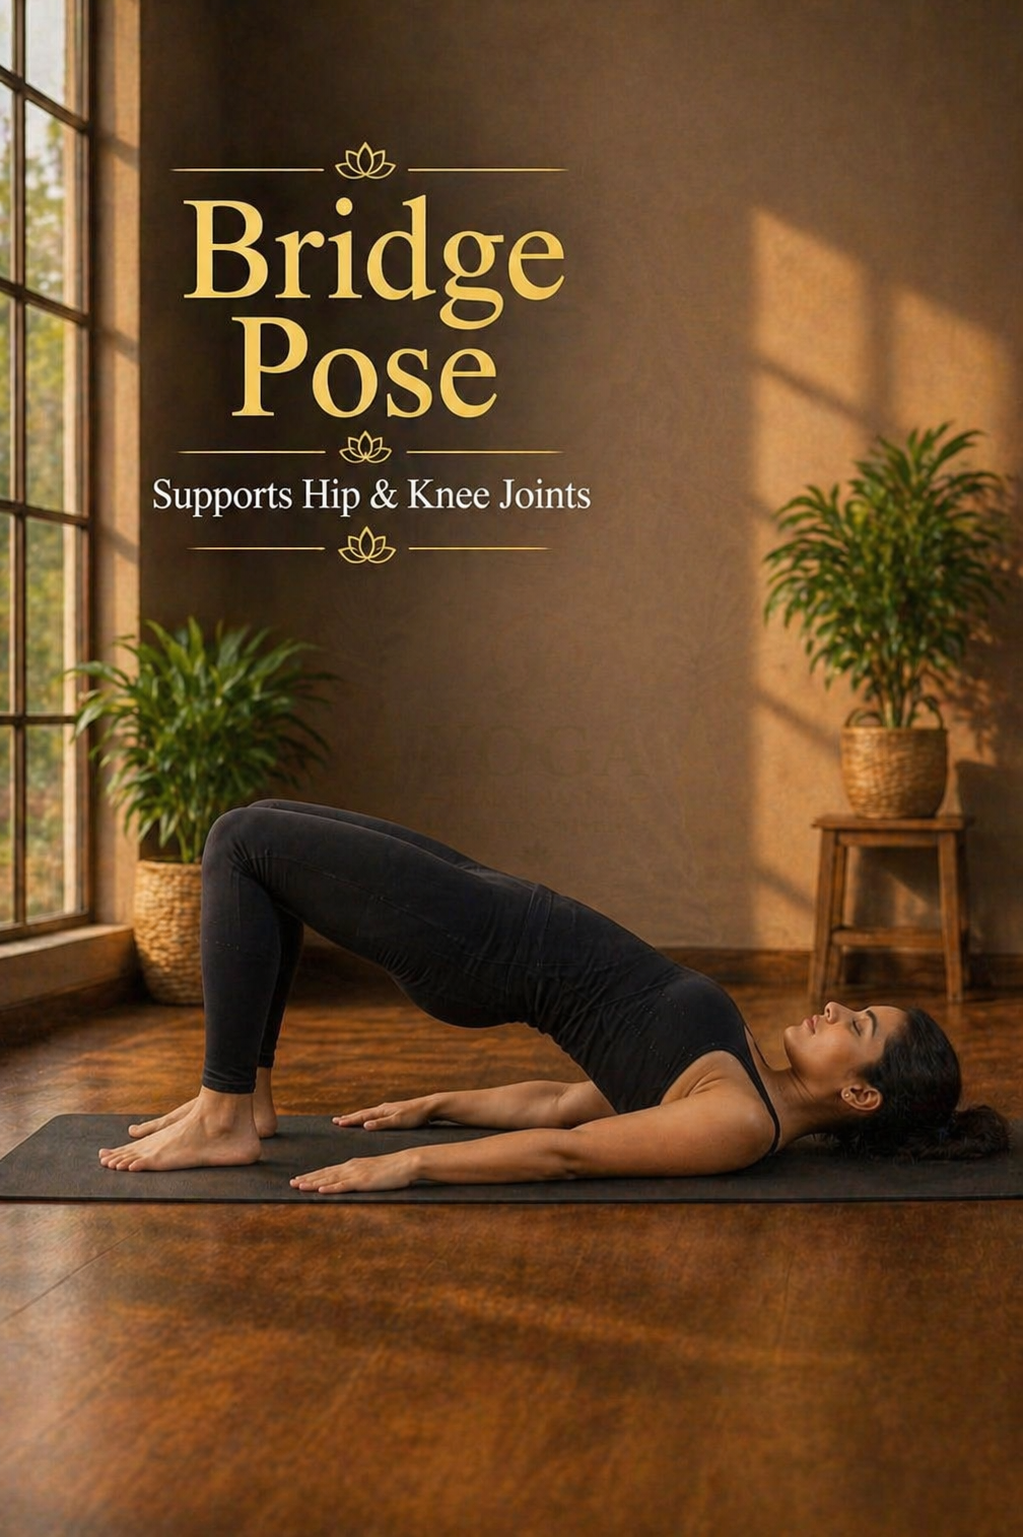
How to Do It:
- Lie flat on your back on a yoga mat.
- Bend your knees and place your feet flat on the floor, hip-width apart.
- Keep your arms relaxed beside your body, with palms facing down.
- Gently lift your hips slightly and place a yoga block or a thick book under your sacrum (the bony area at the base of the spine).
- Lower your hips onto the support and allow your body to settle into the position.
- Make sure the support is placed under the sacrum, not the lower back.
Breathing Pattern:
- Breathe slowly and naturally.
- With each exhale, allow your body to relax a little more.
Duration:
- Hold the pose for 5 to 8 deep breaths.
Benefits:
- Supports hip and knee joint strength
- Helps ease discomfort around the sacroiliac joint
- Gently improves hip flexibility and mobility
- May help reduce lower back tightness
Safety Tips:
- Make sure the support is stable and comfortable.
- Avoid lifting your hips too high — keep the position gentle.
- If you feel discomfort in your back, remove the support and rest.
Practicing this supported posture regularly can help improve hip stability and gradually ease stiffness in the lower body.
10. Supta Padangusthasana – Reclining Hand-to-Big-Toe (Strap Version)
Supta Padangusthasana is a gentle stretching pose that improves flexibility in the legs while reducing strain on the joints. Using a strap or belt makes it easier and more accessible, especially if you have tight hamstrings or knee discomfort.
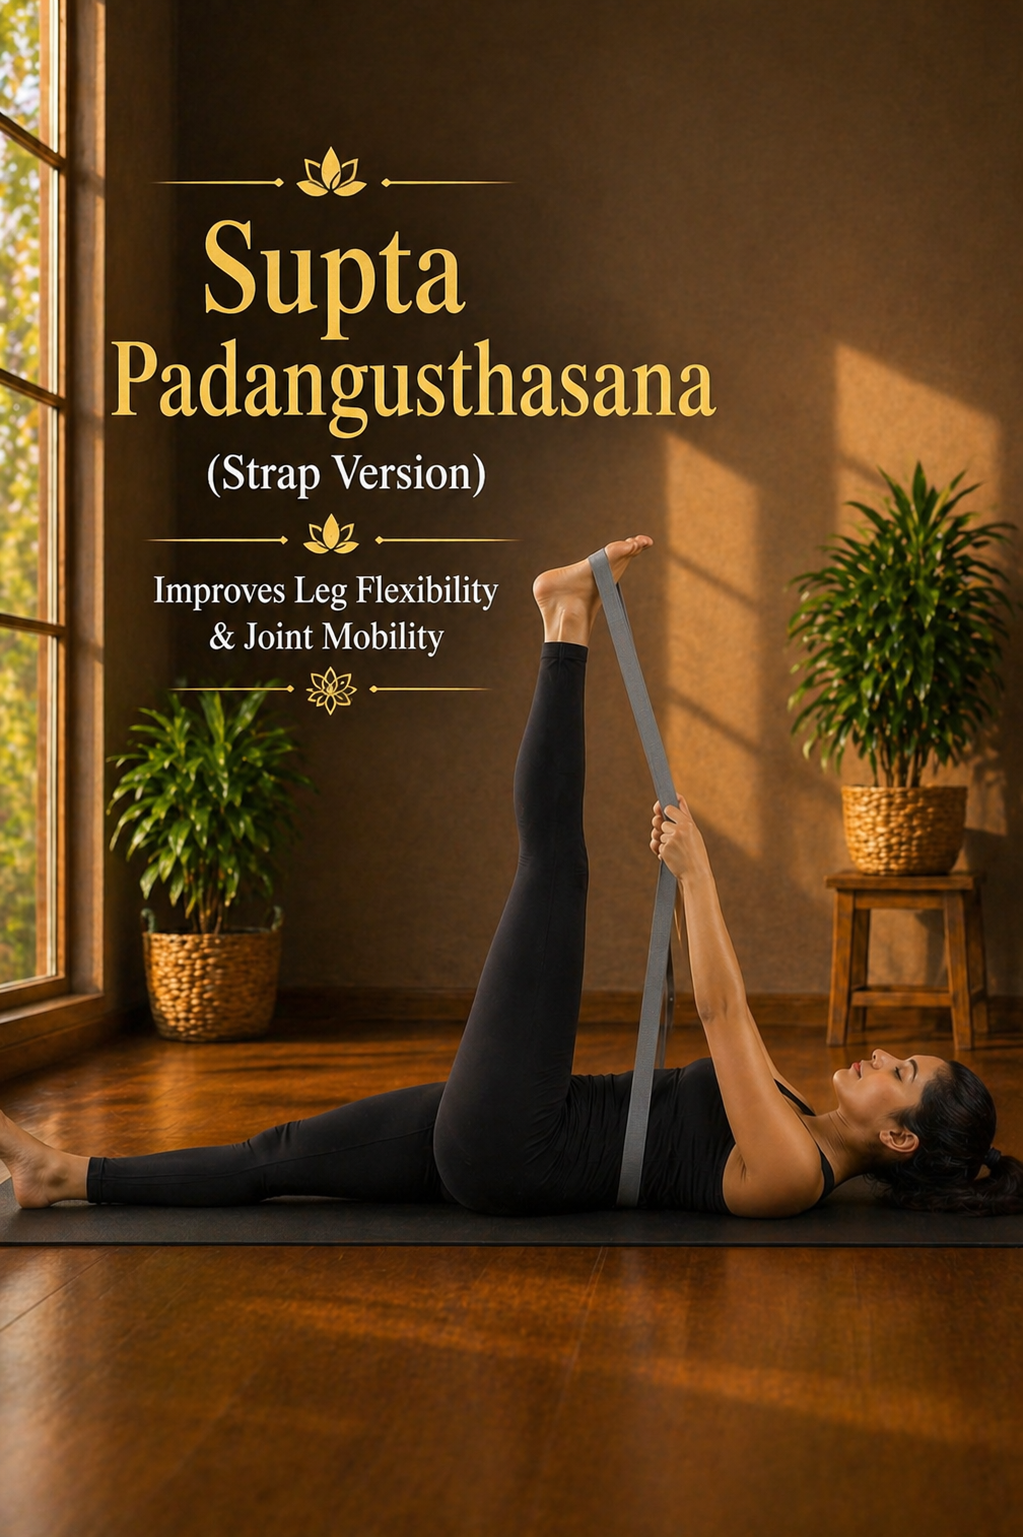
How to Do It:
- Lie comfortably on your back on a yoga mat.
- Bend both knees and allow your body to relax.
- Loop a yoga strap, belt, or towel around your right foot.
- Slowly straighten your right leg and lift it toward the ceiling.
- Keep your left leg bent or extended on the floor, depending on what feels comfortable.
- Hold the strap with both hands and gently draw your leg toward you without forcing the stretch.
- Keep your shoulders relaxed and your back flat against the mat.
Breathing Pattern:
- Breathe slowly and deeply.
- With each exhale, allow the stretch to deepen naturally, without strain.
Duration:
- Hold for 30 seconds on each side.
Benefits:
- Improves hamstring flexibility
- Helps ease stiffness in the knees and hips
- Supports relief from hip flexor tightness
- Enhances overall leg mobility
Safety Tips:
- Avoid locking the knee — keep a slight softness in the joint.
- Do not pull the leg too forcefully.
- If you feel discomfort in the lower back, bend the opposite knee for support.
Practicing this gentle stretch regularly can help improve flexibility and reduce tightness in the legs, especially after long periods of sitting or inactivity.
11. Virabhadrasana I – Warrior I (Chair Supported)
Warrior I (Virabhadrasana I) is a strengthening pose that helps build stability in the legs and hips. The chair-supported variation makes it safer and easier to practice, especially if you have joint discomfort or balance concerns.
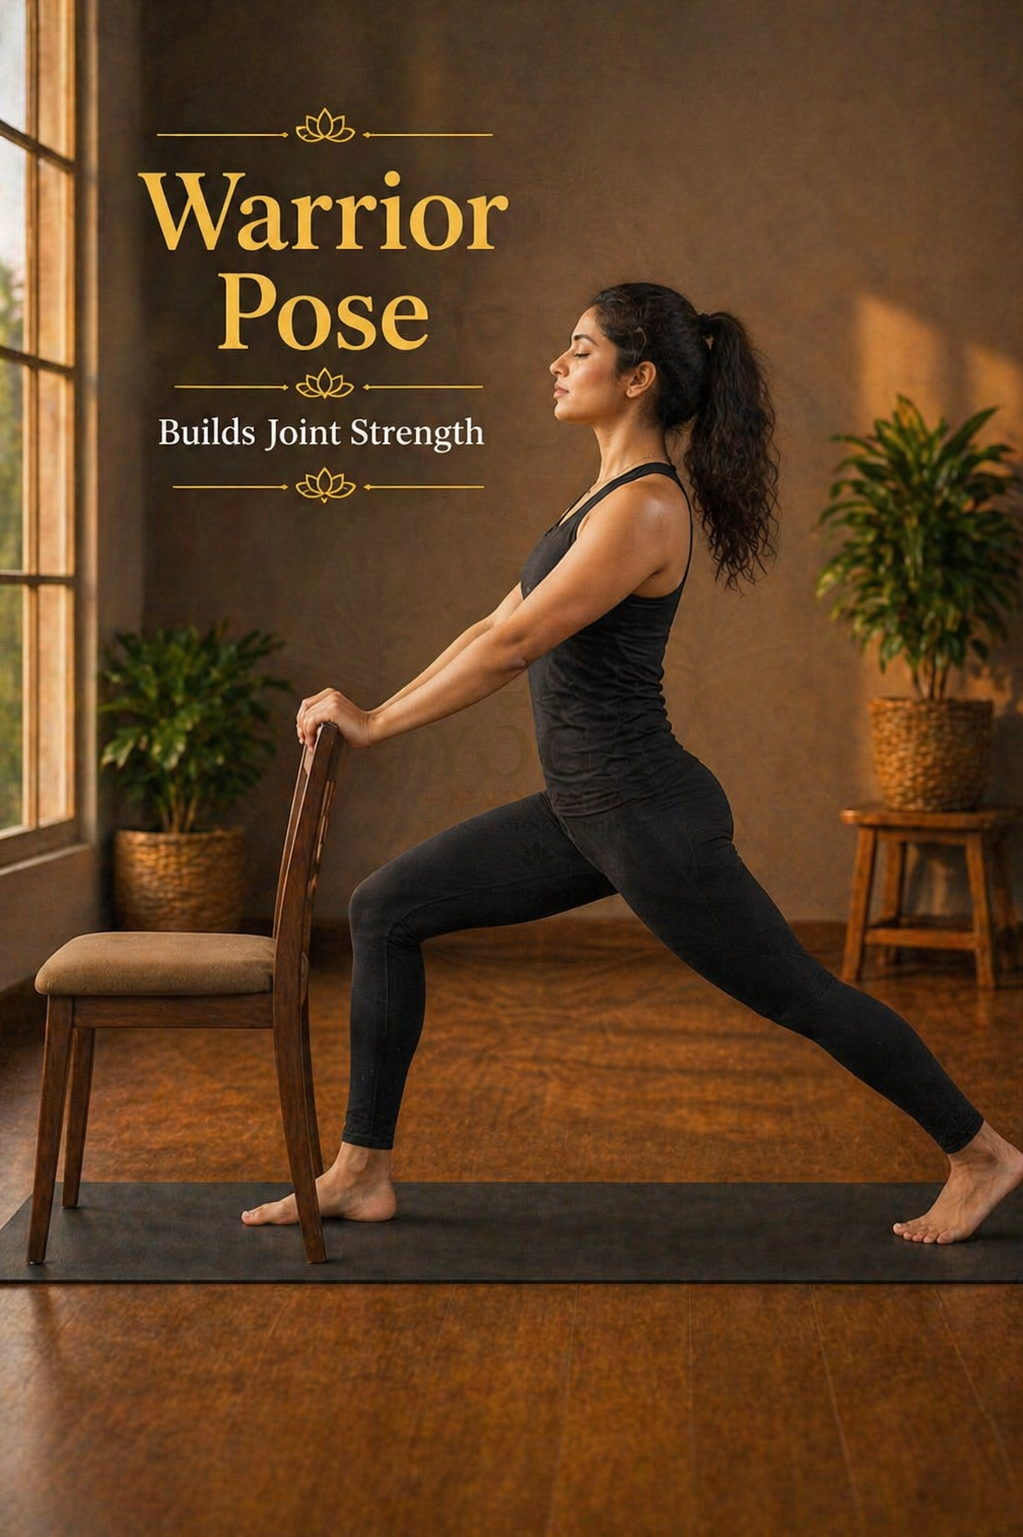
How to Do It:
- Stand upright behind a sturdy chair and hold the backrest for support.
- Step one foot back, keeping your front foot facing forward.
- Gently bend the front knee (up to 90 degrees or less, based on your comfort).
- Keep the back leg straight and try to ground the heel if possible.
- Keep your hips facing forward and your chest lifted.
- Relax your shoulders and avoid leaning forward.
Breathing Pattern:
- Breathe slowly and steadily while holding the pose.
- Stay relaxed and avoid holding your breath.
Duration:
- Hold the position for 3 deep breaths on each side.
Benefits:
- Strengthens the quadriceps and leg muscles
- Improves hip stability and mobility
- Supports knee joint strength
- Enhances overall balance and posture
Safety Tips:
- Do not bend the front knee beyond your comfort level.
- Keep the movement controlled and avoid sudden shifts.
- Use the chair fully for support if balance feels unstable.
Practicing this supported standing pose regularly can help build lower body strength and improve joint stability in a safe and controlled way.
12. Trikonasana – Triangle Pose (Wall Assisted)
Trikonasana (Triangle Pose) is a gentle standing posture that improves flexibility along the sides of the body and supports hip mobility. Using a wall for support makes it more stable and comfortable, especially if you have balance concerns or joint sensitivity.
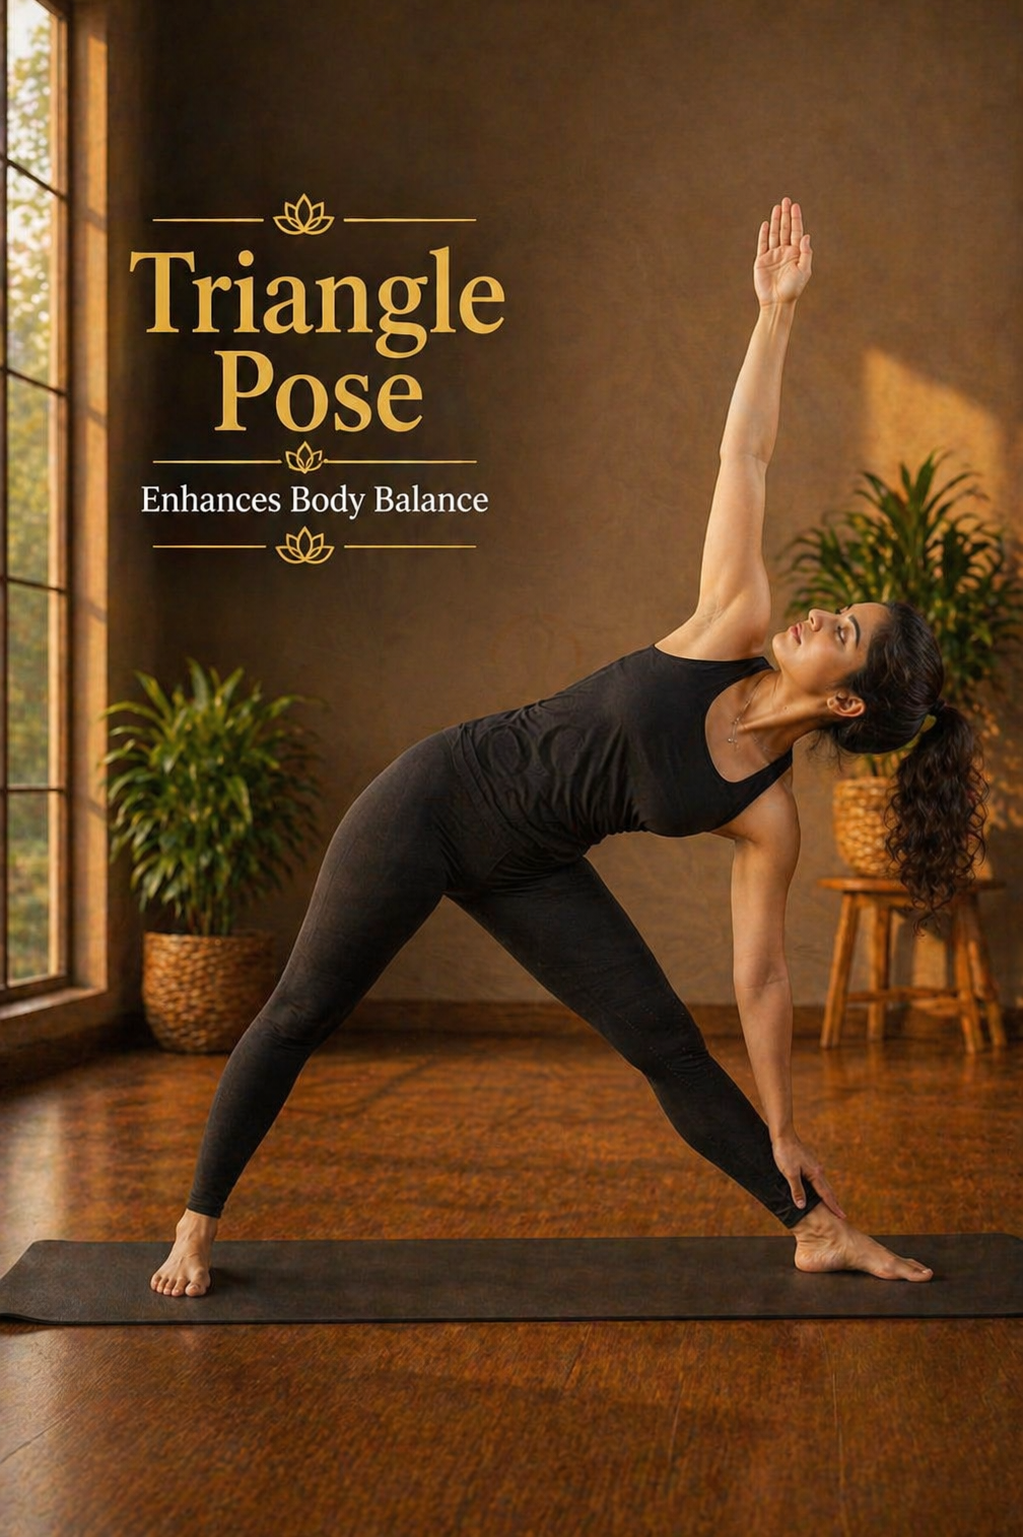
How to Do It:
- Stand with your back lightly touching a wall for support.
- Step your feet wide apart (about 3–4 feet).
- Turn one foot outward while keeping the other slightly inward.
- Extend both arms sideways at shoulder height.
- Slowly reach one hand down toward your shin or a yoga block.
- Lift the opposite arm upward, creating a straight line from bottom hand to top hand.
- Keep your chest open and your body aligned with the wall.
- Look straight ahead or slightly upward, depending on your comfort.
Breathing Pattern:
- Breathe slowly and steadily while holding the pose.
- Avoid holding your breath.
Duration:
- Hold the pose for 3 to 5 deep breaths on each side.
Benefits:
- Improves hip flexibility and joint mobility
- Enhances side-body and spinal flexibility
- Supports better balance and alignment
- Helps ease tightness in the hips and lower back
Safety Tips:
- Avoid bending too deep — keep the movement gentle.
- Use a yoga block if reaching the shin feels uncomfortable.
- Keep your back supported by the wall to maintain proper alignment.
Practicing this posture regularly can help improve flexibility, balance, and overall body coordination in a safe and controlled way.
13. Viparita Karani – Legs-Up-The-Wall
Viparita Karani (Legs-Up-The-Wall) is a deeply relaxing restorative pose that helps improve circulation and reduces pressure on the lower body. It is especially beneficial if you experience swelling, stiffness, or fatigue in the legs and joints.
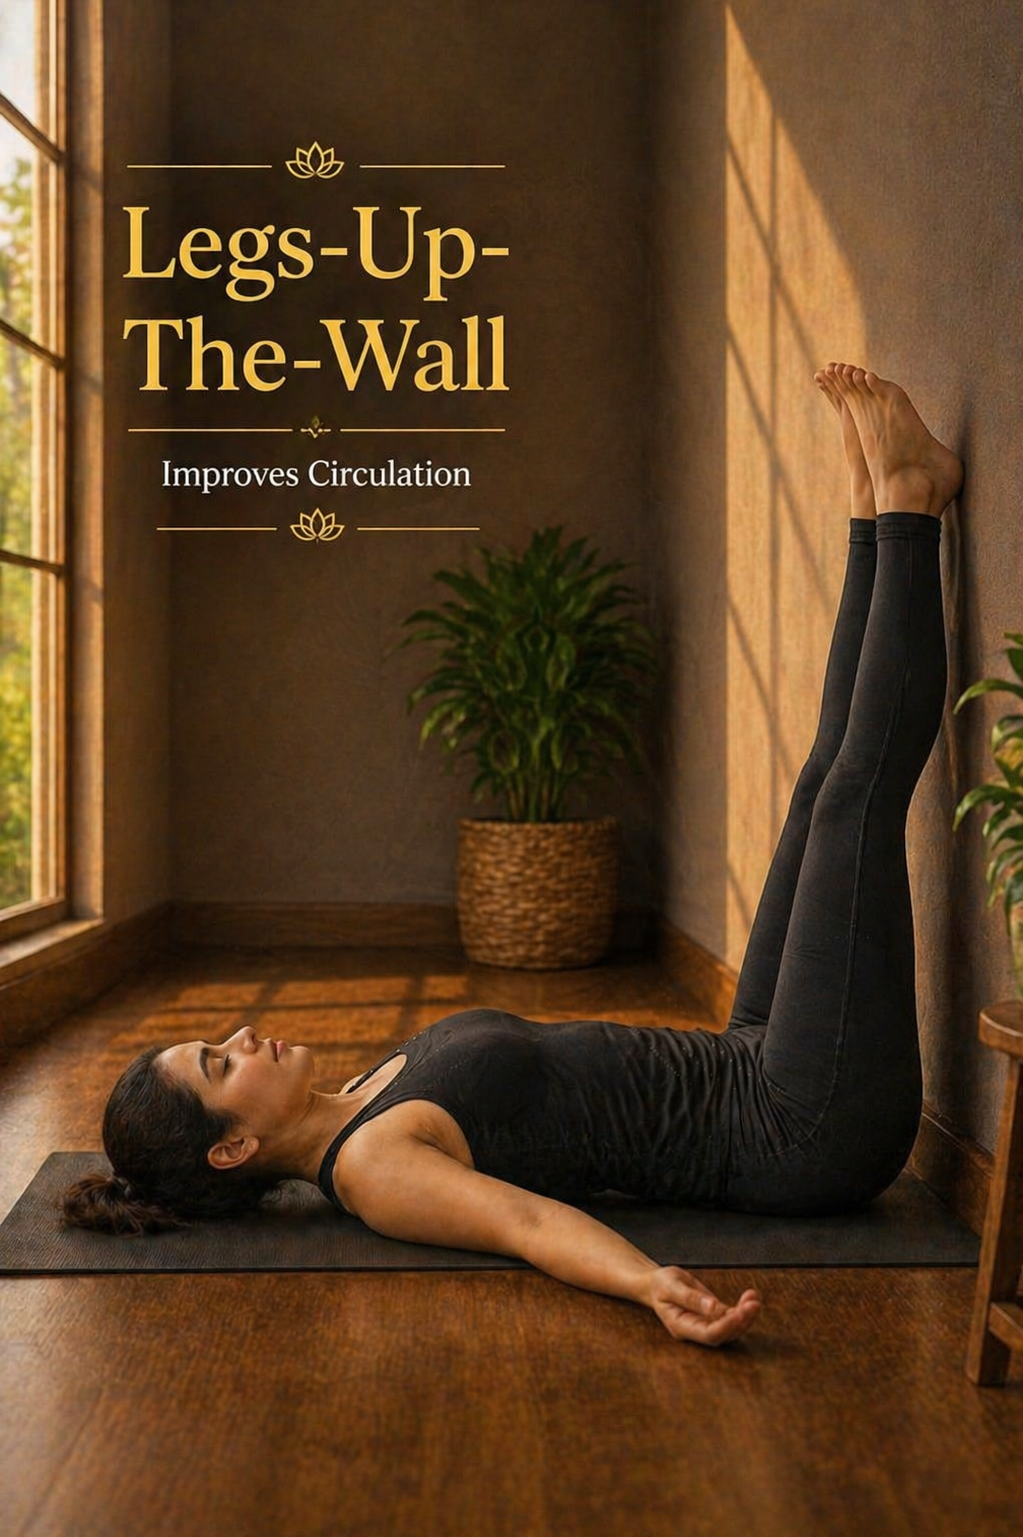
How to Do It:
- Sit sideways next to a wall with one hip touching the wall.
- Gently swing your legs up onto the wall as you lie back on the floor.
- Adjust your position so your legs rest comfortably in a vertical position against the wall.
- Place a folded blanket or cushion under your hips for extra support if needed.
- Rest your arms beside your body with palms facing upward.
- Close your eyes and allow your whole body to relax.
Breathing Pattern:
- Take slow, deep breaths.
- With each exhale, allow your body to relax more deeply.
Duration:
- Stay in the pose for 3 to 5 minutes, or longer if it feels comfortable.
Benefits:
- Helps reduce swelling in the knees and ankles
- Improves blood circulation in the lower body
- Relieves leg fatigue and stiffness
- Promotes deep relaxation and stress relief
Safety Tips:
- Avoid this pose if you have severe neck or eye pressure issues.
- Keep your hips slightly away from the wall if your hamstrings feel tight.
- Come out of the pose slowly to prevent dizziness.
This restorative pose works best at the end of your routine, helping the body relax, improve circulation, and support overall recovery.
14. Ankle-to-Knee Pose (Agnistambhasana – Modified)
The Ankle-to-Knee Pose, also known as a modified Figure-4 stretch, is a gentle hip-opening posture that helps release tightness in the hips and lower back. This supported variation makes it more comfortable, especially for those with joint sensitivity.
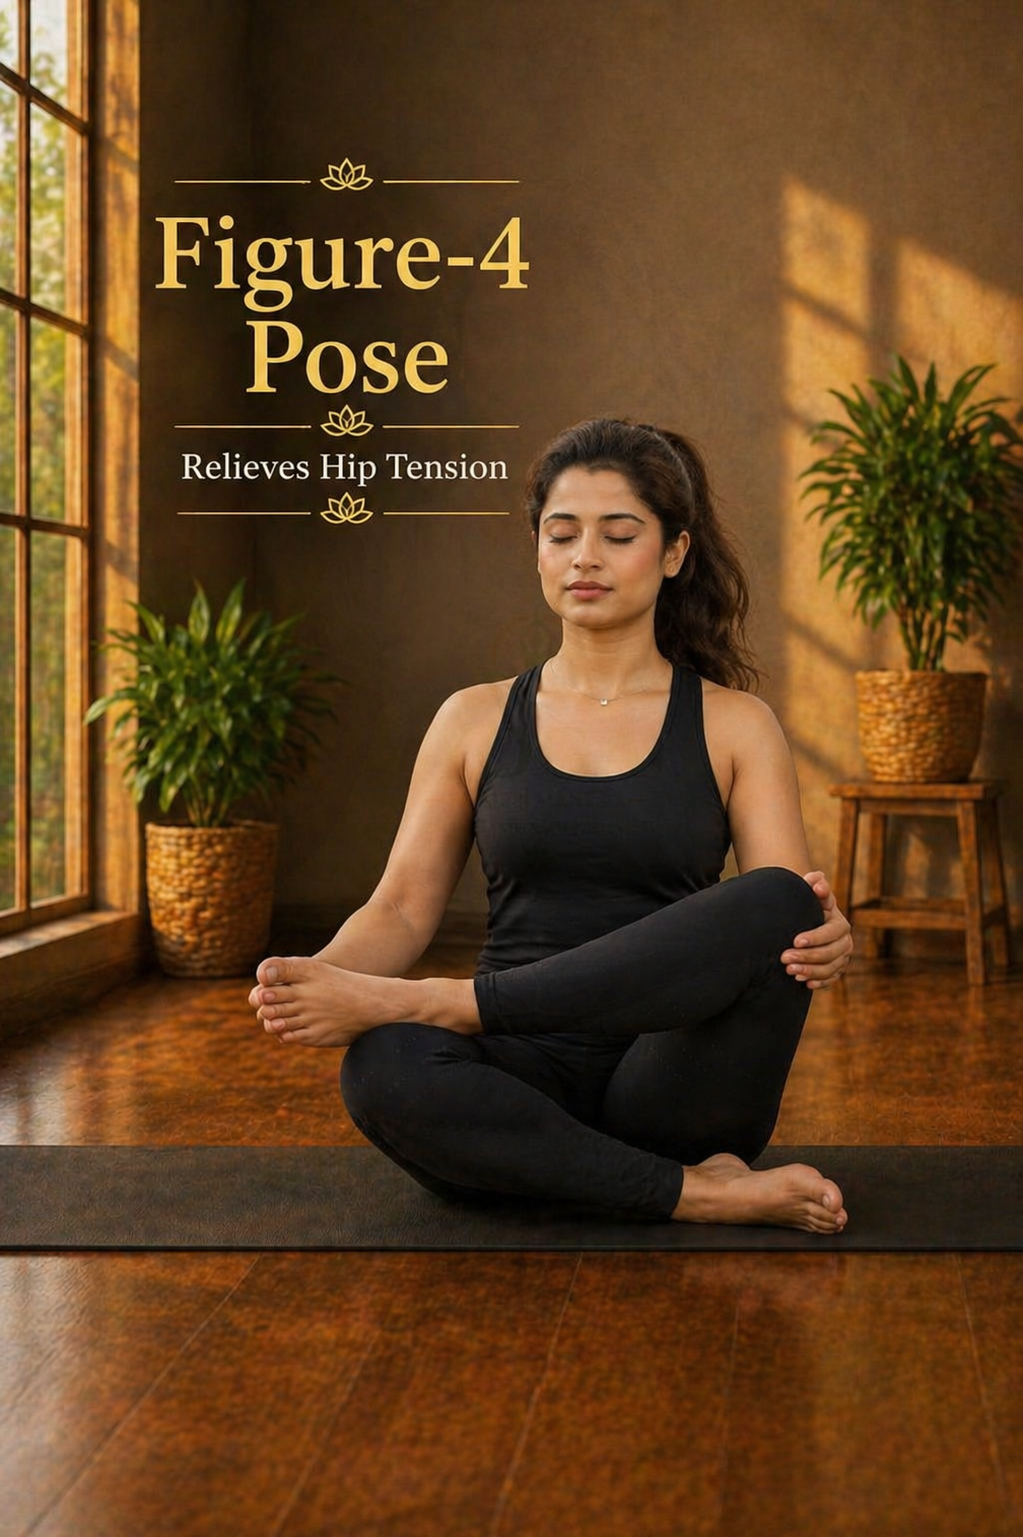
How to Do It:
- Sit comfortably on a cushion or folded blanket to keep your hips slightly elevated.
- Keep your spine straight and your shoulders relaxed.
- Place one ankle over the opposite knee, forming a figure-4 shape.
- Allow the top knee to gently move toward the floor.
- If the stretch feels intense, place a yoga block or cushion under the top foot for support.
- Keep your chest lifted and avoid leaning forward too much.
Breathing Pattern:
- Breathe slowly and deeply.
- With each exhale, allow your body to soften into the stretch.
Duration:
- Hold the pose for 30 seconds on each side.
Benefits:
- Helps ease hip stiffness and joint discomfort
- Stretches the gluteal muscles
- Supports lower back relaxation
- Improves overall hip mobility and flexibility
Safety Tips:
- Avoid pressing the knee down forcefully.
- Use support if your hips feel tight or restricted.
- Keep the movement gentle and within a comfortable range.
Practicing this gentle hip-opening stretch regularly can help improve mobility and gradually reduce tension in the lower body.
15. Savasana – Corpse Pose (With Knee Support)
Savasana (Corpse Pose) may look simple, but it is one of the most important parts of any yoga practice—especially for joint recovery. This supported variation allows the body to fully relax, helping muscles and joints release tension and recover naturally.
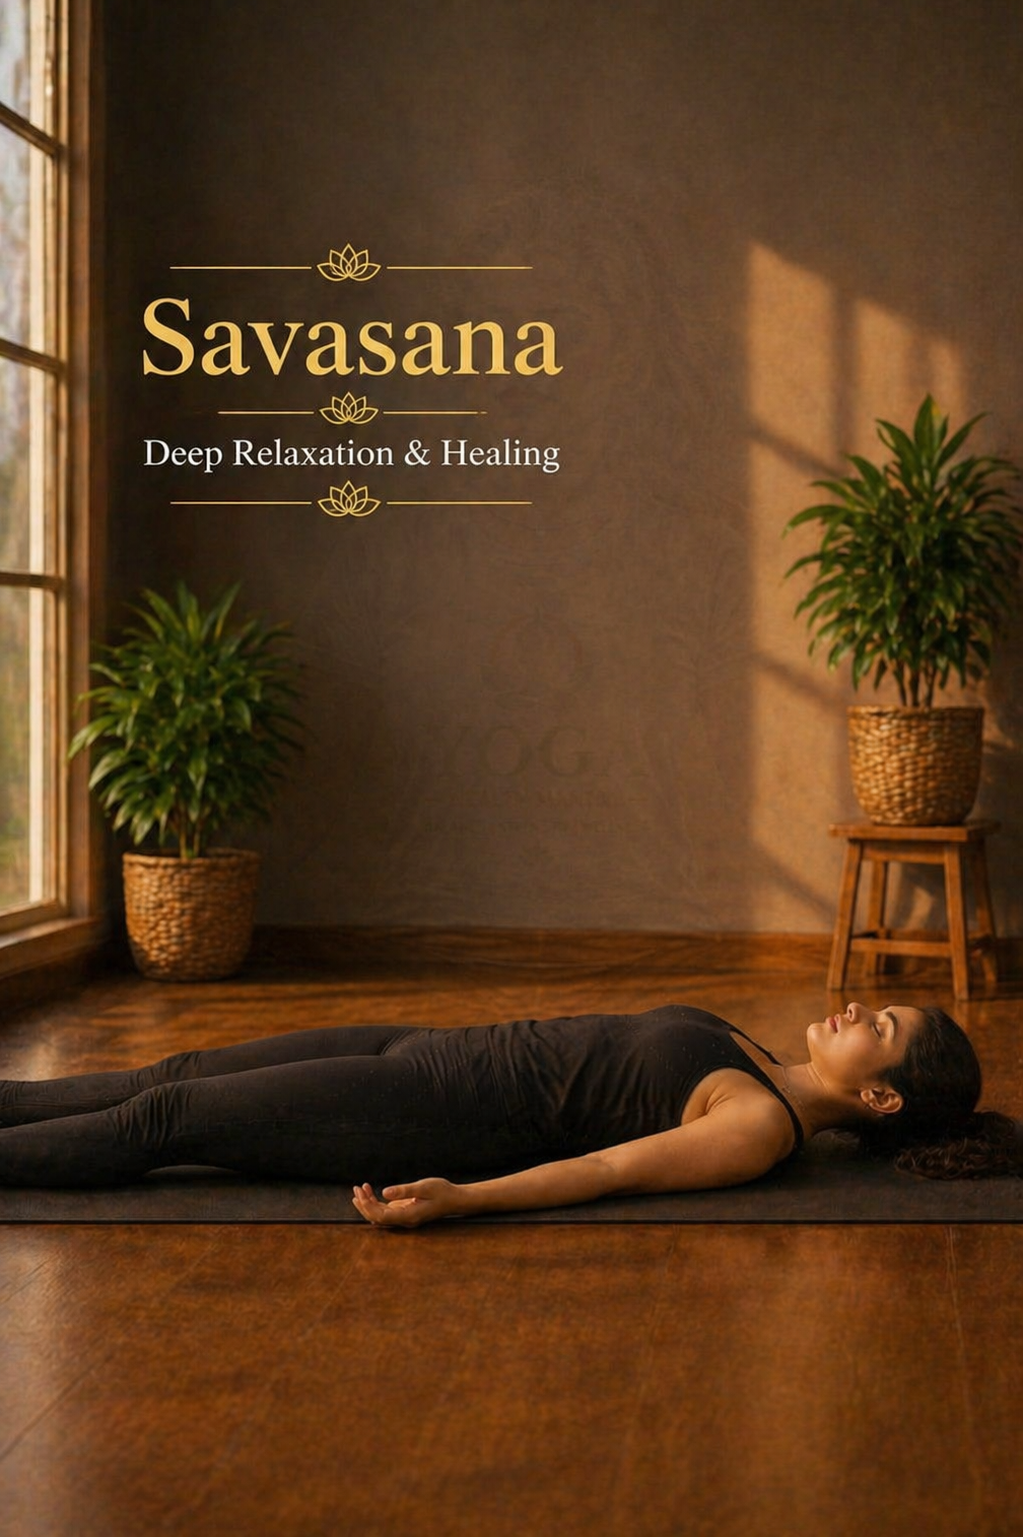
How to Do It:
- Lie comfortably on your back on a yoga mat.
- Place a rolled blanket or cushion under your knees to reduce pressure on the lower back.
- Keep a pillow under your head for neck support.
- Let your arms rest beside your body with palms facing upward.
- Close your eyes and allow your whole body to relax.
- Release all effort and remain completely still.
Breathing Pattern:
- Breathe naturally without trying to control the breath.
- Stay aware of slow, gentle breathing.
Duration:
- Stay in this pose for 5 to 10 minutes.
- This is the most important phase for relaxation and recovery.
Benefits:
- Promotes full-body relaxation
- Helps reduce stress and inflammation
- Supports lowering of cortisol (stress hormone)
- Allows the body to recover and restore energy
Safety Tips:
- Use proper support under the knees and head for comfort.
- Avoid falling asleep—stay gently aware and relaxed.
- If lying flat feels uncomfortable, slightly elevate the upper body.
This final relaxation phase is essential, as it allows the body to absorb the benefits of your practice and supports overall recovery.
20-Minute Daily Yoga Routine for Arthritis
A simple and consistent routine can make a meaningful difference in managing joint stiffness and improving mobility. This 20-minute yoga routine is designed to gently activate the body, improve flexibility, and support overall joint health without putting extra strain on the joints.
Practice this sequence 5 to 6 days a week for the best results. On days when pain or stiffness feels higher than usual, you can keep it light by doing gentle movements (poses 1 to 5) followed by Savasana for relaxation and recovery.
| Step | Pose | Duration | Focus Area |
|---|---|---|---|
| 1 | Neck + Wrist + Ankle Rotations | 2 minutes | Warm-up joints |
| 2 | Seated Cat-Cow | 1 minute | Spine |
| 3 | Child’s Pose (Supported) | 1.5 minutes | Lower back, hips |
| 4 | Tabletop Cat-Cow | 1 minute | Mid back, shoulders |
| 5 | Gentle Cobra | 45 seconds | Spine extension |
| 6 | Supported Bridge | 1 minute | Hips, knees, back |
| 7 | Reclining Hand-to-Toe (Strap) | 2 minutes (both sides) | Hamstrings, knees |
| 8 | Chair Warrior I | 2 minutes | Hips, thighs |
| 9 | Legs-Up-The-Wall | 3 minutes | Legs, circulation |
| 10 | Savasana (Knee Support) | 5 minutes | Full relaxation |
This routine is simple, practical, and easy to follow, making it suitable even for beginners. With regular practice, it can help ease stiffness, improve flexibility, and support smoother joint movement throughout the day.
To build long-term consistency and gradually improve your practice, you can also explore a daily yoga routine for beginners, which focuses on steady progression and balanced movement.
2 Breathing Techniques to Reduce Arthritis Inflammation
Breathing plays a powerful role in calming the body and supporting overall joint health. When your breath becomes slow and steady, it helps relax the nervous system, reduce stress levels, and may even support better inflammation control.
These two simple breathing techniques are easy to practice, beginner-friendly, and can be done anywhere. When combined with gentle movement, they can enhance the overall benefits of your yoga routine and help you feel more relaxed and comfortable.
1. Diaphragmatic Breathing (Belly Breathing)
Diaphragmatic breathing, also known as belly breathing, is one of the simplest and most effective ways to relax the body and support natural recovery. It encourages deeper breathing by engaging the diaphragm instead of shallow chest breathing, which is often linked to stress and tension.
This technique is especially helpful for arthritis, as it helps calm the nervous system, ease stress-related tension, and improve oxygen flow throughout the body.

How to Do It:
- Lie comfortably on your back on a yoga mat or bed.
- Place one hand on your chest and the other on your belly.
- Keep your body relaxed, shoulders soft, and eyes closed.
- Inhale slowly through your nose for about 4 seconds.
- Feel your belly rise while your chest remains mostly still.
- Exhale slowly through your nose for about 6 seconds.
- Allow your belly to gently fall back toward the spine.
- Continue this slow and steady breathing pattern.
Breathing Rhythm:
- Inhale: 4 seconds (belly expands)
- Exhale: 6 seconds (belly relaxes)
Duration:
- Practice for 8 to 10 rounds or about 3 to 5 minutes.
Why It Works:
- Activates the body’s natural relaxation response
- Helps lower stress hormone levels
- May support reducing inflammation over time
- Improves oxygen supply to muscles and joints
Benefits:
- Helps reduce pain perception and tension
- Calms the mind and nervous system
- Supports better sleep and recovery
- Enhances overall relaxation
Safety Tips:
- Avoid forcing the breath — keep it natural and comfortable.
- If you feel dizzy, pause and return to normal breathing.
- Practice in a quiet, relaxed environment for better focus.
Practicing this simple breathing technique daily can support relaxation, reduce stress, and enhance the overall benefits of your yoga routine.
2. Nadi Shodhana (Alternate Nostril Breathing)
Nadi Shodhana, or alternate nostril breathing, is a calming pranayama technique that helps bring balance to the body and mind. It is especially useful for arthritis, as it may help reduce stress, which can otherwise increase discomfort and sensitivity in the joints.
This practice supports the nervous system, improves focus, and promotes a sense of inner calm — all of which contribute to better overall well-being over time.
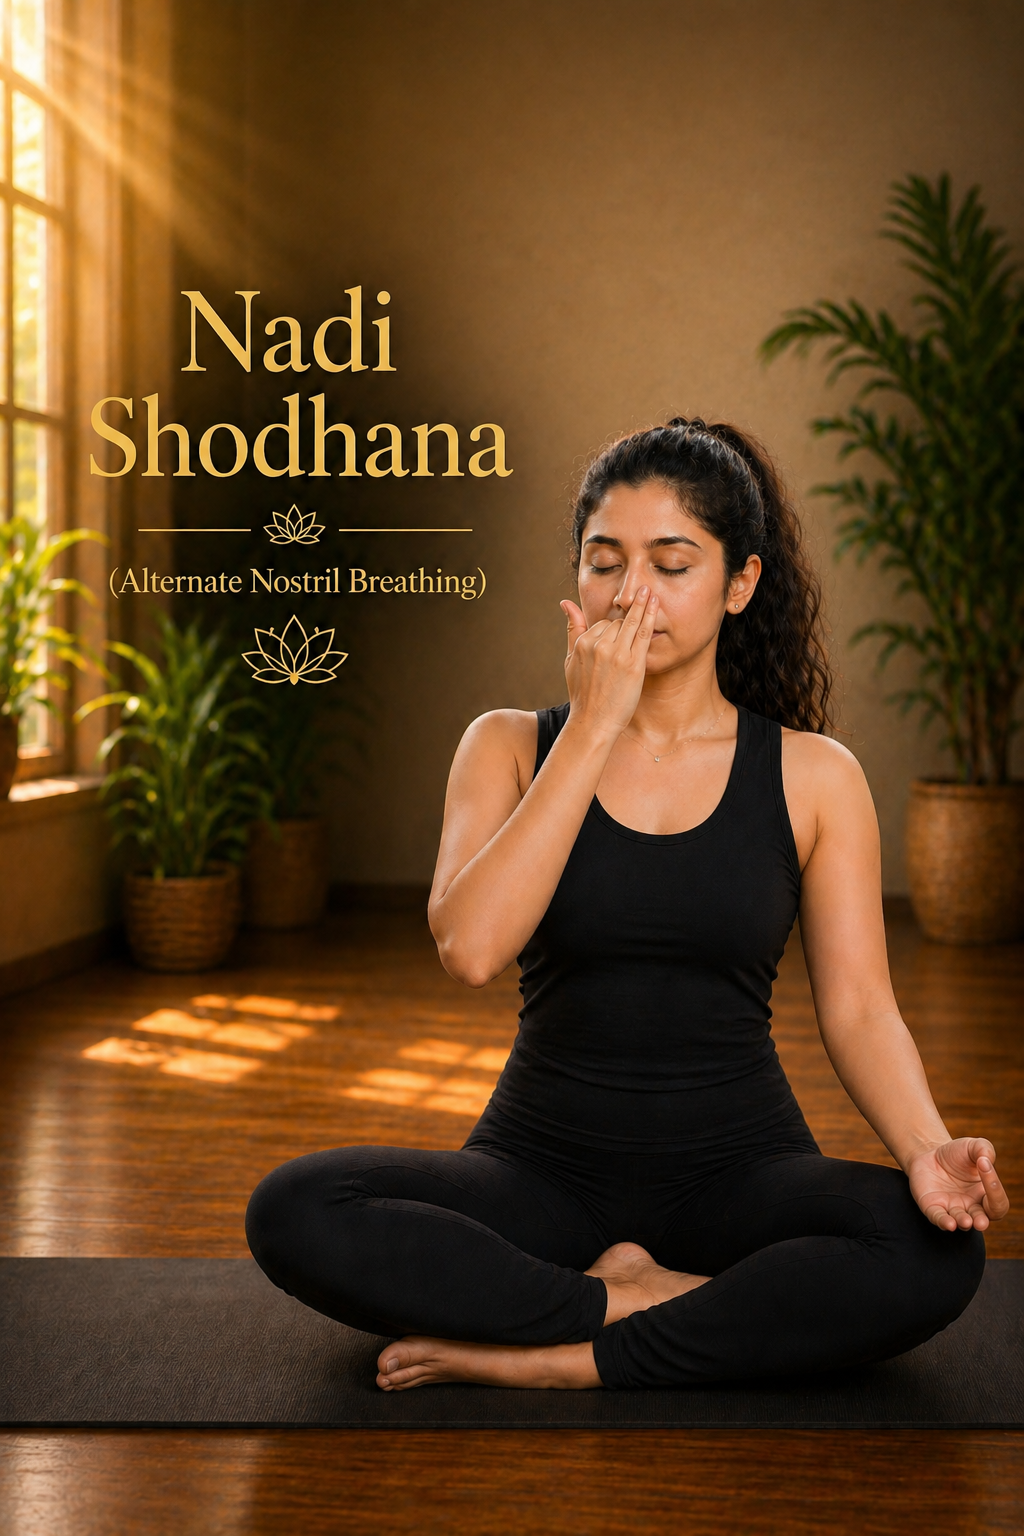
How to Do It:
- Sit comfortably in a cross-leg position or on a chair with your spine straight.
- Relax your shoulders and keep your body steady.
- Place your left hand on your knee in a relaxed position.
- Use your right hand in Vishnu Mudra (fold the index and middle fingers, and use the thumb and ring finger).
- Close your right nostril with your thumb.
- Inhale slowly through your left nostril.
- Close the left nostril with your ring finger and release the right nostril.
- Exhale slowly through the right nostril.
- Now inhale through the right nostril, then switch sides and exhale through the left.
- Continue this alternating pattern in a smooth and steady rhythm.
Breathing Pattern:
- Inhale from one nostril → Exhale from the other
- Keep the breath slow, steady, and relaxed
Duration:
- Practice for 3 to 5 minutes, or longer if comfortable.
Benefits:
- Helps balance the nervous system
- Reduces stress and mental tension
- Supports emotional calmness and focus
- May help ease arthritis-related discomfort
Safety Tips:
- Avoid forcing the breath — keep it gentle and natural.
- If you feel uncomfortable, return to normal breathing.
- Practice in a quiet, distraction-free environment.
Practicing this technique regularly can promote relaxation and help maintain a calm, balanced state of mind.
Chair Yoga for Severe Arthritis (If You Cannot Get on Floor)
If standing, kneeling, or getting down on the floor feels uncomfortable, chair yoga can be a safe and practical alternative. It allows you to stay active, improve mobility, and reduce stiffness — all without placing extra pressure on sensitive joints.
Use a sturdy, armless chair and sit with your feet flat on the floor. Keep your spine upright, shoulders relaxed, and movements slow and controlled. Even a short, consistent practice can make a noticeable difference over time.
Simple Chair Yoga Movements:
- Chair Cat-Cow: Sit upright with hands on knees. Inhale as you gently arch your back and open the chest, then exhale as you round your spine. Move slowly with your breath.
- Seated Forward Fold: Sit tall, then slowly exhale and fold forward over your thighs. Let your arms relax naturally. Avoid forcing the stretch.
- Seated Twist: Sit upright and gently rotate your torso to one side. Hold the back of the chair for support. Repeat on the other side with control.
- Ankle Pumps: While seated, move your feet up and down in a slow, rhythmic motion. Repeat for 15 to 20 repetitions.
- Shoulder Rolls: Roll your shoulders forward in a circular motion 10 times, then repeat backward 10 times.
Benefits:
- Improves joint mobility and flexibility
- Helps reduce morning stiffness
- Supports better blood circulation
- Allows safe movement without strain on knees or hips
Even 10 minutes of chair yoga daily can help reduce stiffness and improve comfort in everyday activities. The key is consistency — gentle, regular movement is far more effective than occasional intense effort.
Gentle yoga practices are widely recognized for their supportive role in managing joint discomfort. As highlighted by the National Center for Complementary and Integrative Health (NCCIH), regular yoga practice may help improve physical function and support pain management when practiced consistently.
7 Lifestyle Habits That Amplify Yoga Benefits for Joints
Yoga works best when supported by the right daily habits. Simple lifestyle changes can make a meaningful difference in improving joint health, reducing discomfort, and enhancing the overall benefits of your practice.
- Follow an anti-inflammatory diet: Include natural foods like turmeric, ginger, green leafy vegetables, and omega-3 rich foods such as walnuts and flaxseeds. These can help support the body’s natural inflammation balance.
- Stay hydrated: Drinking enough water helps keep joints lubricated and supports cartilage health, which may reduce stiffness and discomfort.
- Use heat therapy before yoga: A warm shower or heating pad for 10 minutes can help relax stiff joints and prepare your body for gentle movement.
- Apply ice after activity: If any joint feels swollen or warm after exercise, applying an ice pack for about 10 minutes may help ease discomfort.
- Maintain a healthy weight: Extra body weight puts additional pressure on joints. Even small weight changes can help reduce stress on the knees and hips over time.
- Prioritize sleep: Getting 7 to 8 hours of quality sleep supports natural recovery, tissue repair, and overall healing.
- Practice mindfulness and relaxation: Stress can increase pain sensitivity. Simple relaxation techniques and mindful breathing can help calm the mind and support better pain management.
When combined with regular yoga practice, these healthy habits can play an important role in managing joint discomfort and improving overall mobility. As highlighted by Harvard Health Publishing, low-impact activities and consistent movement can help reduce joint pain and support better joint function over time.
Frequently Asked Questions (Arthritis and Yoga)
Q1: Can yoga make arthritis worse?
Yoga is generally safe when practiced correctly. It may cause discomfort only if done with forceful stretching or high-impact movements. Gentle, modified poses with proper support can help reduce stiffness and improve mobility. Always avoid sharp pain and move within your comfort range.
Q2: How long until I feel relief?
Many people begin to notice reduced stiffness and better mobility within 1 to 2 weeks. More noticeable improvements in flexibility and overall comfort often take 6 to 8 weeks of regular practice.
Q3: Is hot yoga good for arthritis?
A warm environment can help relax stiff joints, but intense hot yoga (such as Bikram) may not be suitable for everyone. A mildly warm setting is usually a safer and more comfortable option.
Q4: Can yoga be practiced after joint replacement surgery?
Yes, yoga can be helpful after recovery, but only after 6 to 12 months of healing and under professional guidance. Avoid deep squats, extreme twists, and high-pressure movements unless approved by a physiotherapist.
Q5: Which yoga style is best for arthritis?
Gentle and slow-paced styles work best, such as Hatha, Yin (gentle), Restorative, and Chair Yoga. It is best to avoid fast-paced or intense styles during periods of active inflammation.
One Week Yoga Plan for Arthritic Joints
A structured weekly routine helps maintain consistency while giving your body enough time to recover and adapt. This balance is important for improving flexibility, strength, and overall joint comfort.
- Monday: Full 20-minute routine
- Tuesday: Breathing practice (15 minutes) + gentle poses (Child’s Pose, Cat-Cow, Ankle Rotations, Seated Twist, Savasana)
- Wednesday: Full 20-minute routine
- Thursday: Chair yoga (15 minutes) + Legs-Up-The-Wall
- Friday: Full 20-minute routine
- Saturday: Rest or gentle walking + breathing practice
- Sunday: Gentle, slow-paced practice (hold supported poses for 2 to 3 minutes)
This balanced approach keeps your joints active while also allowing proper recovery — which is essential for long-term comfort, flexibility, and mobility.
Final Thoughts: Your Joints Deserve Gentle Movement
Living with arthritis can make movement feel challenging at times, and it’s completely natural to want to avoid activity. However, gentle movement is exactly what your joints need to stay flexible, supported, and functional.
Yoga for arthritis is not about extreme flexibility or complicated poses. It is about moving with awareness, breathing deeply, and treating your body with patience and care. Even small, consistent efforts can lead to meaningful improvements over time.
You don’t need to do everything at once. Start with just 10 minutes a day. Use support when needed, adjust poses based on your comfort, and most importantly — listen to your body without judgment.
Progress may feel slow in the beginning, but every small step matters. Simple changes like moving more comfortably, feeling less stiffness, or handling daily tasks with ease are signs that your body is responding positively.
With regular practice over weeks and months, you may begin to notice better mobility, reduced discomfort, and greater confidence in your movements. Your joints respond best to consistency, gentle effort, and mindful care.
Start small, stay consistent, and give your body the time it needs — your joints will thank you.
Disclaimer: This content is intended for informational purposes only and should not be considered a substitute for professional medical advice, diagnosis, or treatment. Always consult a qualified healthcare professional before starting any new exercise or yoga routine, especially if you have an existing medical condition or are undergoing treatment.
