


Understanding Sciatica — The Nerve Pain You Didn’t Ask For
Have you ever felt a sharp pain starting from your lower back and gradually traveling down your leg?
That uncomfortable, sometimes burning sensation could be sciatica — a common nerve-related condition that many people experience.
Sciatica is not a disease on its own. Instead, it is a symptom that usually occurs when the sciatic nerve becomes irritated or compressed.
This is the longest nerve in the human body, starting from the lower spine, passing through the hips and buttocks, and running down the back of each leg.
When pressure is placed on this nerve, it can lead to pain ranging from mild discomfort to sharp, shooting sensations.
In many cases, the most common cause is a herniated or bulging disc in the lower spine, which presses on nearby nerve roots.
In older adults, conditions such as spinal stenosis (narrowing of the spinal canal) are often responsible.
Other factors like muscle tightness, joint issues, or inflammation around the pelvis can also contribute to nerve irritation.
Certain lifestyle habits can increase the risk of developing sciatica. Sitting for long hours, lifting heavy objects incorrectly, or repeating twisting movements
can place extra strain on the lower back. Being overweight or going through pregnancy may also affect spinal alignment and increase the chances of nerve-related discomfort.
According to NHS, sciatica is quite common, and many people experience it at least once in their lifetime.
The good news is that with the right approach — including gentle movement, stretching, and awareness of posture — this condition can often be managed effectively.
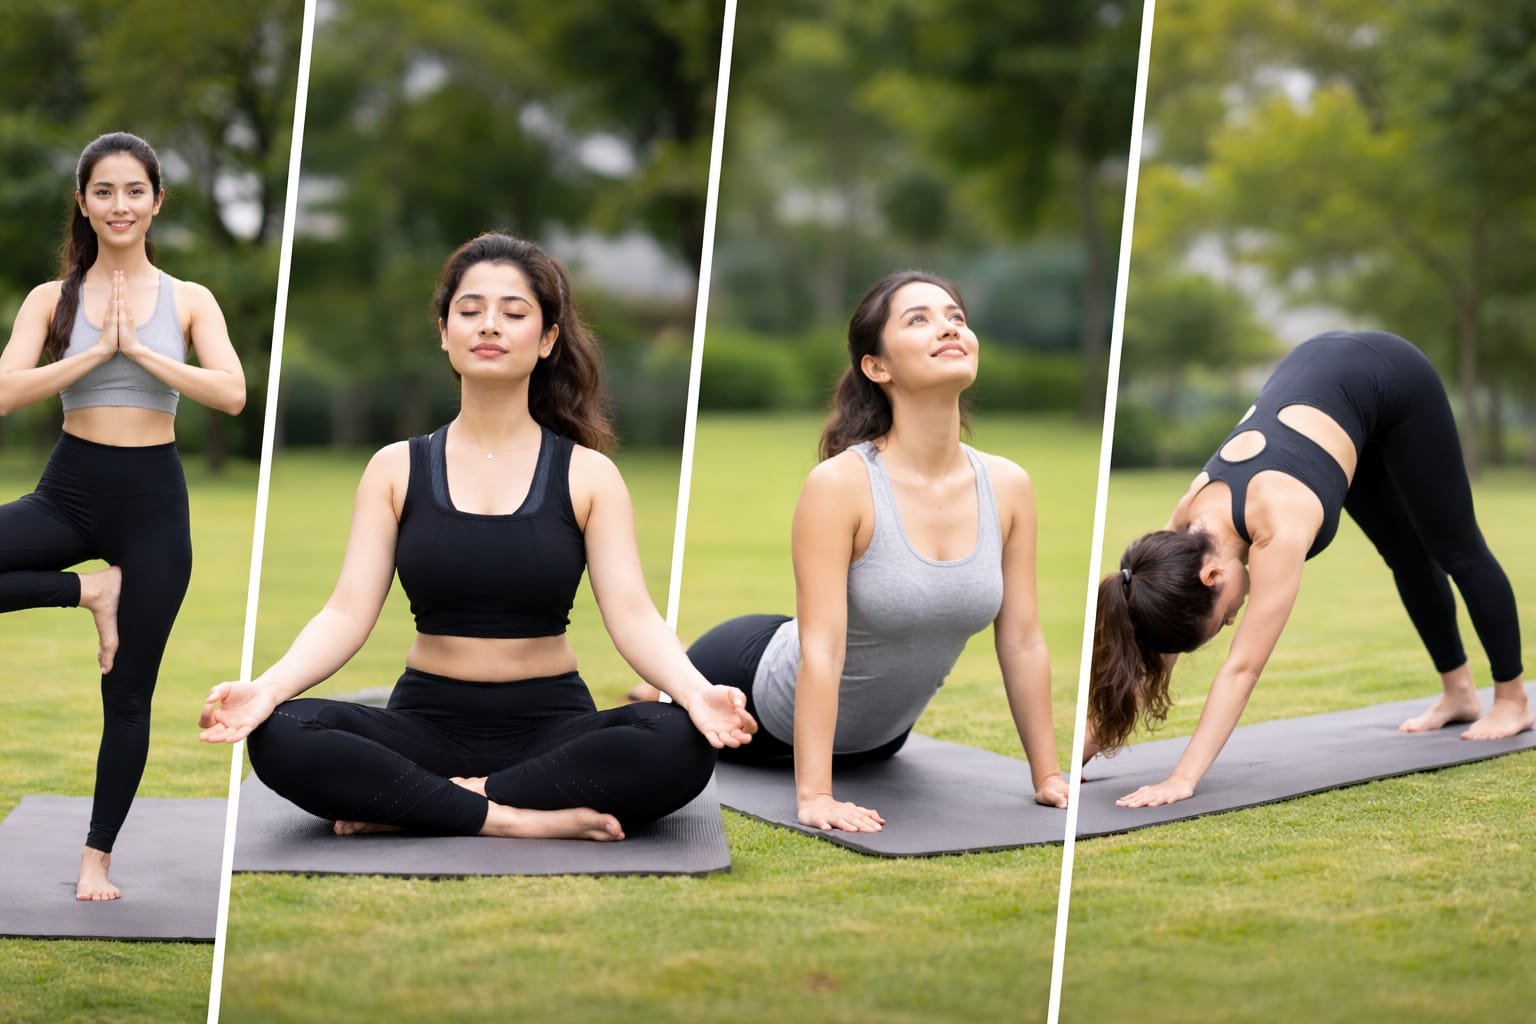
If you are new to yoga, it is helpful to first understand the basics and build a strong foundation before moving on to more targeted poses.
You can explore our beginner’s yoga guide to start your practice safely and confidently.
Why Yoga Works for Sciatica: A Scientific Perspective
You might be wondering — can something as simple as yoga really help with sciatica pain?
The answer is encouraging. Recent research suggests that gentle, consistent movement can play an important role in supporting recovery and reducing nerve-related discomfort over time.
In recent years, structured yoga and movement-based practices have been associated with improvements in pain levels, flexibility, and day-to-day function.
With regular practice, many individuals also experience reduced stiffness and better overall mobility.
So, how does yoga actually work for sciatica? It’s not just about stretching — it supports your body in multiple ways:
- Improves spinal alignment: Gentle movements may help create space around the nerve roots, which can reduce pressure on the sciatic nerve.
- Increases flexibility: Tight muscles in the hamstrings, hips, and lower back can affect spinal movement. Yoga helps release this tension gradually and safely.
- Strengthens core muscles: A stronger core supports the lower back and reduces unnecessary strain during everyday activities.
- Supports relaxation: Yoga helps calm the nervous system, which may lower overall tension and improve comfort.
In most cases, healthcare professionals recommend a conservative approach for sciatica, especially in the early stages.
This often includes rest, guided movement, and physical therapy. Yoga fits naturally into this approach, as it combines gentle stretching with relaxation and improved body awareness.
Scientific evidence also supports the role of exercise-based therapy in managing chronic low back conditions, which are closely linked to sciatica.
For example, findings from peer-reviewed research show that consistent movement can improve both pain levels and functional ability over time.
You can explore this in more detail through this clinical study on exercise-based therapy for chronic back pain, which highlights the benefits of structured physical activity as part of recovery.
Along with physical movement, breathing practices can also support relaxation and nervous system balance.
Controlled breathing helps calm the body, reduce stress, and improve overall comfort during recovery.
You can explore this further in our guide to pranayama breathing techniques, which explains how simple breathwork can enhance your yoga practice.
A Critical Distinction: Discogenic Sciatica vs. Piriformis Syndrome
When it comes to sciatica, one important thing to understand is this — not all pain is the same.
The underlying cause of your symptoms can vary, and that directly affects which yoga approach will actually help you.
In simple terms, most cases of sciatica fall into two common types: disc-related (discogenic) and muscle-related (piriformis syndrome).
Understanding this difference can help you practice more safely and choose the right movements for your body.
| Feature | Discogenic Sciatica | Piriformis Syndrome |
|---|---|---|
| Primary Cause | Bulging or herniated disc in the lower spine | Tight or overactive piriformis muscle |
| Compression Area | Near the nerve root in the lumbar spine | In the buttock region where the nerve passes |
| Common Triggers | Forward bending, prolonged sitting | Hip pressure, prolonged sitting, internal rotation |
| Yoga Focus | Spinal support, gentle back extension | Hip opening and muscle release |
If your sciatica is disc-related, the main goal is to protect the spine.
Avoid deep forward bends, as they may increase pressure on the discs.
Instead, focus on gentle back extensions and core-strengthening movements that support the lower back.
On the other hand, if the issue is related to the piriformis muscle, the approach is different.
Here, tight muscles in the hips may be putting pressure on the nerve.
In this case, hip-opening stretches can be especially helpful.
For example, poses like pigeon pose and gentle glute stretches can help release tension and improve mobility.
If you are unsure about your condition, it’s always best to begin with simple, beginner-friendly movements and progress gradually.
For a safer approach, you can refer to our yoga for back pain relief guide, which focuses on gentle exercises and proper alignment.
The Best Yoga Poses for Sciatica Relief: Detailed Guide
If you are dealing with sciatica pain, how you practice yoga matters just as much as the poses themselves. Many people tend to push too hard, expecting faster results — but in reality, a gentle and consistent approach works far more effectively.
A simple rule to remember: yoga should never cause sharp or shooting pain. A mild stretching sensation is completely normal, but if you feel nerve-related discomfort, it’s a clear signal to pause and adjust your posture. If you are unsure about your form, move slowly and stay within a range that feels safe and controlled.
The poses below are carefully selected to help release tension, improve mobility, and support natural relief from sciatica discomfort. Take your time with each movement, focus on your breathing, and allow your body to progress gradually without forcing any position.
1. Reclining Hand-to-Big-Toe Pose (Supta Padangusthasana)
Target: Hamstrings, glutes, and lower back
This pose is one of the safest and most effective stretches for sciatica, especially if tight hamstrings or lower back stiffness are causing discomfort.
Since your body stays supported on the floor, it allows you to stretch without placing unnecessary pressure on the spine.
If you often feel pulling or tightness in the back of your legs, this stretch can help release that tension and improve overall mobility.
With regular practice, it may also support better posture and reduce strain on the lower back.
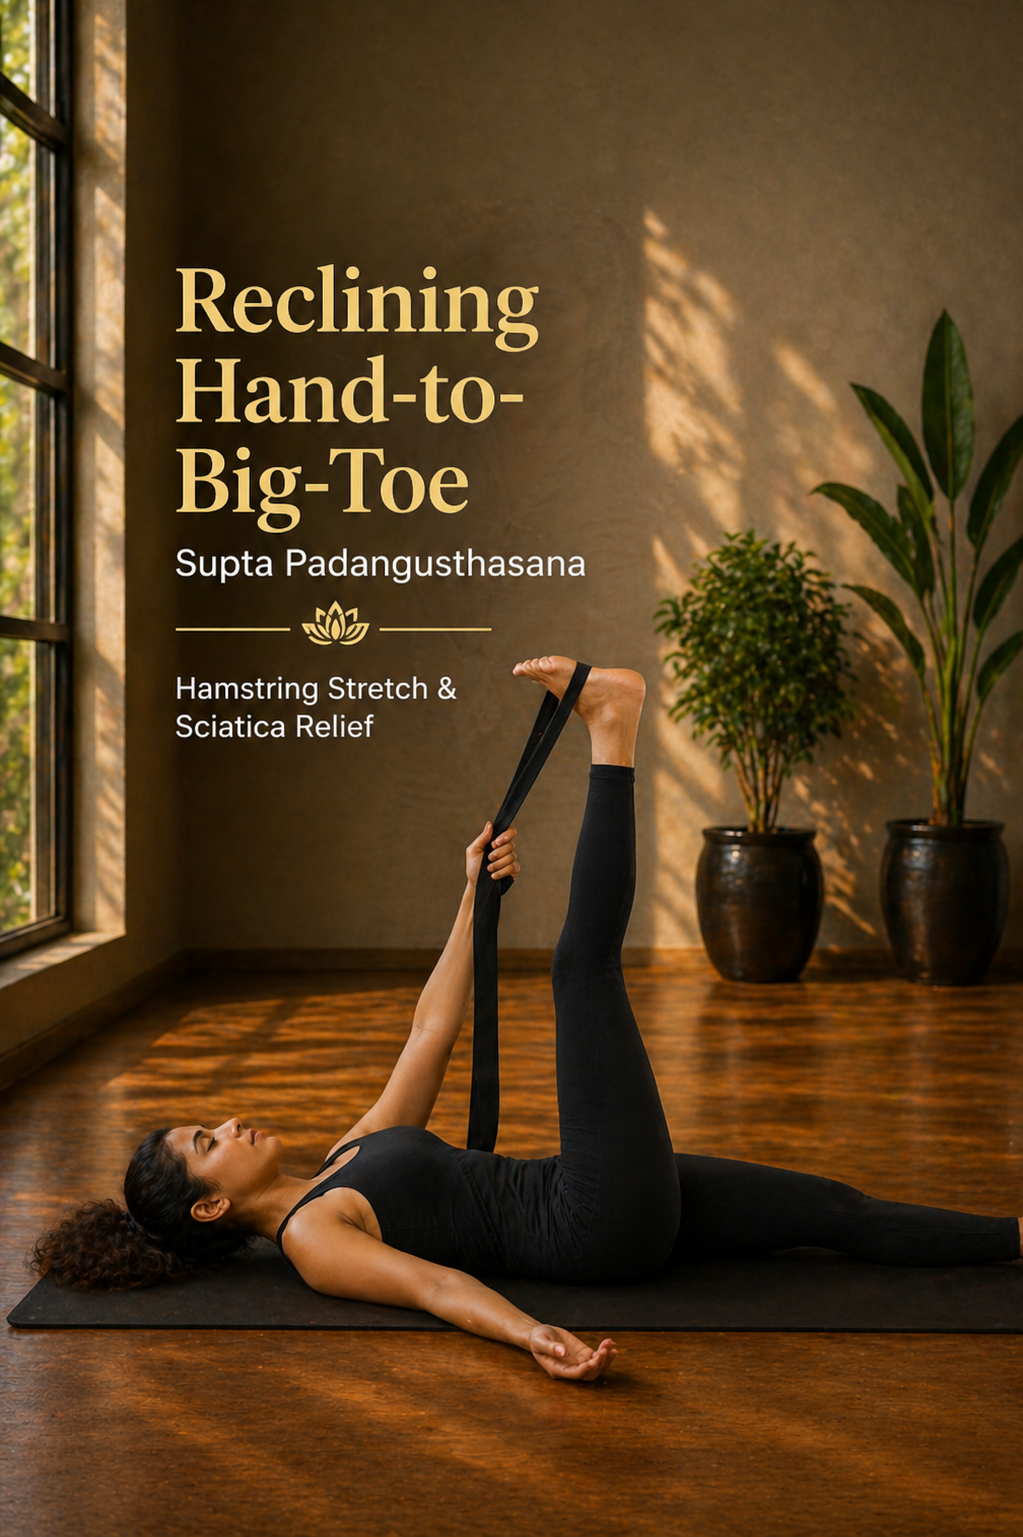
How to Practice
- Lie comfortably on your back with both legs extended and your spine relaxed.
- Loop a yoga strap, belt, or towel around the arch of your right foot.
- Keep your left leg straight and gently press it into the floor for stability.
- Slowly lift your right leg upward toward the ceiling while keeping the knee straight.
- Hold the strap firmly but avoid pulling too hard — keep the movement controlled.
- Make sure your hips stay level and grounded — do not lift one side of your pelvis.
- Breathe slowly and deeply while holding the stretch for 30–60 seconds.
- Lower your leg gently and repeat on the other side.
Helpful Tips for Better Practice
- If your hamstrings feel tight, slightly bend the raised leg instead of forcing it straight.
- Use a longer strap or towel to keep the stretch comfortable and controlled.
- Keep your shoulders relaxed and avoid lifting your upper body.
- Focus on steady breathing to help your muscles relax naturally.
Why It Helps with Sciatica
- Gently stretches tight hamstrings that may pull on the lower back.
- Reduces tension in the hips and glutes.
- Supports better alignment of the pelvis and spine.
- Helps ease pressure around the sciatic nerve.
Tip: The goal is not to lift your leg as high as possible, but to feel a comfortable stretch without pain.
Always stay within a range that feels safe for your body.
For better results, practice this movement in a calm and relaxed state, allowing your muscles to release tension naturally.
2. Child’s Pose (Balasana)
Target: Lower back relaxation and gentle spinal stretch
Child’s Pose is one of the most calming and beginner-friendly yoga poses for sciatica relief.
It helps your body slow down, relax the lower back, and gently release tension around the hips and spine.
If your lower back feels stiff after sitting for a long time, this pose can feel like a gentle reset.
Because the body stays supported close to the floor, it allows the spine to relax without adding extra pressure on the joints.
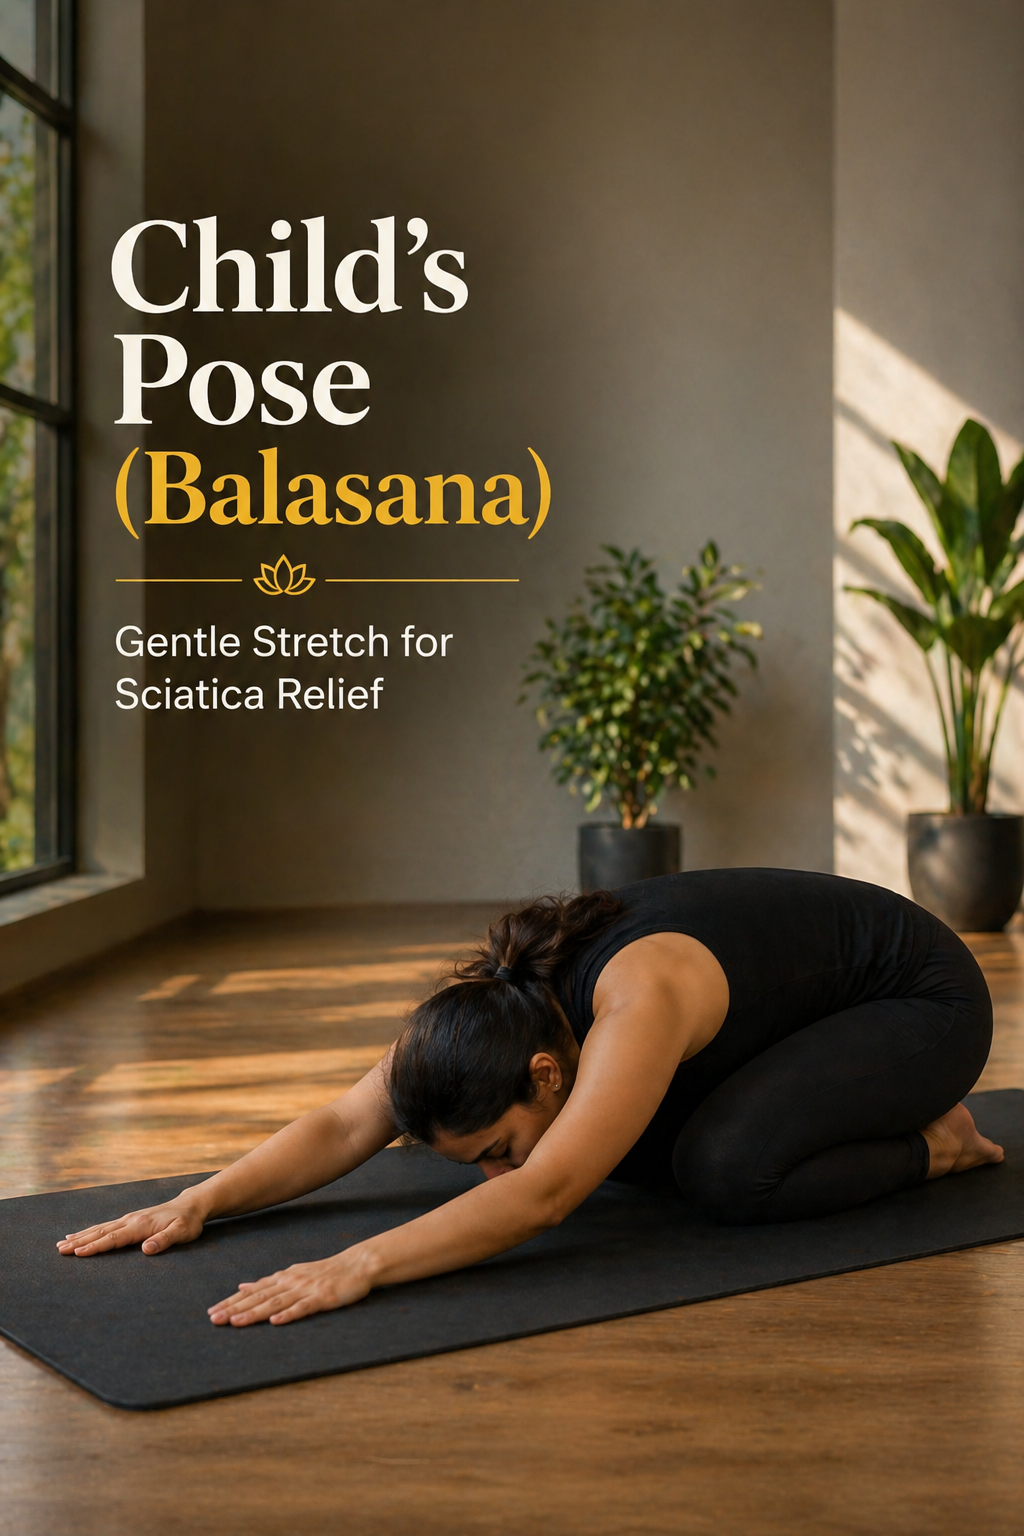
How to Practice
- Kneel down on your yoga mat with your big toes touching and knees slightly apart.
- Slowly move your hips back toward your heels.
- Gently fold your upper body forward, allowing your chest to rest toward your thighs.
- Place your forehead comfortably on the mat, a folded towel, or a yoga block.
- Extend your arms forward for a deeper stretch, or keep them relaxed beside your legs.
- Relax your shoulders, soften your lower back, and breathe slowly.
- Hold the pose for 30–60 seconds, or a little longer if it feels comfortable.
Helpful Tips for Better Practice
- Do not force your hips to touch your heels if your knees or hips feel uncomfortable.
- Keep your breathing slow and steady to help the lower back release tension naturally.
- If your forehead does not reach the mat, use a pillow, folded blanket, or yoga block for support.
- Keep the pose soft and relaxing — this is not a strength-focused posture.
Helpful Variations for Sciatica
- Place a cushion or folded blanket between your thighs and calves if your knees or hips feel tight.
- Widen your knees slightly to create more space for your torso and reduce lower back pressure.
- Use a bolster or pillow under your chest for a more restorative version.
- If stretching the arms forward feels too intense, keep your arms relaxed beside your body.
Why It Helps with Sciatica
- Gently relaxes the lower back muscles.
- Helps release tension around the hips and pelvis.
- Supports gentle spinal decompression without strain.
- Calms the nervous system and promotes relaxation.
Tip: This pose should feel comfortable and soothing. If you feel sharp pain, tingling, or increased nerve discomfort, slowly come out of the pose and adjust your position.
Since relaxation plays a key role in recovery, you can also explore simple practices for reducing stress and calming the body to support overall healing.
3. Cat–Cow Stretch (Marjaryasana–Bitilasana)
Target: Spinal mobility and core awareness
Cat–Cow is one of the most effective and beginner-friendly movements to gently loosen up the spine.
If your lower back feels stiff, tight, or uncomfortable due to long sitting hours, this stretch can help restore natural movement.
Unlike static poses, this stretch involves slow and controlled motion.
It helps improve circulation around the spine and reduces stiffness in the lower back, making it an ideal warm-up before deeper stretches.
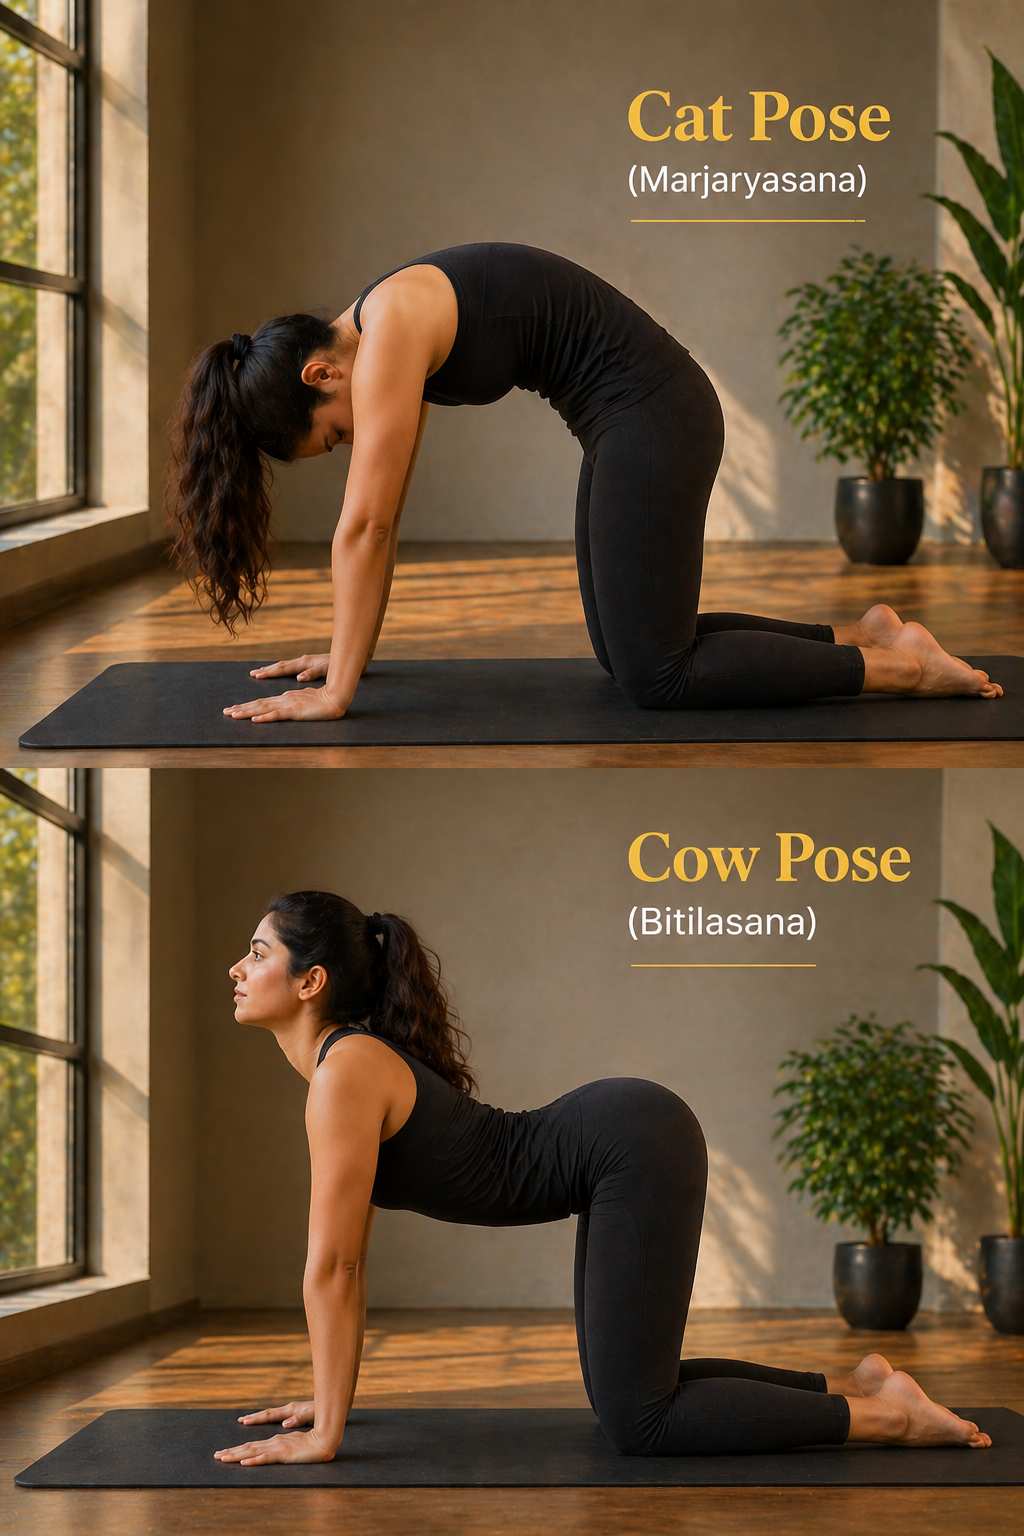
How to Practice
- Start in a tabletop position with your hands and knees on the mat.
- Place your wrists directly under your shoulders and your knees under your hips.
- Keep your arms straight but relaxed, and maintain a neutral spine.
- As you inhale, gently drop your belly toward the floor, lift your chest forward, and raise your tailbone upward (Cow Pose).
- As you exhale, slowly round your spine upward, draw your belly in, and tuck your chin toward your chest (Cat Pose).
- Move smoothly between these two positions, coordinating each movement with your breath.
- Continue this flow for 8–10 slow, controlled cycles.
Helpful Tips for Better Practice
- Keep the movement smooth and controlled — avoid fast or jerky transitions.
- Let your breath guide the rhythm of the movement.
- Stay within a comfortable range of motion; do not force the stretch.
- Keep your shoulders stable and avoid collapsing into your arms.
Why It Helps with Sciatica
- Improves flexibility and mobility in the spine and lower back.
- Reduces stiffness caused by prolonged sitting.
- Supports better posture and spinal alignment.
- Helps relax muscles around the hips and pelvis.
Tip: If you feel any discomfort in your wrists, place a folded towel under your palms for extra support.
This movement works best as a gentle warm-up before practicing other yoga poses.
4. Downward-Facing Dog (Adho Mukha Svanasana)
Target: Full-body stretch, hamstrings, calves, and core engagement
Downward-Facing Dog is one of the most well-known yoga poses, and it’s easy to understand why.
It provides a deep, full-body stretch while also helping to build strength in the arms, shoulders, and core.
For individuals experiencing sciatica, this pose can be particularly beneficial.
It gently lengthens the spine and helps release tightness in the hamstrings and calves — areas that often contribute to lower back discomfort and nerve irritation.
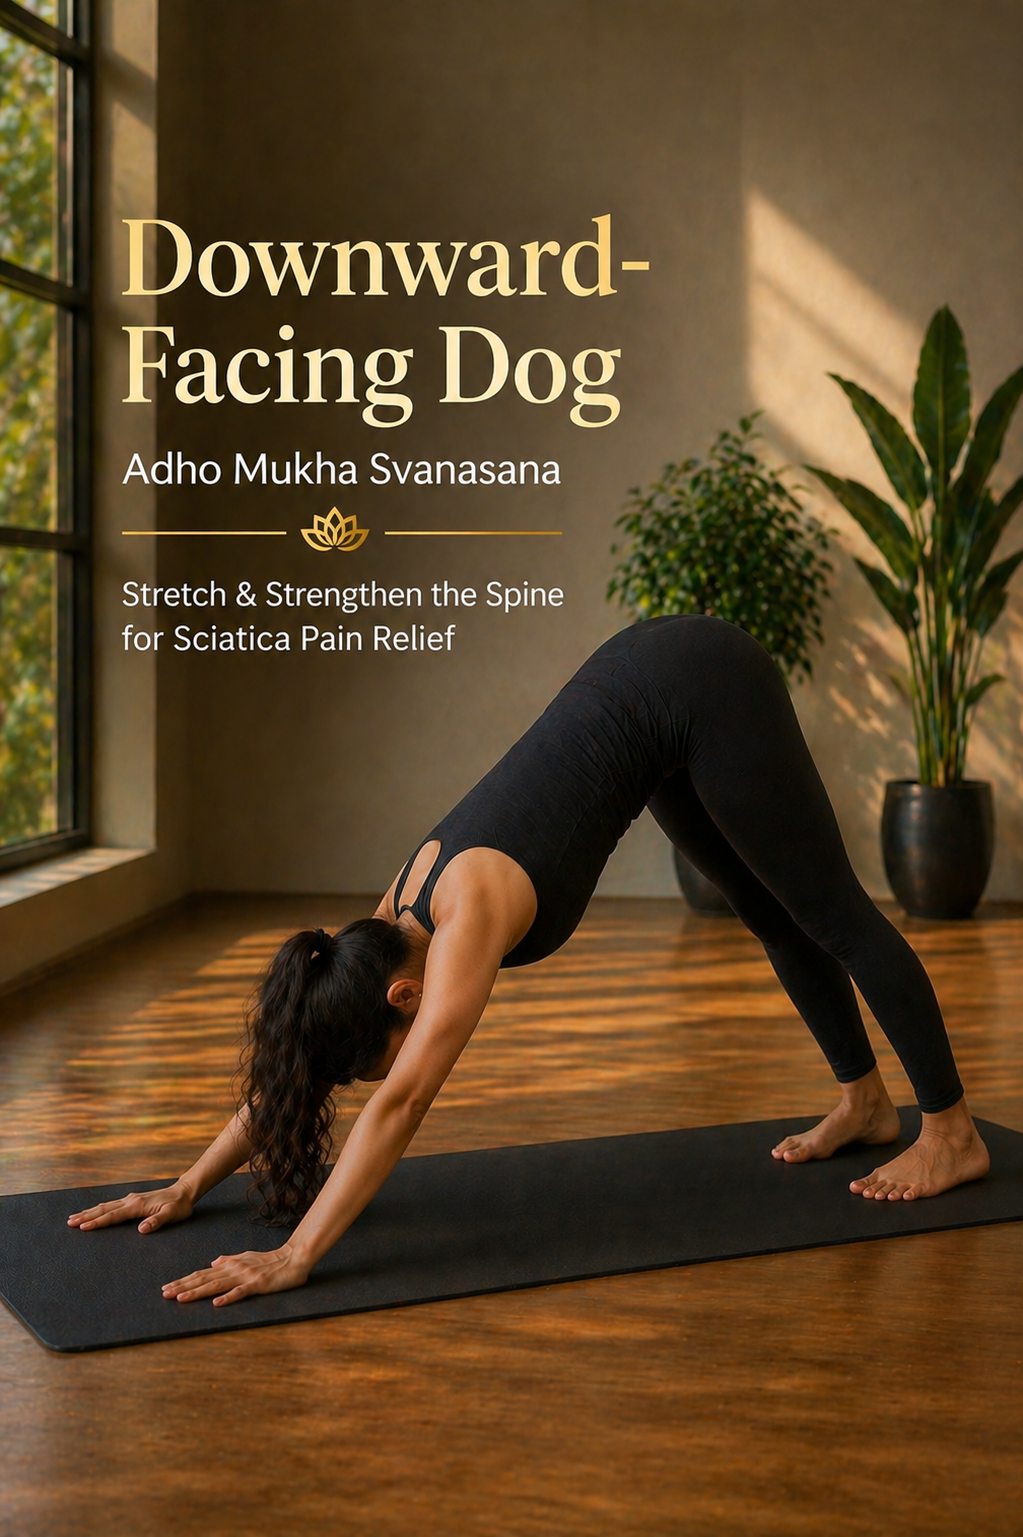
How to Practice
- Begin in a tabletop position with your hands and knees on the mat.
- Place your hands shoulder-width apart and spread your fingers wide for better support.
- Tuck your toes under and slowly lift your hips upward toward the ceiling.
- Form an inverted “V” shape with your body.
- Keep your arms straight and press your hands evenly into the mat.
- Allow your head to relax naturally between your arms, with your gaze toward your legs or the floor.
- Focus on lengthening your spine rather than forcing your legs completely straight.
- Hold the pose for 30–60 seconds while maintaining slow, steady breathing.
Helpful Tips for Better Practice
- Slightly bend your knees if your hamstrings feel tight to reduce strain on the lower back.
- Prioritize spine length over pushing your heels down toward the floor.
- Distribute your weight evenly between your hands and feet.
- Keep your shoulders active and avoid collapsing into your arms.
Beginner-Friendly Modifications
- Maintain a comfortable bend in your knees to make the posture more accessible.
- Keep your heels lifted — there is no need to force them to touch the floor.
- If you experience wrist discomfort, place a folded towel or yoga mat under your palms for support.
Why It Helps with Sciatica
- Gently stretches tight hamstrings that may pull on the lower back.
- Supports spinal lengthening and mild decompression.
- Strengthens the core muscles, which help stabilize the lower back.
- Improves overall flexibility and body awareness.
Tip: This pose should feel like a gentle stretch, not a struggle.
If you experience sharp pain, tingling, or discomfort, slowly come out of the pose and readjust your position.
Practicing with slow, controlled breathing can make the stretch more effective and help your muscles relax naturally.
If you are just starting your yoga journey, it’s best to begin with simple and well-supported movements.
For a structured and safe introduction, you can refer to our guide on beginner-friendly yoga poses, which can help you build confidence and improve your overall practice step by step.
5. Pigeon Pose (Eka Pada Rajakapotasana) — Modified
Target: Piriformis muscle and deep hip rotators
Modified Pigeon Pose is one of the most effective stretches for sciatica caused by tight hip muscles, especially the piriformis.
However, it’s important to approach this pose gently and with control, as forcing it can increase discomfort instead of relieving it.
When practiced correctly, this pose helps release deep tension in the hips and glutes, which may reduce pressure on the sciatic nerve and improve mobility over time.
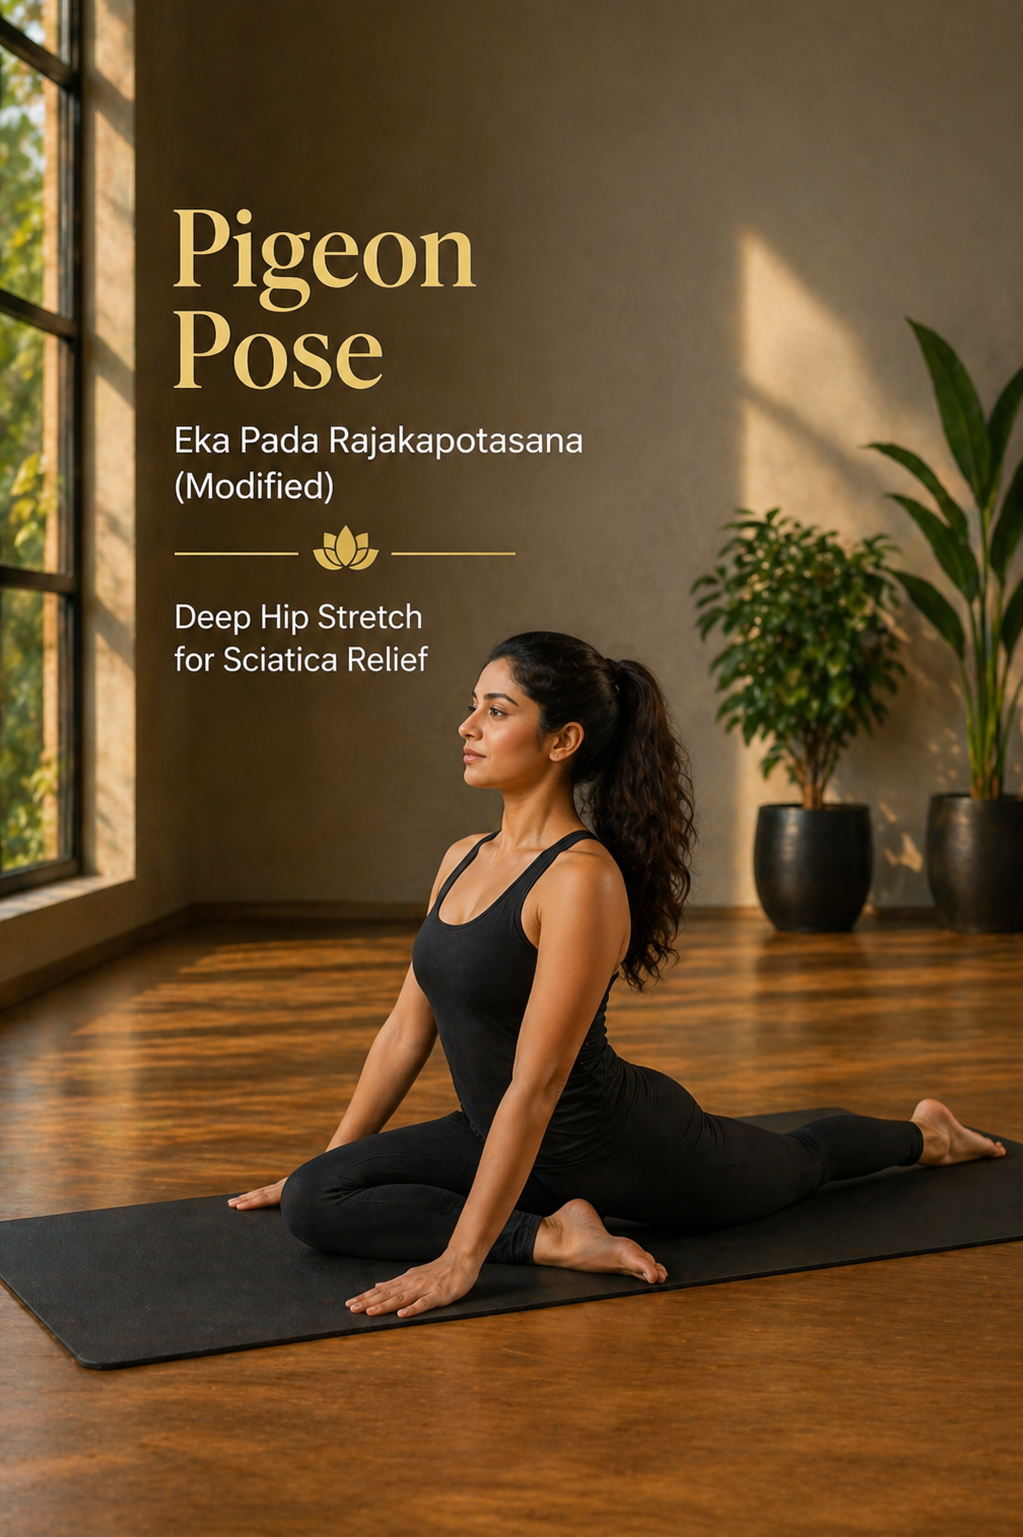
How to Practice (Safe Modified Version)
- Start in a tabletop position with your hands and knees on the mat.
- Slowly bring your right knee forward toward your right wrist.
- Place your right shin at a comfortable angle — it does not need to be perfectly parallel.
- Extend your left leg straight back behind you, keeping it relaxed and aligned.
- Keep your hips as level as possible — avoid leaning to one side.
- Stay upright with your hands on the floor for support.
- Hold the position for 30–60 seconds while breathing slowly.
- Switch sides and repeat with the other leg.
Helpful Tips for Better Practice
- Do not force your front leg into a 90-degree angle — keep it natural and comfortable.
- Keep your weight supported by your hands or forearms, especially if you are a beginner.
- Use props like cushions, yoga blocks, or folded blankets under your hips for support.
- Focus on relaxing your hips instead of pushing deeper into the stretch.
Beginner-Friendly Modification
- Place a pillow or block under your front hip to reduce pressure.
- Stay in an upright position instead of folding forward.
- If the pose feels too intense, reduce the angle of your front leg.
Why It Helps with Sciatica
- Releases tightness in the piriformis muscle, a common contributor to sciatic discomfort.
- Improves hip flexibility and range of motion.
- Helps ease pressure on the sciatic nerve.
- Supports better alignment of the pelvis.
Tip: This pose should create a deep but comfortable stretch in the hip area.
If you feel sharp pain or nerve discomfort, slowly come out of the pose and adjust your position.
6. Legs-Up-the-Wall Pose (Viparita Karani)
Target: Restorative relaxation and gentle nerve decompression
If you’re looking for a pose that feels effortless yet deeply relaxing, Legs-Up-the-Wall is a perfect choice.
It is a restorative posture that allows your body to rest while gently improving circulation and easing tension in the lower back and legs.
This pose uses gravity in a natural way. By placing your legs upward, it can help reduce pressure in the lower body and allow the muscles around the hips and spine to relax.
It’s especially helpful after long hours of sitting or standing.
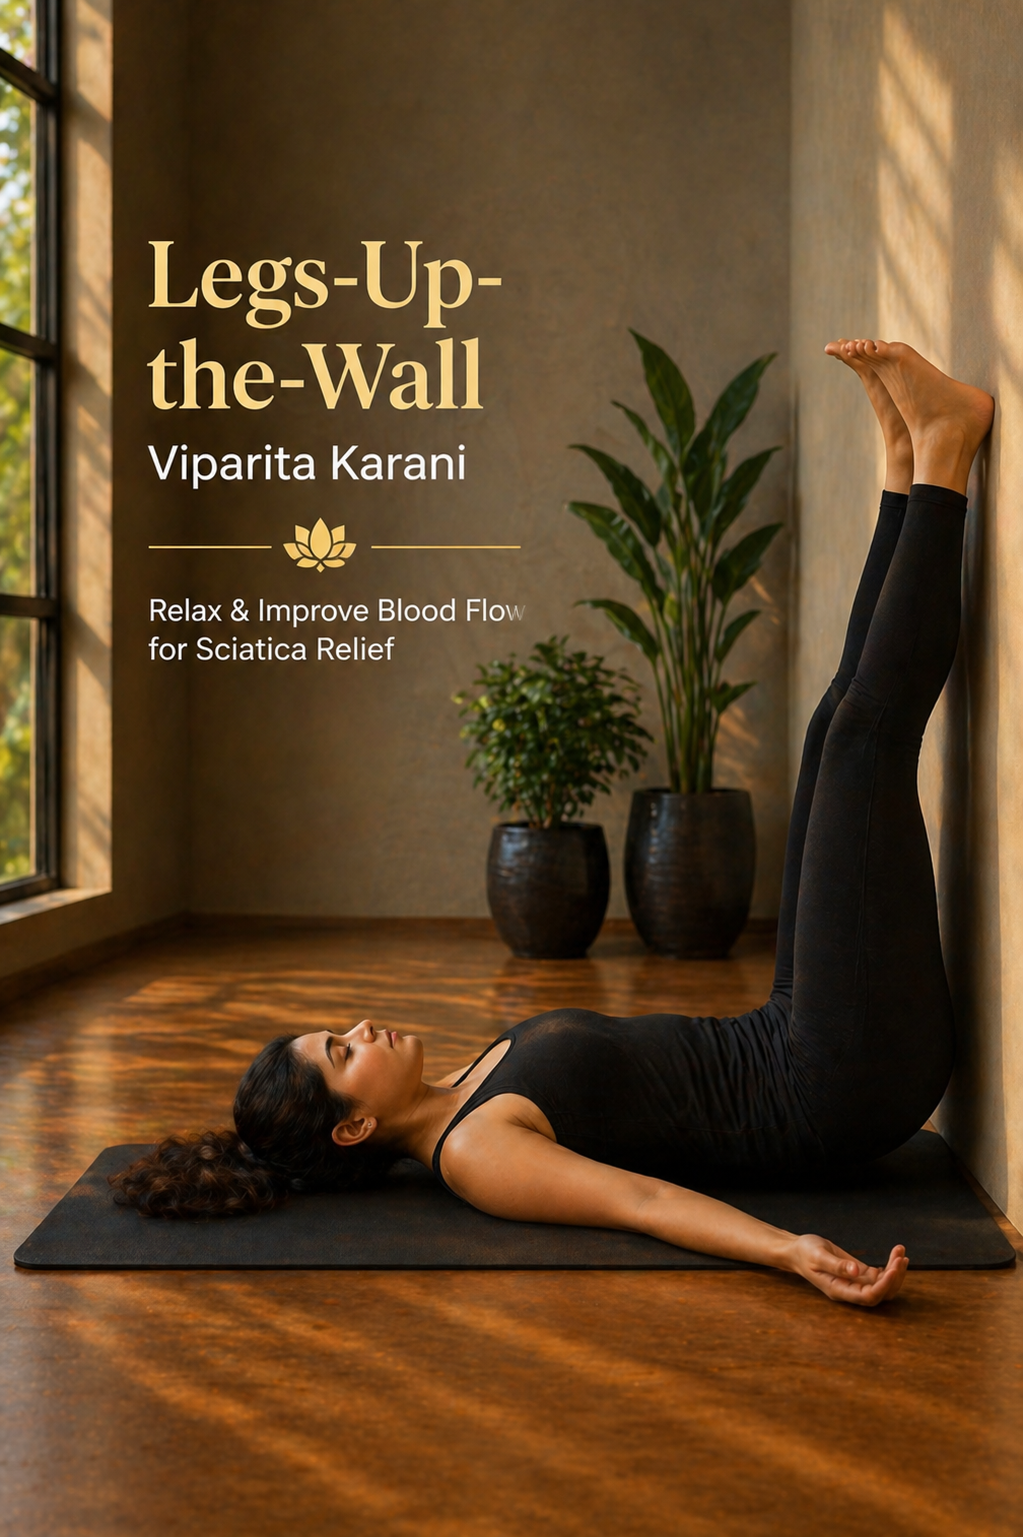
How to Practice
- Sit close to a wall and gently lie down on your back.
- Swing your legs up so they rest vertically against the wall.
- Adjust your position so your hips are close to or lightly touching the wall.
- Keep your legs straight and relaxed — avoid holding unnecessary tension.
- Rest your arms comfortably by your sides with palms facing upward.
- Close your eyes and focus on slow, natural breathing.
- Stay in this position for 5–10 minutes for best results.
Helpful Tips for Better Practice
- If your hamstrings feel tight, move slightly away from the wall instead of forcing your legs straight.
- Place a folded blanket or cushion under your hips for extra comfort and support.
- Keep your neck relaxed and avoid lifting your head.
- Make sure your lower back feels supported — adjust your position if needed.
Why It Helps with Sciatica
- Gently reduces pressure in the lower back and hips.
- Helps relax tight muscles around the sciatic nerve.
- Improves blood circulation in the legs.
- Calms the nervous system and supports overall relaxation.
Tip: This is a relaxation pose, so there should be no effort or strain.
If you feel discomfort in your lower back, adjust your distance from the wall or add more support under your hips.
7. Bridge Pose (Setu Bandhasana)
Target: Glutes, hamstrings, and core stability
Bridge Pose is a gentle strengthening exercise that supports the lower back.
By activating the glutes and core, it helps improve pelvic stability and reduces unnecessary strain on the spine.
If your sciatica is linked to weak muscles or poor posture, this pose can be especially helpful.
It teaches your body how to move with better control and alignment.
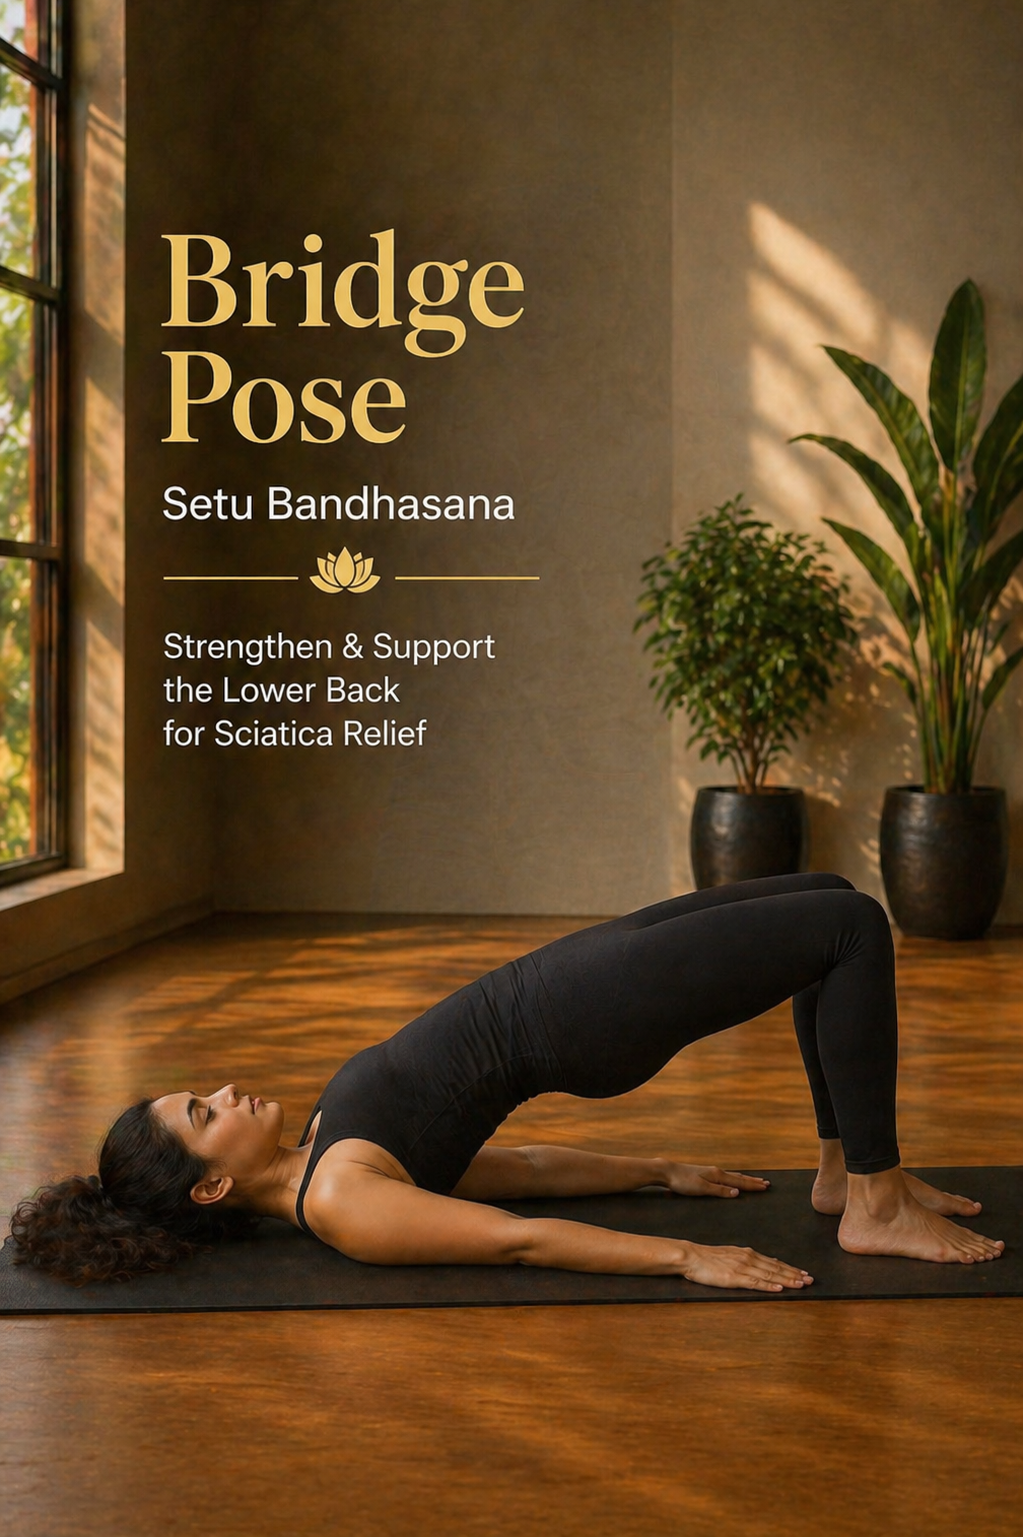
How to Practice
- Lie comfortably on your back with your knees bent and feet flat on the floor.
- Place your feet hip-width apart, with your heels close to your hips.
- Keep your arms relaxed by your sides, palms facing down.
- Press firmly through your feet and slowly lift your hips toward the ceiling.
- Engage your glutes and core while keeping your thighs parallel.
- Avoid turning your knees outward — keep them aligned with your hips.
- Hold the position for 3–5 slow breaths.
- Lower your hips gently back to the floor in a controlled manner.
Helpful Tips for Better Practice
- Press through your heels instead of your toes for better glute activation.
- Keep your neck relaxed — avoid turning your head while in the pose.
- Do not lift too high — focus on a comfortable and controlled movement.
- Move slowly to avoid strain on the lower back.
Beginner-Friendly Modification
- Place a yoga block or cushion under your hips for a supported bridge pose.
- Hold the supported position instead of actively lifting if you feel weak or unstable.
- Keep the lift small and gradual if you are just starting.
Why It Helps with Sciatica
- Strengthens the glutes, which support the lower back.
- Improves pelvic alignment and stability.
- Reduces pressure on the lower spine.
- Encourages better posture and movement patterns.
Tip: Focus on smooth and controlled lifting rather than height.
The goal is to activate the right muscles, not to push your body too far.
As you build strength and stability, you can gradually include this pose as part of your daily yoga routine for consistent and safe progress.
8. Half Lord of the Fishes Pose (Ardha Matsyendrasana) — Gentle
Target: Spinal mobility, gentle rotation, and hip release
Gentle twisting poses like Ardha Matsyendrasana can support spinal mobility, but they should always be practiced carefully — especially if you have sciatica.
When done with control, this pose helps improve flexibility and release mild tension around the spine and hips.
The key is to keep the movement soft and controlled.
Instead of forcing a deep twist, focus on creating a comfortable rotation that feels natural and pain-free.
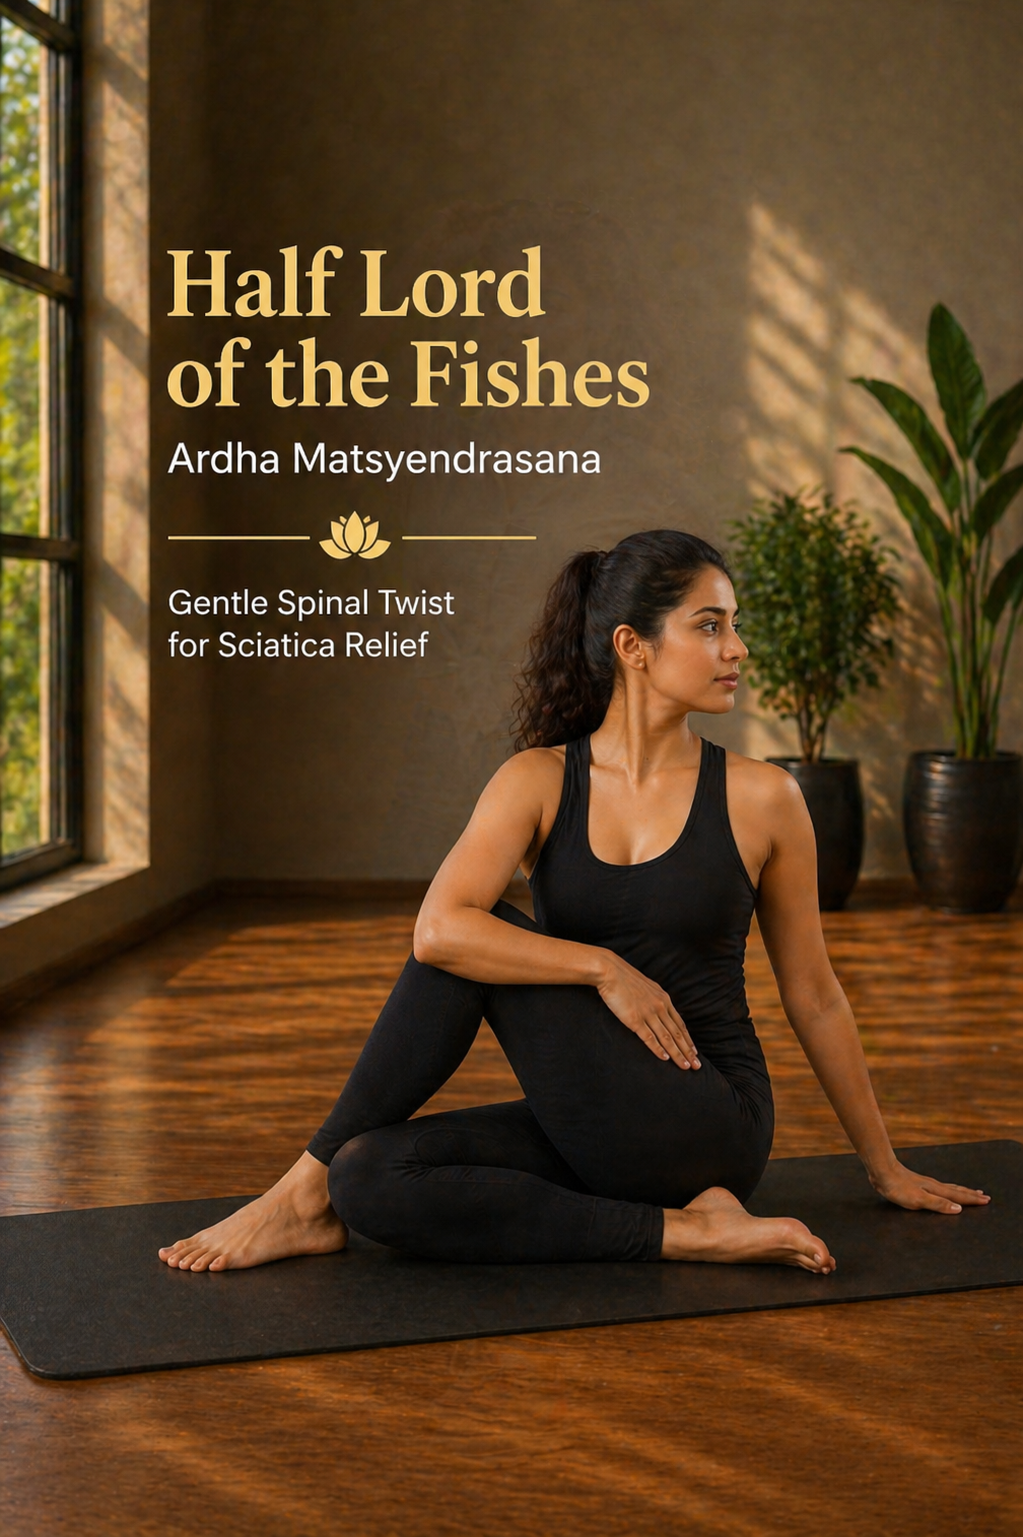
How to Practice
- Sit comfortably on the mat with your spine straight and shoulders relaxed.
- Bend your right knee and place your right foot outside your left thigh.
- Keep your left leg folded or extended straight, depending on your comfort level.
- Place your right hand behind your body for support.
- Bring your left arm across your right knee and gently hold or press against it.
- Slowly rotate your upper body toward the right side.
- Keep your spine tall as you twist — avoid slouching.
- Hold the position for 20–30 seconds while breathing slowly, then switch sides.
Important Safety Tips
- Keep the twist gentle — do not force your body into a deep rotation.
- Focus the twist in your upper and mid-back, not in the lower spine.
- Keep your pelvis stable and grounded on the mat.
- If you feel any sharp pain, tingling, or nerve discomfort, come out of the pose immediately.
Why It Helps with Sciatica
- Improves gentle spinal mobility without overloading the lower back.
- Releases mild tension in the hips and surrounding muscles.
- Supports better posture and body awareness.
- Encourages controlled and mindful movement.
Tip: Always prioritize comfort over depth. A small, controlled twist is far more beneficial than a forced stretch.
9. Locust Pose (Salabhasana) — Modified
Target: Back extensors (lower back), glutes, and posterior chain
Modified Locust Pose is a gentle strengthening exercise for the lower back.
Instead of focusing on stretching, this pose helps build strength in the muscles that support your spine, which can reduce unnecessary strain and improve stability.
For people with sciatica, stronger back muscles can help control movement and reduce irritation around the nerve.
The key is to start slowly and avoid overloading the lower back.
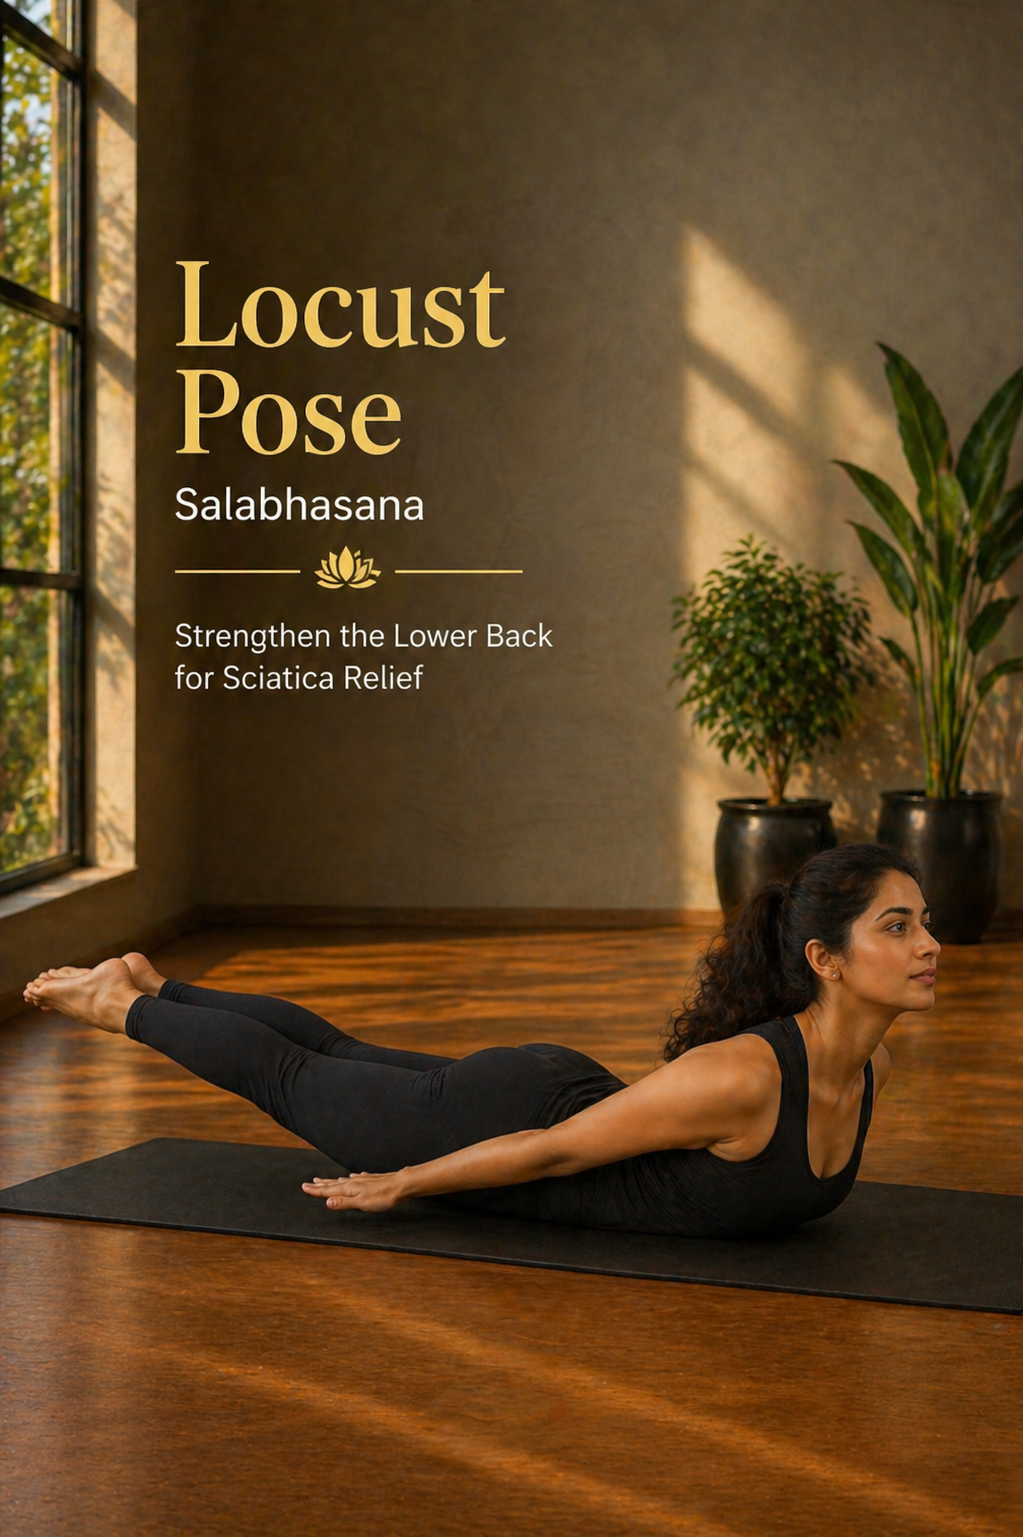
How to Practice (Beginner Version)
- Lie on your stomach with your legs extended straight back and feet relaxed.
- Place your arms alongside your body with palms facing down or slightly inward.
- Rest your forehead gently on the mat to keep your neck neutral.
- On an inhale, slowly lift your chest off the floor while keeping your pelvis grounded.
- Keep your gaze slightly forward without straining your neck.
- Hold the position for 3–5 slow breaths.
- Lower your chest gently back down and relax.
Progression (As You Get Comfortable)
- Once your back feels stronger, you can begin to lift your legs slightly off the floor.
- Lift both legs together while keeping them straight and controlled.
- Maintain steady breathing and avoid jerky movements.
Helpful Tips for Better Practice
- Keep your pelvis grounded — do not lift your hips.
- Focus on a gentle lift rather than height.
- Engage your glutes lightly to support your lower back.
- Keep your neck relaxed and avoid looking too far upward.
Why It Helps with Sciatica
- Strengthens the muscles that support the lower spine.
- Improves posture and spinal stability.
- Reduces abnormal movement patterns that may irritate the nerve.
- Builds overall back strength gradually and safely.
Tip: Start with small, controlled lifts and increase gradually.
If you feel any sharp pain in your lower back, stop and rest before trying again.
Poses to Avoid with Sciatica (Safety First)
Knowing which yoga poses to avoid is just as important as knowing which ones to practice.
Certain movements can increase pressure on the sciatic nerve and make your symptoms worse instead of better.
If a pose causes sharp pain, tingling, or discomfort that travels down your leg, it’s a clear signal to stop and adjust.
Always listen to your body and move within a safe and comfortable range.
| Pose Category | Examples | Why to Avoid |
|---|---|---|
| Deep Forward Bends | Seated Forward Bend, Standing Forward Bend, Plow Pose | Excessive bending in the lower back can increase pressure on discs and irritate the nerve. |
| Full Backbends | Wheel Pose, Upward Bow Pose | Deep backbends may compress the spine if done without proper support. |
| Deep Twists | Revolved Triangle, Intense Supine Twists | Combining twisting and bending can put extra strain on the lower spine. |
| Straight-Leg Lifts | Double leg lifts, straight-leg boat pose | These movements can overload the lower back and increase discomfort. |
Other Movements to Be Careful With
- Deep squatting: Can increase pressure on the lower spine if done aggressively.
- High-impact activities: Running, jumping, or fast movements may send stress through the spine.
- Weighted forward bending: Lifting weights with a rounded back can strain the lower back muscles.
The goal is not to avoid movement completely, but to choose movements that support healing rather than increase stress on the body.
If you are unsure about a particular pose, it’s always better to skip it or choose a safer alternative.
For a clearer understanding of what to avoid during practice, you can refer to our guide on common yoga mistakes, which can help you practice more safely and confidently.
Yoga Styles Best Suited for Sciatica
Choosing the right style of yoga can make a big difference when you’re dealing with sciatica. Some styles focus on slow, controlled movement and support, while others are more intense and may not be suitable during pain or recovery.
If your goal is relief and recovery, it’s best to start with gentle and structured approaches that allow your body to move safely.
Hatha Yoga (Best for Beginners)
Hatha Yoga is often the safest starting point. It focuses on slow movements, proper alignment, and controlled breathing.
- Allows you to move at a comfortable pace
- Helps you understand correct posture
- Gives you time to notice how your body feels in each pose
This style is ideal for beginners who want to build confidence while practicing safely.
Restorative Yoga (Best During Pain or Recovery)
Restorative Yoga is designed for deep relaxation and healing. It uses props like pillows, blankets, and blocks to fully support the body.
- Helps reduce muscle tension
- Allows the body to relax without effort
- Suitable during flare-ups or when movement feels difficult
This style is especially helpful when your body needs rest rather than active stretching.
Yin Yoga (For Deep Muscle Release)
Yin Yoga involves holding poses for longer durations, usually 3–5 minutes. It works on deeper tissues like ligaments and fascia, especially around the hips.
- Helps release long-term tightness
- Improves flexibility in the hips and lower body
- Supports gradual tension release
However, it should always be practiced gently and mindfully — never push into pain.
Styles to Be Careful With
Fast-paced styles like Vinyasa or Power Yoga may not be suitable during active sciatica pain.
- Quick transitions can put sudden pressure on the spine
- Less time to adjust posture safely
- Higher risk of overstraining tight muscles
If you enjoy dynamic yoga, it’s better to return to it gradually after your symptoms improve.
A balanced approach that focuses on gentle movement, proper alignment, and consistency can support long-term recovery and overall well-being.
Sample Weekly Yoga Practice Guide
A simple, structured routine can make your yoga practice more effective and safe — especially when dealing with sciatica. The plan below is designed for the subacute or chronic phase (when pain is manageable, not severe).
Each session should begin with a few minutes of calm breathing and end with relaxation to allow your body to recover properly. If your symptoms increase, reduce intensity or take rest.
Daily Micro-Practice (15 Minutes)
Short on time? This quick routine is perfect for busy days or when you want gentle relief without overdoing it.
| Pose | Duration | Focus |
|---|---|---|
| Cat–Cow | 5 rounds | Spine mobility and breathing |
| Child’s Pose | 1 minute | Lower back relaxation |
| Reclining Hand-to-Big-Toe | 1 minute each leg | Hamstring stretch |
| Legs-Up-the-Wall | 5 minutes | Relaxation and circulation |
| Gentle Supine Twist | 1 minute each side | Light spinal movement |
Full Practice Session (30–40 Minutes)
On days when you have more time, follow this complete routine. Practice on alternate days and allow rest days in between for recovery.
- Centering & Breathing (5 minutes): Lie on your back and observe your natural breath.
- Cat–Cow (5 rounds): Gently warm up the spine.
- Child’s Pose (2 minutes): Relax the lower back and deepen breathing.
- Downward-Facing Dog (1 minute): Keep knees slightly bent for comfort.
- Low Lunge (30 seconds each side): Stretch the hip flexors gently.
- Modified Pigeon Pose (2 minutes each side): Use props for support.
- Bridge Pose (3 repetitions): Hold for 3–5 breaths each time.
- Supta Padangusthasana (1 minute each side): Stretch the hamstrings safely.
- Gentle Twist (1 minute each side): Keep the movement soft and controlled.
- Legs-Up-the-Wall (5–10 minutes): Deep relaxation and recovery.
- Savasana (5–10 minutes): Rest with a pillow under your knees for support.
Helpful Weekly Plan
- Day 1: Full Practice
- Day 2: Rest or Micro-Practice
- Day 3: Full Practice
- Day 4: Rest
- Day 5: Full Practice
- Day 6: Light Micro-Practice
- Day 7: Full Rest
Tip: Consistency is more important than intensity. Even a short daily routine can help your body adapt and recover over time.
Important Safety Tips During Home Practice
While practicing yoga at home, safety should always be your first priority. Even simple movements can cause discomfort if done incorrectly or without awareness.
- Avoid sharp or shooting pain: A gentle stretch is normal, but nerve pain is not. Learn to recognize the difference and stop immediately if discomfort increases.
- Do not hold poses too long: Holding a pose for 30–60 seconds is usually enough. Longer holds can sometimes increase strain instead of relief.
- Do not practice during flare-ups: If your pain suddenly worsens, focus on rest, gentle movement, and recovery instead of active stretching.
Lifestyle Modifications That Support Yoga Practice
Yoga can be very helpful, but it works best when combined with healthy daily habits. Small changes in your routine can reduce pressure on your spine and support long-term relief.
1. Improve Your Sitting Posture
Sitting for long hours is one of the most common causes of lower back stress. Using a chair with proper lower back support can help maintain a natural spine position.
- Keep your back straight and shoulders relaxed
- Avoid slouching forward
- Take short breaks every 30–60 minutes to stand or stretch
2. Choose the Right Sleep Position
Your sleeping posture can either support recovery or increase discomfort. Making small adjustments can help reduce pressure on the lower back.
- Side sleepers: Place a pillow between your knees to keep your hips aligned
- Back sleepers: Keep a pillow under your knees to reduce strain on the lower back
- Avoid sleeping on your stomach: This can increase pressure on the spine
3. Practice Safe Lifting Techniques
Improper lifting can worsen sciatica symptoms quickly. Using the right technique helps protect your lower back.
- Bend your knees instead of your waist
- Keep the object close to your body
- Engage your core before lifting
- Avoid lifting heavy weights during pain episodes
4. Maintain a Healthy Body Weight
Excess weight can increase pressure on the lower spine and surrounding structures. Even small improvements in weight management can reduce stress on the back and support recovery.
5. Create a Balanced Daily Routine
Combining yoga with simple daily habits can improve your overall results. A consistent and balanced routine can help your body adapt, recover, and stay active without unnecessary strain.
Real Experiences: How Yoga Can Support Sciatica Recovery
When dealing with sciatica, it’s natural to feel frustrated — especially if other treatments haven’t worked as expected. Many people turn to yoga as a gentle and supportive approach, and their experiences often highlight the importance of consistency and patience.
Some individuals who struggled with long-term lower back pain and stiffness found that adding simple yoga practices to their routine helped improve flexibility and posture over time. With regular practice, they noticed that everyday movements became easier and overall discomfort gradually reduced.
Others have shared that focusing on gentle stretching — especially around the hips and lower back — helped release muscle tightness. This, in turn, supported better sleep and reduced the feeling of constant tension in the body.
There are also cases where people experienced relief by combining restorative poses with breathing techniques. These practices helped calm the nervous system and made it easier to manage discomfort during recovery.
It’s important to remember that results can vary from person to person. Yoga is not a quick fix, but a supportive practice that works best when done regularly and mindfully.
Starting with a simple, structured routine and progressing gradually can help you stay consistent without overstraining your body.
Frequently Asked Questions About Yoga for Sciatica
Can I practice yoga during an acute sciatica flare-up?
During a severe pain episode, it is usually better to focus on rest and very gentle movement, such as short walks. Avoid any yoga pose that increases your pain or triggers nerve discomfort.
Once the pain starts to settle (which may take a few days to a couple of weeks), you can slowly begin with simple poses like Cat–Cow and Child’s Pose. Always move gradually and stay within a comfortable range.
How long does it take to see results from yoga?
The time frame can vary from person to person. With regular and consistent practice, many people begin to notice small improvements within a few weeks. More noticeable changes in flexibility and comfort may develop over 4–8 weeks.
The key is consistency — even short daily sessions can make a difference over time.
Can yoga make sciatica worse?
Yes, if it is done incorrectly. Poor posture, forcing deep stretches, or practicing unsuitable poses can increase discomfort.
To stay safe, focus on proper alignment, use props when needed, and avoid any movement that causes sharp or shooting pain.
Should I continue medical treatment along with yoga?
Yes. Yoga is best used as a supportive practice alongside medical advice, especially during the early stages of sciatica. If your doctor has recommended medication or therapy, continue following that plan.
Yoga can complement these treatments by improving mobility, reducing tension, and supporting overall recovery.
Which type of yoga is safest for beginners?
Gentle styles such as Hatha yoga, restorative yoga, and beginner-friendly routines are usually the safest options.
- Hatha Yoga: Slow pace with a focus on alignment
- Restorative Yoga: Deep relaxation with full body support
- Yin Yoga: Gentle long holds for flexibility (practice mindfully)
It’s best to avoid fast-paced or intense styles in the beginning and focus on building confidence with slow, controlled movements.
When to Seek Medical Attention
While yoga can support recovery in many cases of sciatica, there are situations where medical attention becomes essential. Recognizing these warning signs early can help prevent complications and ensure proper care.
Seek immediate medical help if you experience:
- Progressive weakness in your leg or foot
- Numbness in the saddle area (inner thighs, around the hips, or genital region)
- Difficulty controlling bladder or bowel movements
- Sudden, severe pain that does not improve with rest or gentle care
These symptoms may indicate a serious condition that requires urgent medical evaluation. It’s important not to delay professional care in such cases.
If your pain continues for more than a few weeks despite gentle movement and self-care, it is also a good idea to consult a healthcare professional. They can guide you on the next steps, which may include further assessment or treatment options.
Yoga can be a helpful part of recovery, but it should always be practiced alongside proper guidance when needed. If you are unsure about your condition, seeking professional advice can help ensure safe and appropriate care.
Before starting any new exercise routine, especially if you have a diagnosed spinal condition or recent injury, it’s best to consult your healthcare provider. This helps ensure that your practice remains safe and suitable for your body.
Final Thoughts: Building a Sustainable Practice
Using yoga for sciatica is not about quick results — it’s about building a practice that supports your body over time. Some days you may feel strong enough for a full session, while on other days, even a few gentle stretches or minutes of mindful breathing are enough. Both are valuable, and both support your progress.
Instead of focusing on intensity, focus on consistency, patience, and self-awareness. Your body responds best when you listen to it, not push against it.
Key Principles to Remember
- Understand your body: Learn to recognize the difference between a comfortable muscle stretch and nerve discomfort. If pain feels sharp or travels down the leg, stop and adjust.
- Use support when needed: Props like straps, blocks, pillows, or blankets help you practice safely and comfortably.
- Focus on your breath: Smooth, steady breathing is a good sign that your body is relaxed. If your breathing becomes strained, ease out of the pose.
- Stay gently active: Complete rest is not always helpful. Light, controlled movement can support recovery and reduce stiffness.
- Know the cause: Whether your sciatica is related to discs or muscles, understanding the source helps you choose the right approach.
Over time, regular yoga practice can support better flexibility, posture, and overall comfort. It works best when combined with healthy habits and a balanced routine.
Gentle movement, when practiced consistently, can play an important role in managing long-term back discomfort and improving overall mobility.
Remember, many people experience sciatica at some point in life, and with the right approach, it can be managed effectively. With patience, awareness, and consistent practice, you can support your body on its path toward better movement and comfort.
Medical Disclaimer
This article is for general informational purposes only and should not be considered medical advice. Always consult your healthcare provider before starting any new exercise program, especially if you have an existing medical condition or ongoing pain.
